
I described in a previous post the 2022 changes in the BigDino web stack, with the biggest change being that we’re now using OpenLiteSpeed (“OLS”) as our web server application. There are a whole buttload of “how to install Wordpress on OLS” posts on the web and I ended up reading most of them during the process of switching the server over, but most of them are outdated in some way, and none of them included everything I ended up needing to do to get everything working.
Partially to document my configuration for the world but mainly so that I won’t ever have to look all this up from scratch again, here’s how I configured OpenLiteSpeed to serve up Wordpress quickly, safely, and securely. (I hope.)
The big switch: from text files to GUI
In spite of how excited I was to switch over to OpenLiteSpeed, there was one aspect that I was positively dreading: giving up the convenience and quickness of directly editing configuration text files and instead switching over to using a GUI as the primary means of making server config changes. OLS does allow you to edit its config files directly, but I wanted to make a good-faith effort to actually do things the “right” way—or at least the way the developers intended for most people to use their application.
The GUI is for the most part easy to use, though coming from Nginx some of the terminology required some googling in order to fully understand. I think I got everything figured out, but there was a bit of a learning curve to map the things I knew how to do in Nginx to the OLS way of doing things. (Much of the OLS way of doing things is based around the Apache way of doing things, including the way OLS handles rewrites and .htaccess files. More on that in a bit.)
Securing that GUI
Still, having come of age in a certain era of computing, a world-accessible configuration GUI feels like a fast way to get pwn3d. Several OLS setup guides recommended putting additional security in front of it, but I settled on simply firewalling the admin console via an AWS security group. The admin console listens on TCP port 7080, so I created one ruleset with that port open and listening for inbound connections from my current IP address, and one ruleset with that port closed.

When I need to actively make changes, I switch the EC2 instance I’m running all of this on to the “admin port open” security group. When I’m done, I switch it to the “admin port closed” group. It’s maybe a little paranoid, but it makes me feel a lot more secure than the alternative of trying to secure the port with extra authentication or even just leaving it open. (And please don’t do that. Seriously. Why take the risk?)
WP virtual host configuration
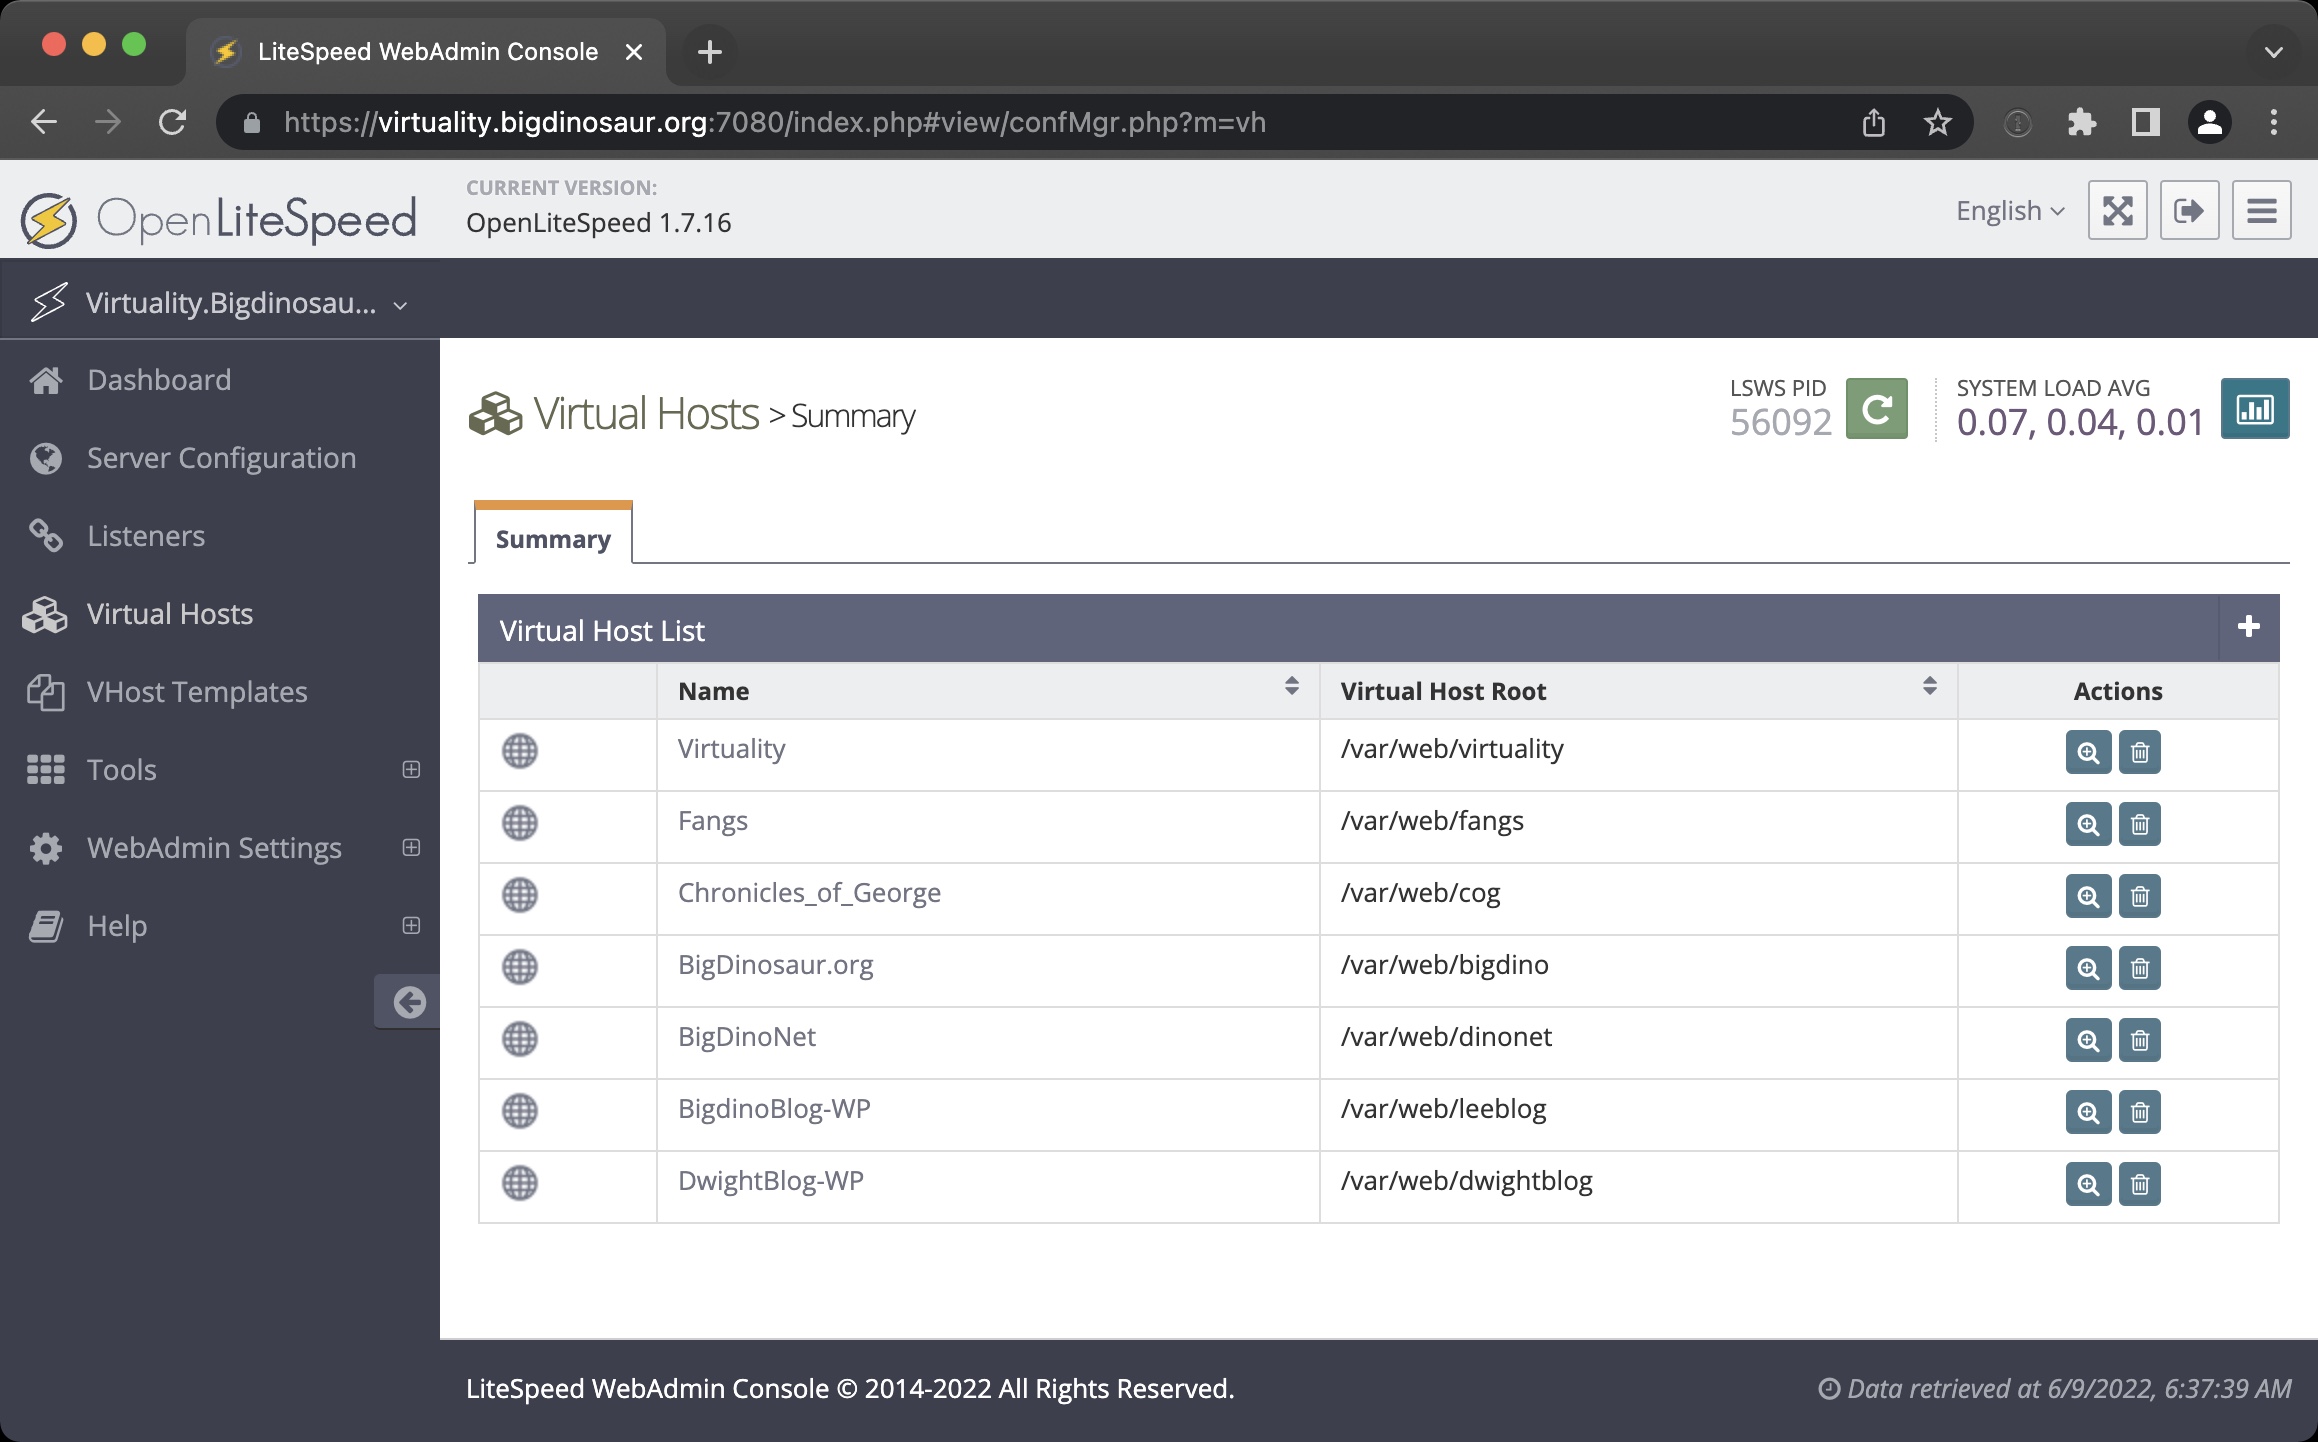
Like most web server applications, OLS uses the concept of “virtual hosts” so that you can run multiple sites on your server, each with its own bits of configuration. This is especially useful when you’re hosting full applications (like Wordpress!) that might need a bit of extra love out of the box to work properly and securely—rather than throwing all your applications into a pile and trying to keep everything balanced with your global server configuration, every time you need to set up a new site you simply create a new virtual host (or “vhost”). Each site lives on its own vhost, and each site can have its own configuration.
Adding a vhost gets you this screen here, where you’ve got a number of required parameters to fill in. Odds are you know what most of these do, and odds are you can accept the default values for most of them:
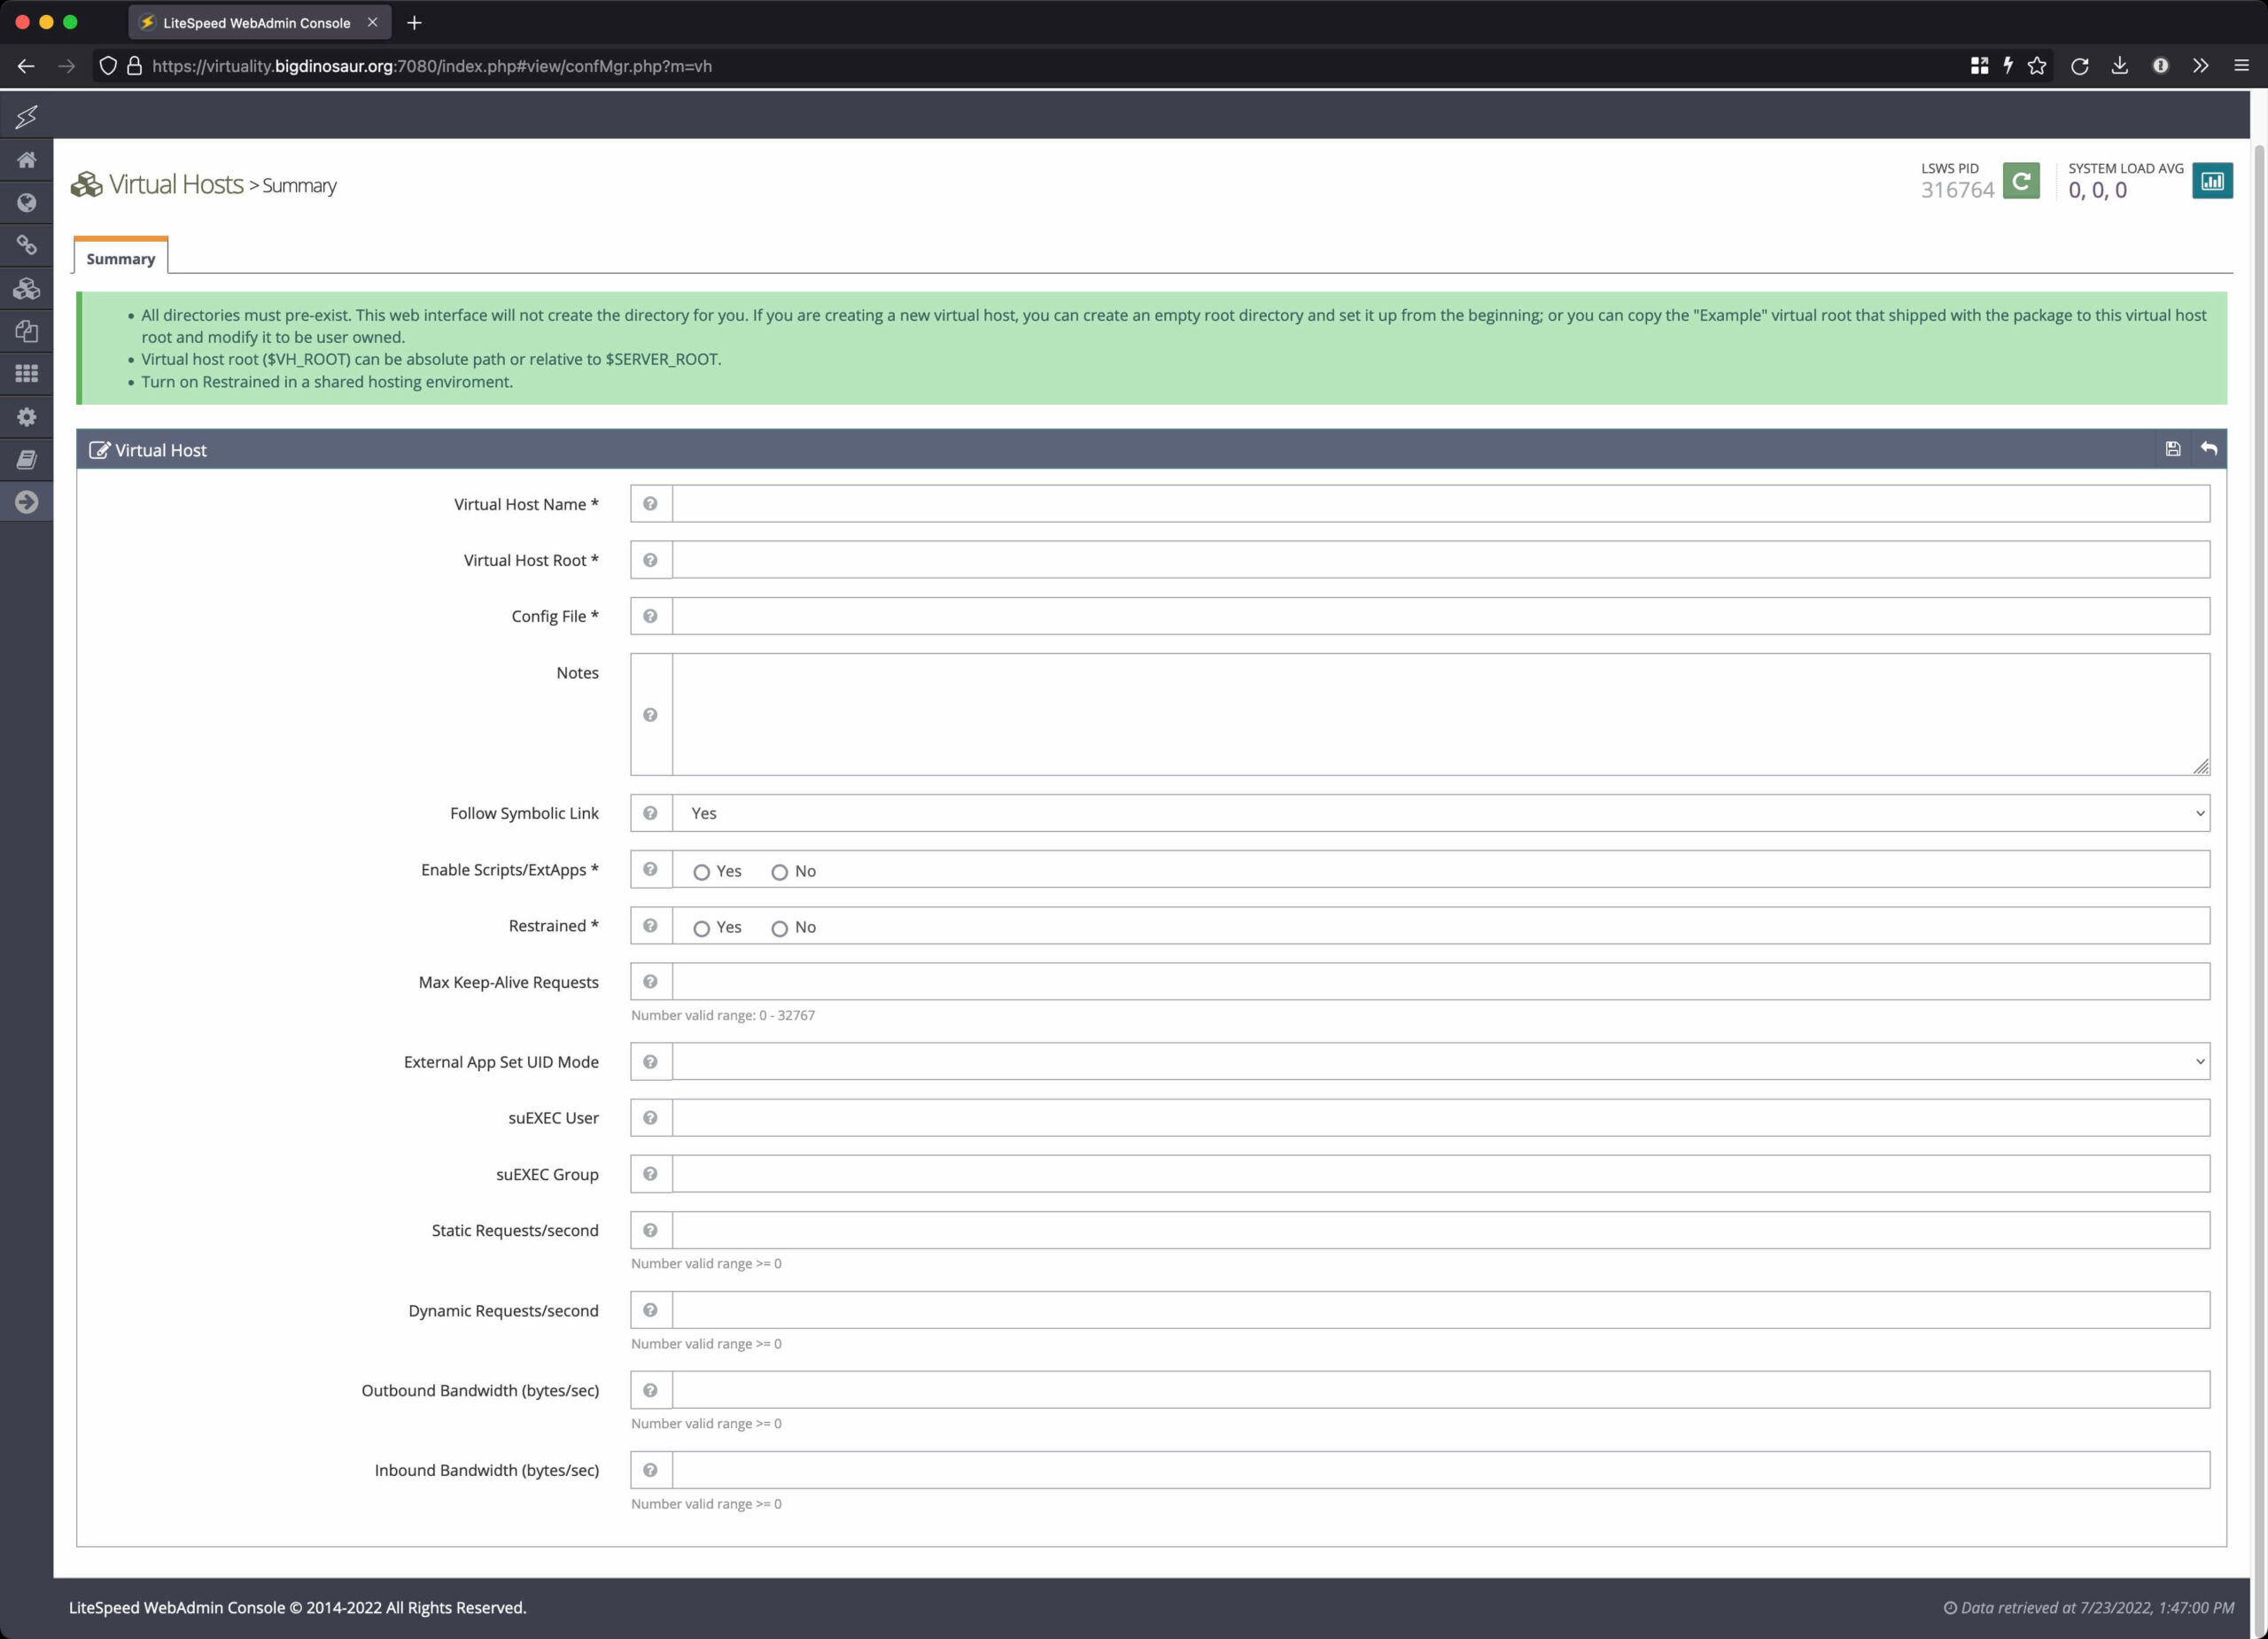
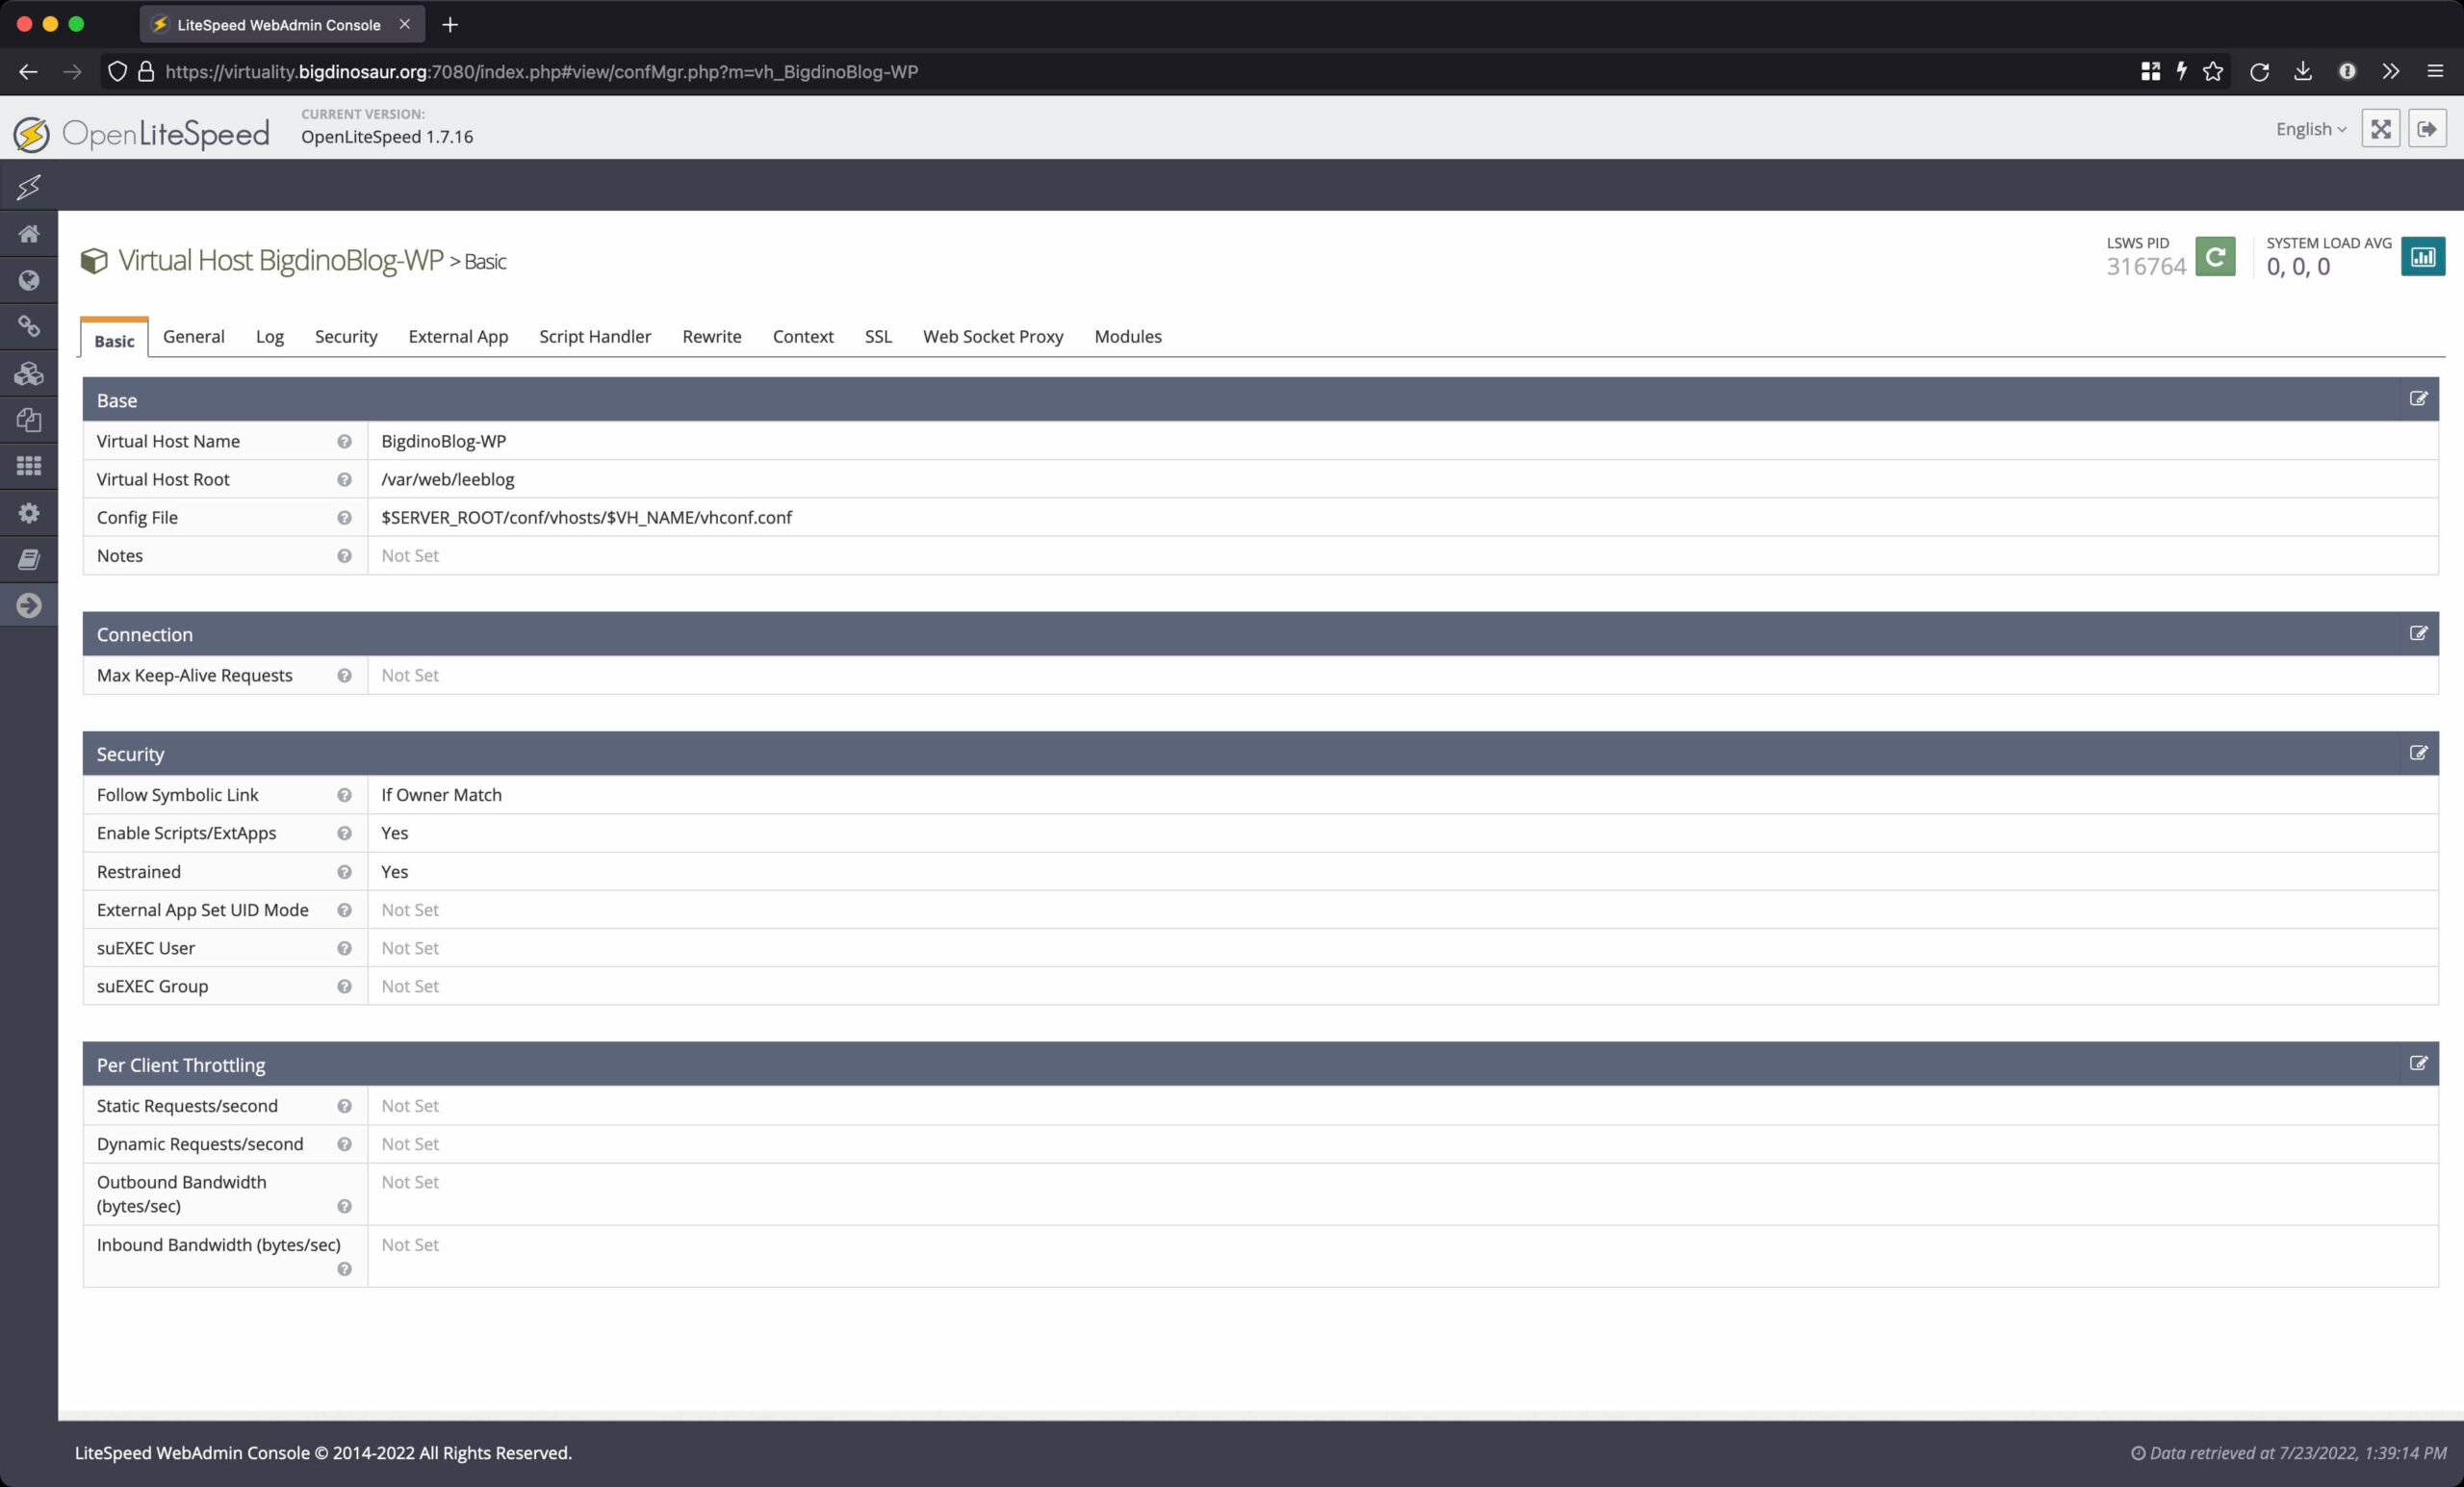
The image at left is the “add a vhost” screen waiting for input, and the image at right is what it looks like after some basic details are entered. At the very least, your vhost needs a name, a path for the files to actually live in, and a configuration file location. If you intend to run php applications, or anything else that requires an additional external program or interpreter, you need to set “Enable Scripts/ExtApps” to “yes.” I also toggled “Restrained” to “yes,” which is intended to prevent files outside of the web root from being accessed by anything running on the vhost.
(There are also lots of things I’m not using that other folks might find useful, like per-vhost throttle settings. I’m not going to talk about those settings, but they are easily google-able. Same deal for all the rest of the pages—I’m only going to talk about the bits I’m actually using.)
That takes care of the “Basic” tab. Moving on to the “General” tab:
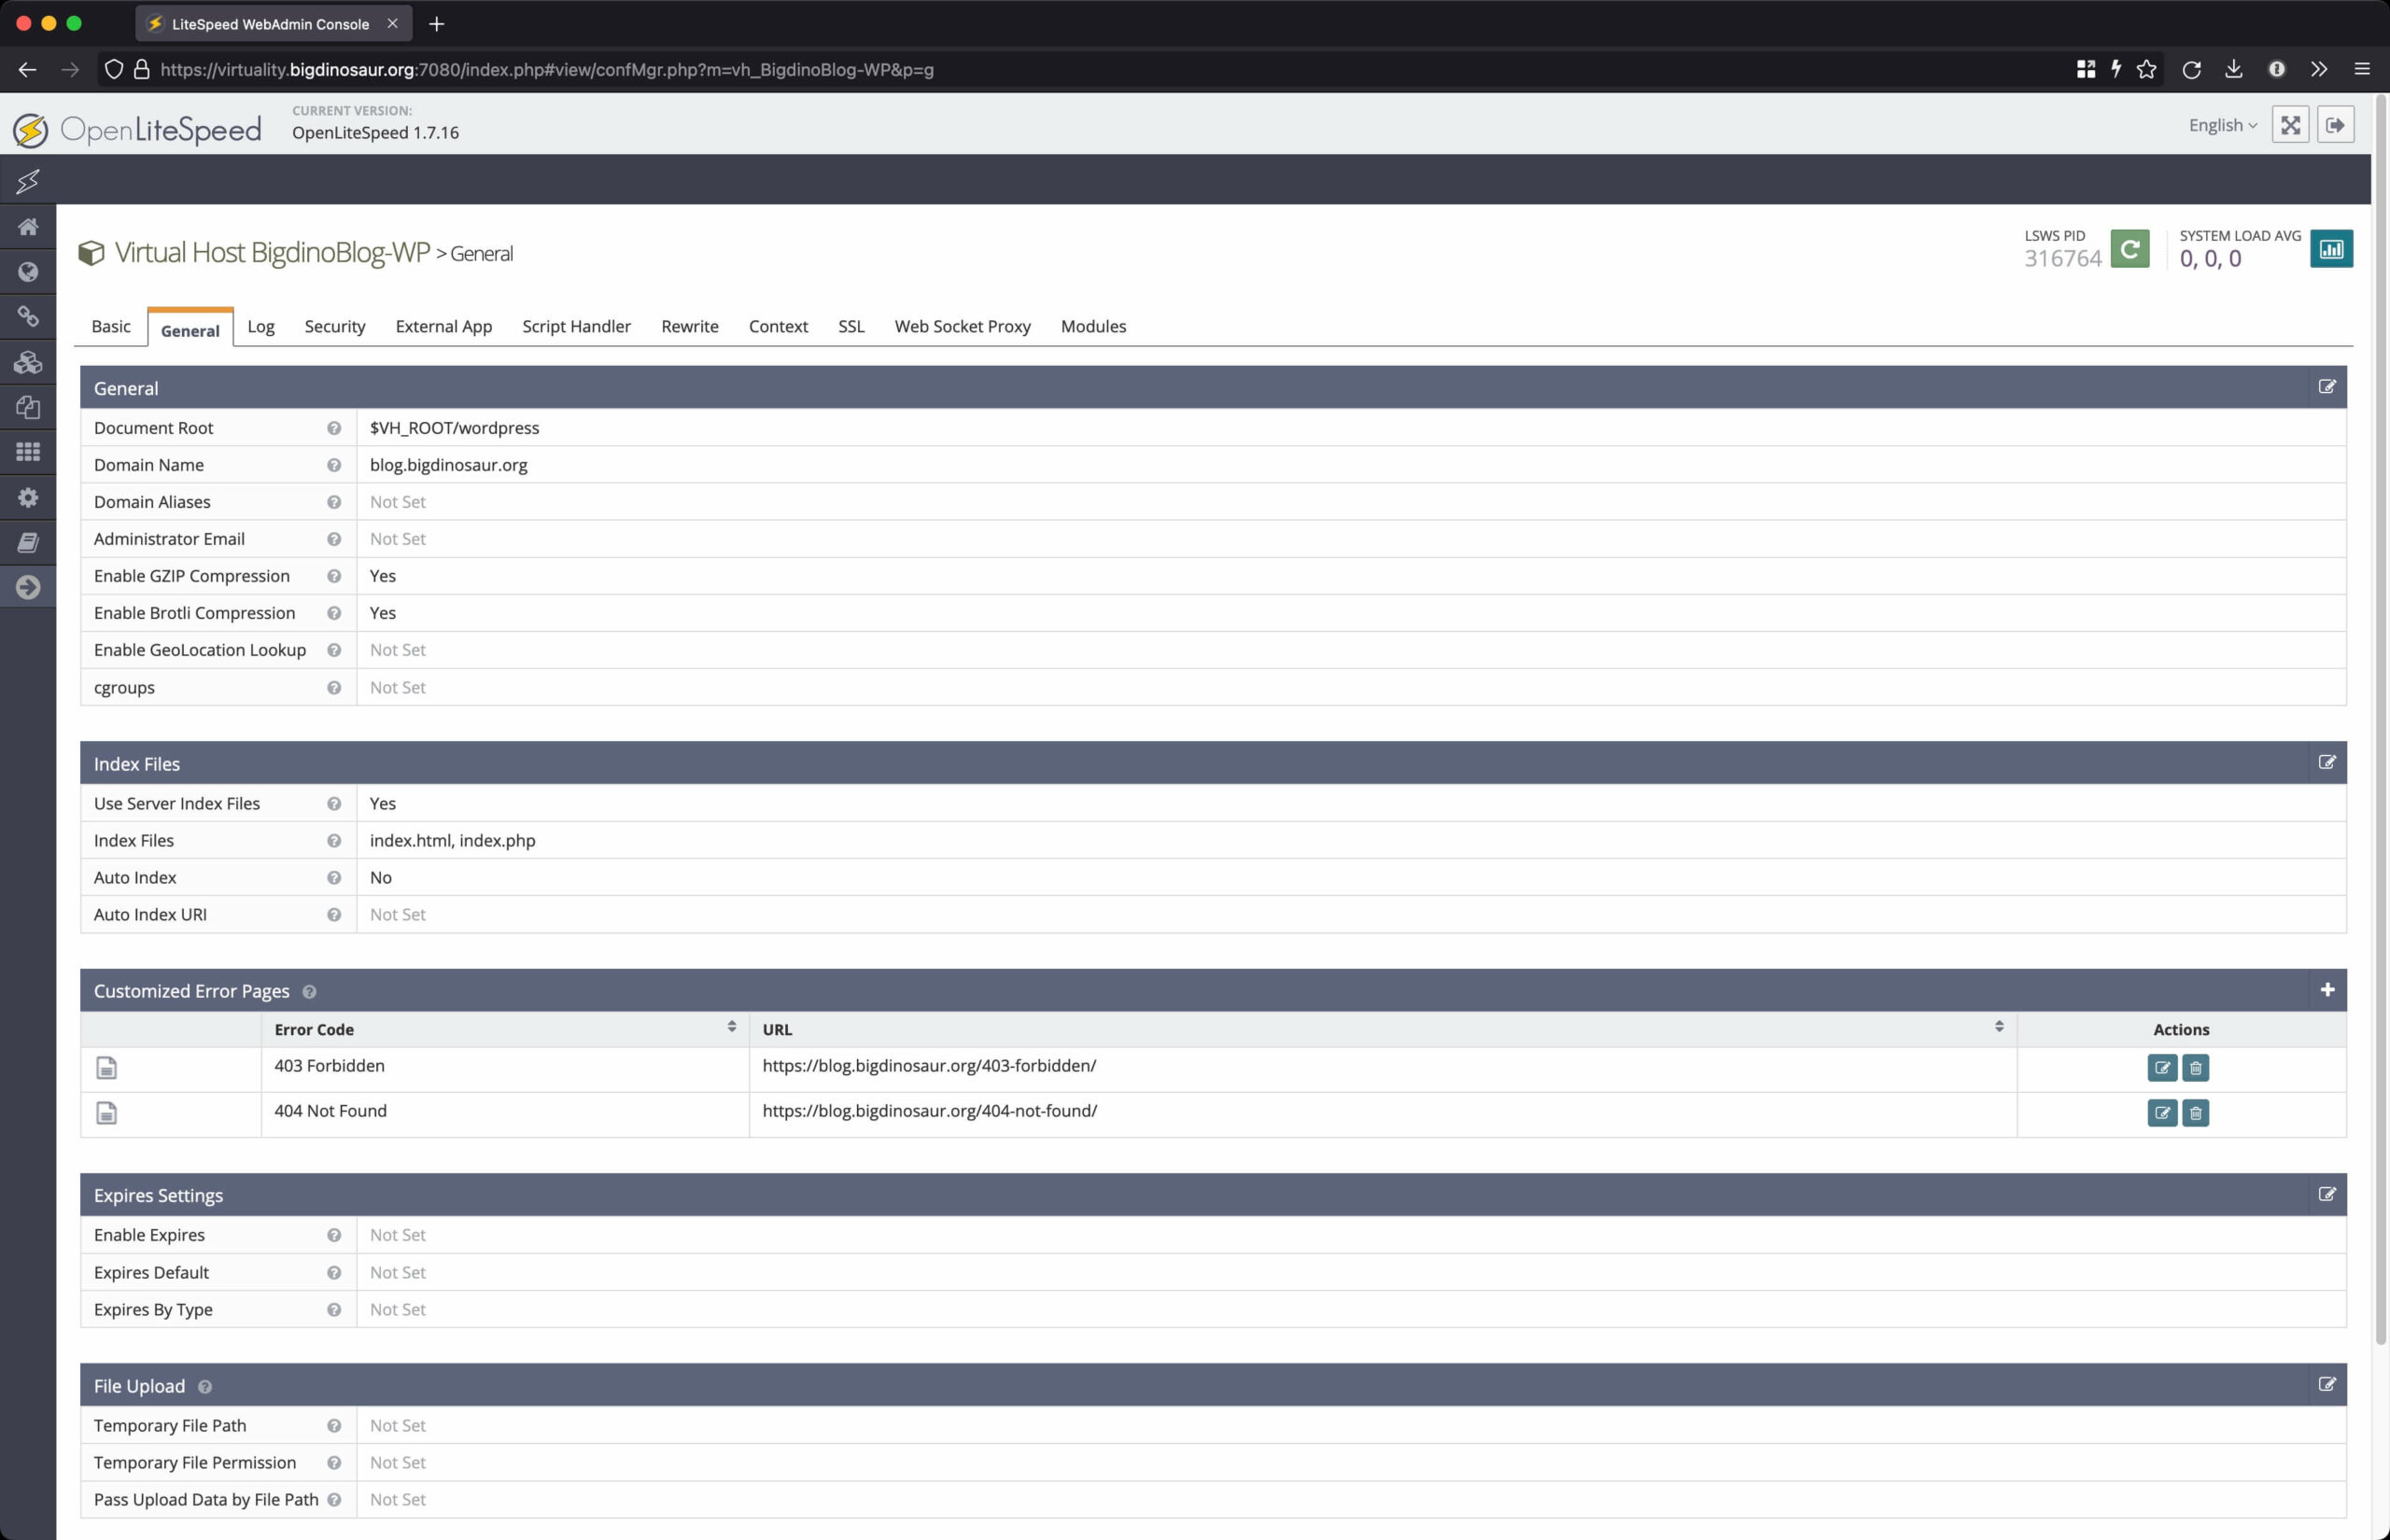
The first setting to specify here is the “document root,” which differs from the web root defined on the Basic page in that the web root could notionally contain log and config files for your site, while the document root contains the actual files that you’re serving out. I have mine set to a subdirectory underneath the web root.
Then, a very important bit: you’ll need to define a name, along with any aliases, so the server knows what hostname to listen for to direct traffic to this vhost. My blog uses blog.bigdinosaur.org as its fully-qualified domain name, so I don’t need any aliases; if you’re serving your WP site from example.com without a subdomain, you might want to add www.example.com to your alias list so that the server is listening for that name. Otherwise, visitors who typed in example.com would see your site, but visitors who type www.example.com won’t.
This tab lets you enable compression (which has almost no downsides and which you should almost certainly do), and it also lets you set up what your default index file is and whether directory indexing is on or not. Wordpress needs index.php in the list of index files, so I made sure to add it.
This tab is also where you specify custom error pages, if you’d like. I need to do a bit more investigation about how to do this with Wordpress, as it’s not quite working. (I suspect WP is handling the errors itself at the application level rather than letting the web server do it, so fixing this might require some plugin work.)
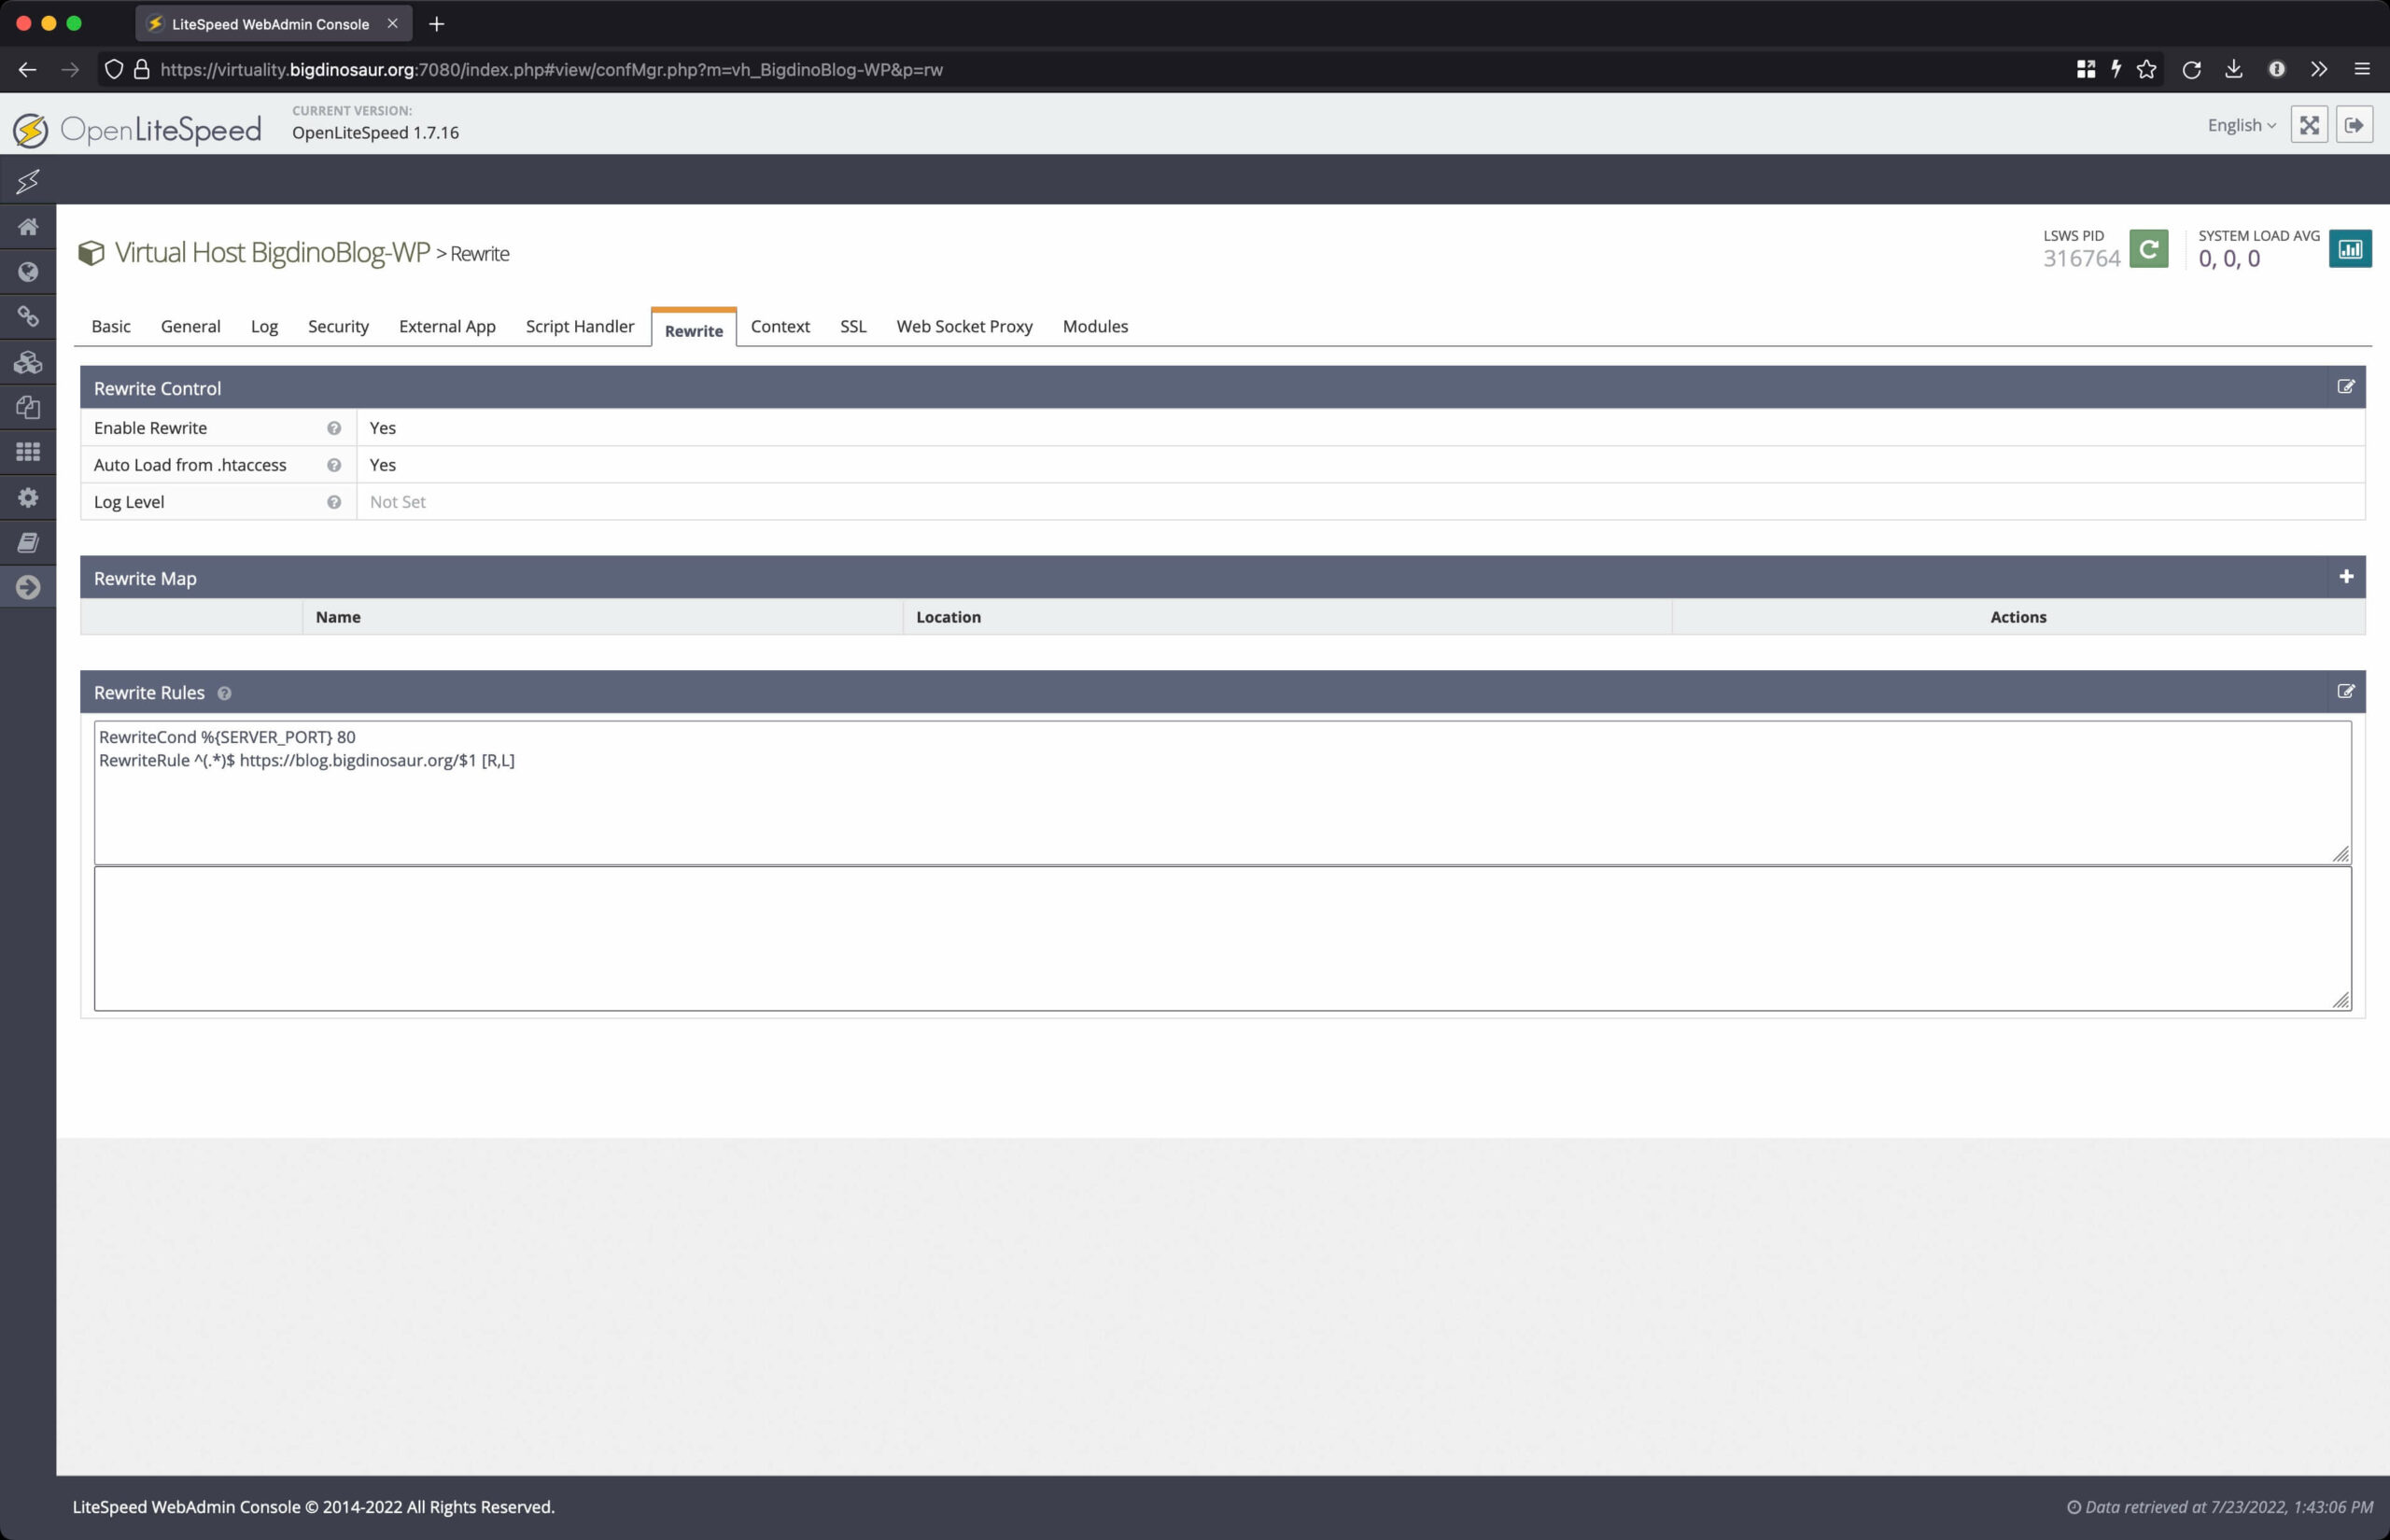
Next is the “Rewrite” tab, where you can—surprise—control vhost-level rewrites. There are lots of places to set rewrites up with OLS, including good ol’ .htaccess files, but this is the proper place to put rewrites that need to function for all requests across the whole vhost. This is where I’m putting my HTTP-to-HTTPS rewrite rule, so that visitors to the site that come by way of HTTP will get redirected to HTTPS.
(This is somewhat of a superfluous redirect because BigDinosaur.org, like all responsible web sites, uses HTTP Strict Transport Security. Your browser should be more or less incapable of letting you type http://blog.bigdinosaur.org—it’ll automatically redirect you to the HTTPS version of the site because the site is on the big HSTS preload lists. If you’re hosting a site and not using HSTS, you should start, yesterday.)
A very important setting you’ll want to make sure is enabled is the “Auto Load from .htaccess” one, which ensures that your .htaccess files are utilized whenever OLS comes across one.
Next is the “Context” tab, and this one took me a bit to grok.
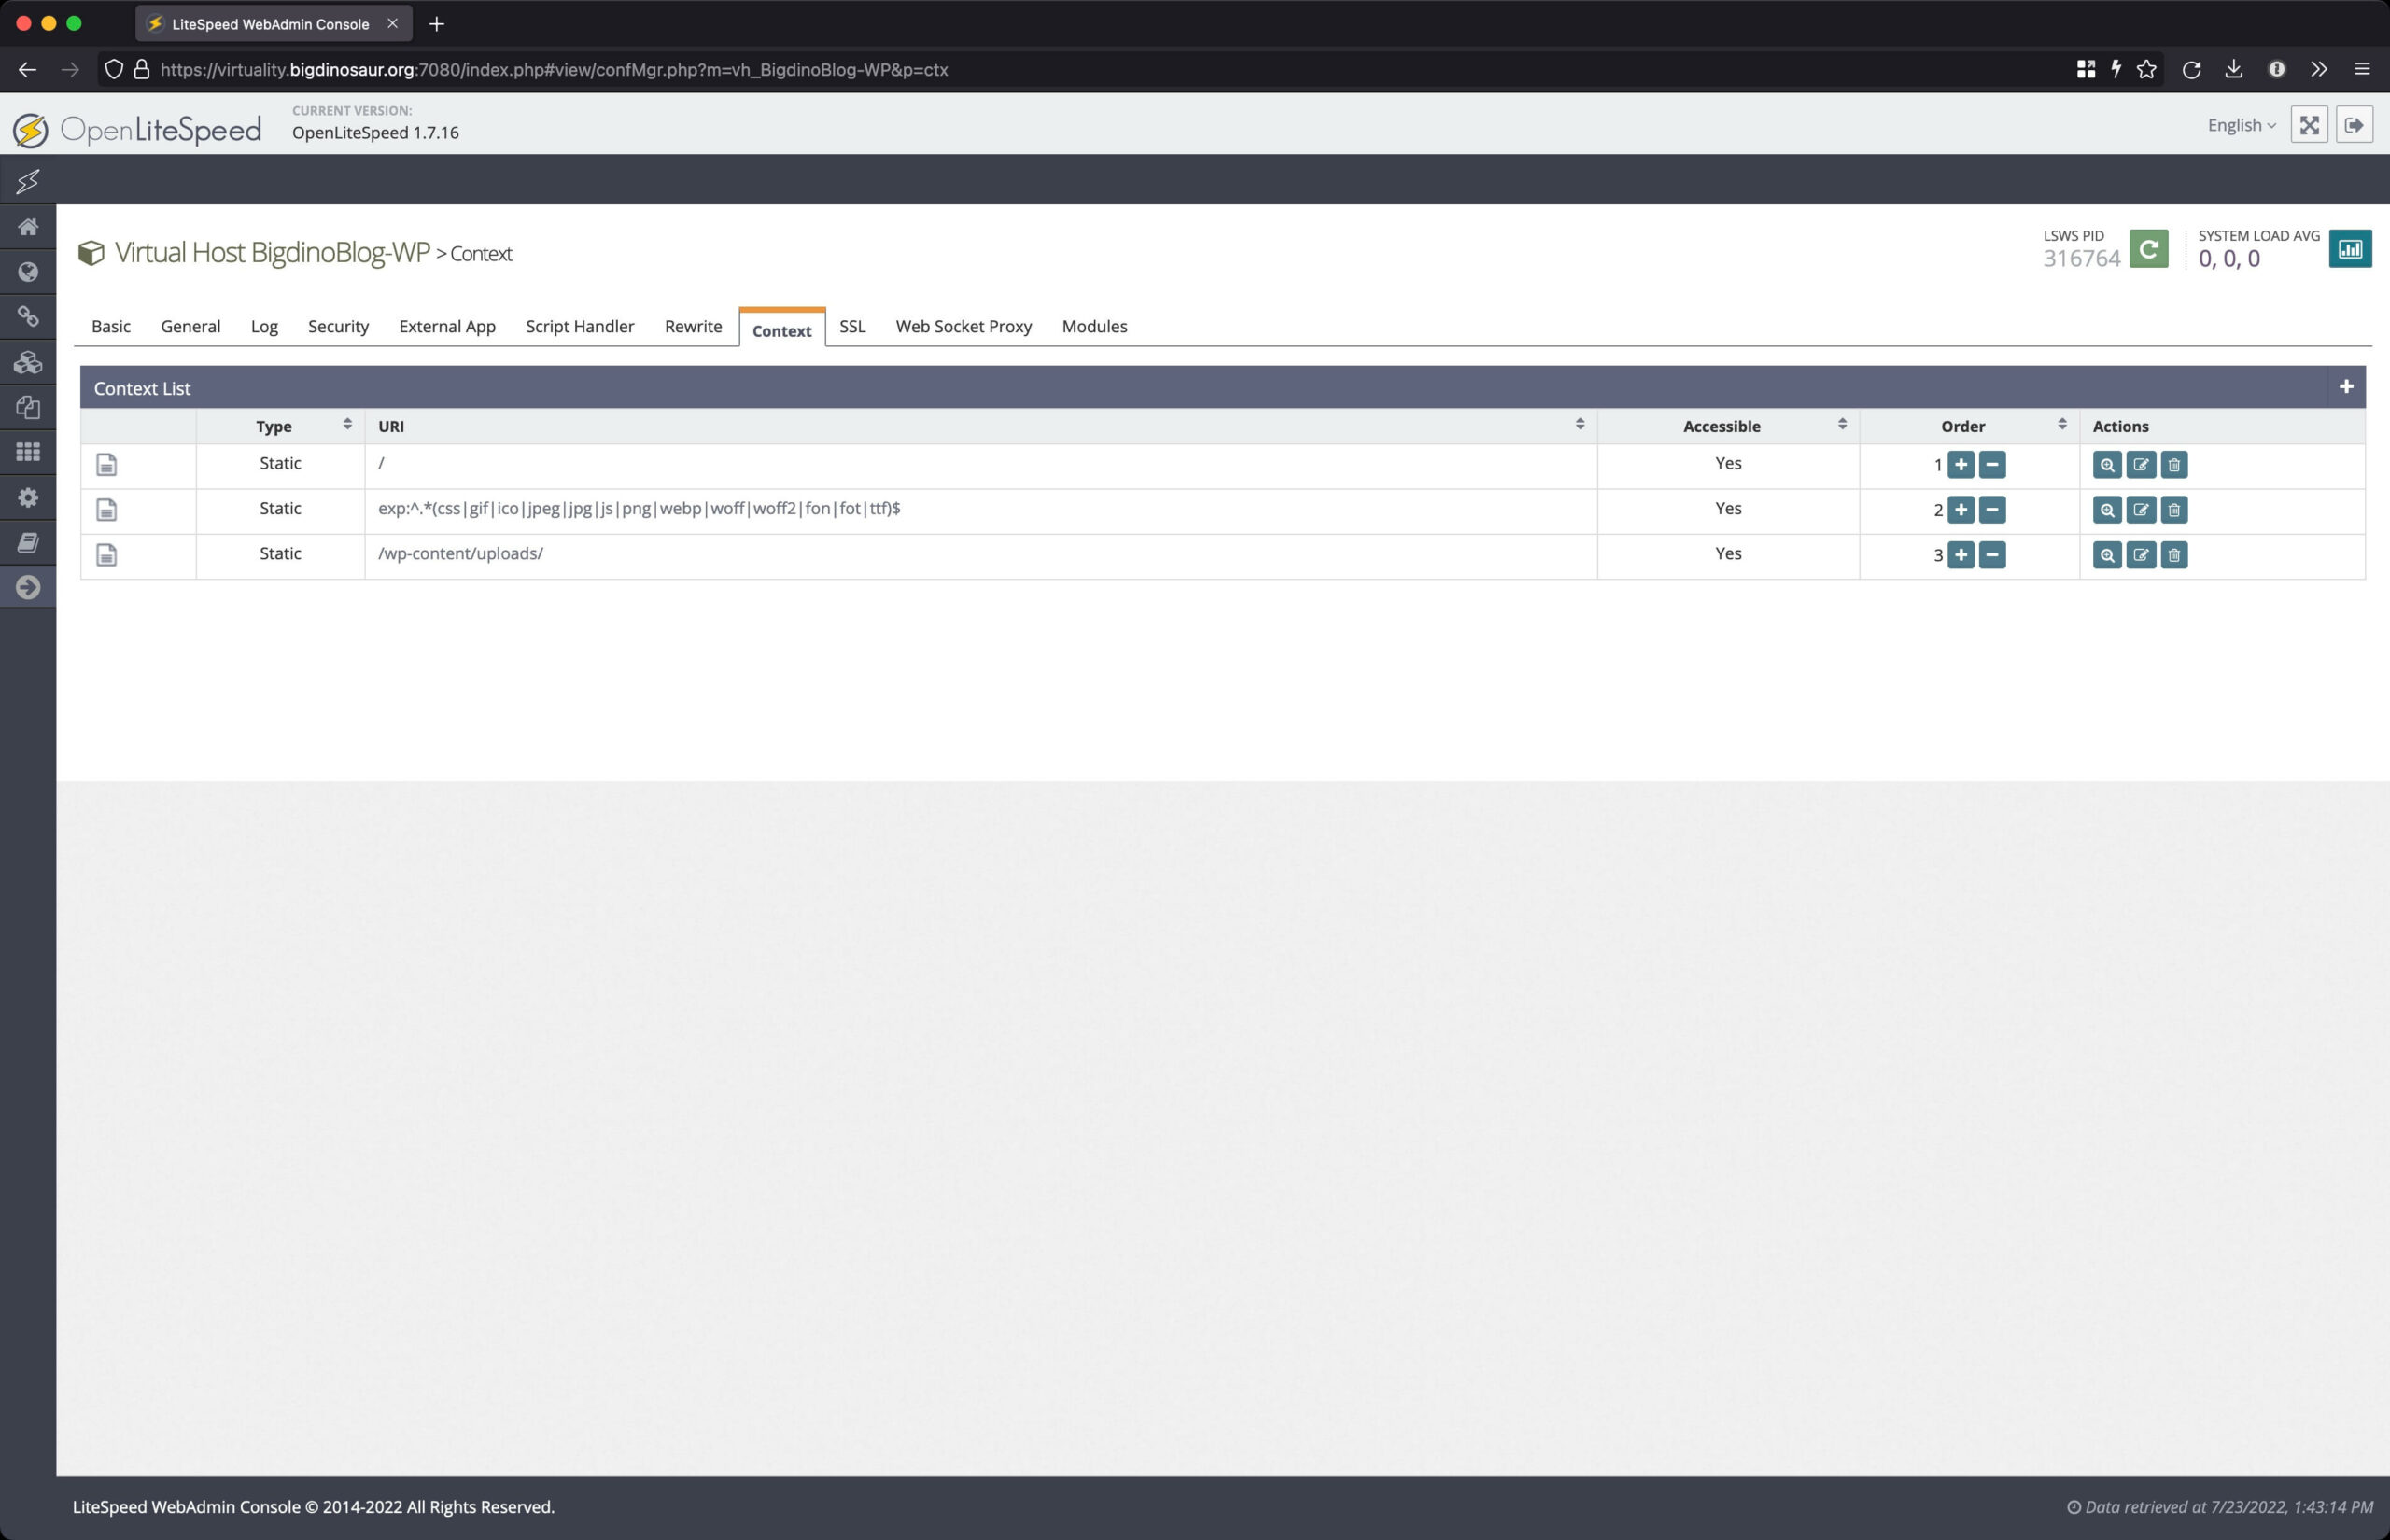
The “Context” tab lets you define things that happen in certain contexts. Which sounds confusing. Here’s a better example: if you want to define some rules that only apply to image files, or that only apply to your upload directory, this is the place to do those things. First you define the context under which your settings apply, and then you set some settings. The way this tab seems to be most often used is to send customized headers, using the global “/” context (meaning “all requests”). I’m also using it to set specific rewrite rules on specific locations, and to change the cache expiry of some stuff. Let’s jump in.


The three contexts I constructed and am using for Wordpress. From left to right, we have the global (“/“) context, a context for images and other files I want a long cache expiry on, and the uploads directory context.
First, the global context, denoted by a single forward slash. I’m using this context to set all my custom headers, including Content Security Policy (see the “Header Operations” field in the first image). Further, this is also where I’m emplacing some specific rewrite rules to help prevent certain security issues—mainly restricting client access to certain locations and files.
I have reproduced the header operations and rewrite rule code blocks below for copying and pasting. However, don’t just copy and paste what I’ve got and assume it will work for you. The CSP header in particular requires a lot of work to get right (there are sites and tools that can help, but it’s largely a manual process of trial and error, especially if you use Jetpack).
Header operations:

set X-Are-Dinosaurs-Awesome HELL YES
set Server clever girl
set Referrer-Policy strict-origin-when-cross-origin
set Strict-Transport-Security max-age=31536000;includeSubDomains;preload;
set X-Content-Type-Options nosniff
set X-XSS-Protection 1; mode=block
set X-Frame-Options SAMEORIGIN
set Expect-CT Expect-CT: max-age=0; report-uri='https://bigdino.report-uri.io/r/default/ct/reportOnly'
set Content-Security-Policy default-src https:; style-src 'self' 'unsafe-inline' https://fonts.googleapis.com; img-src 'self' https: data:; object-src 'none'; script-src 'self' 'unsafe-inline' 'unsafe-eval'; font-src 'self' data: https://fonts.gstatic.com; upgrade-insecure-requests; frame-ancestors https://blog.bigdinosaur.org

--

Rewrite rules:

RewriteRule ^wp-admin/includes/ - [F,L]
RewriteRule !^wp-includes/ - [S=3]
RewriteRule ^wp-includes/[^/]+\.php$ - [F,L]
RewriteRule ^wp-includes/js/tinymce/langs/.+\.php - [F,L]
RewriteRule ^wp-includes/theme-compat/ - [F,L]

# BEGIN Block Sensitive Files
RewriteCond %{REQUEST_URI} error_log|wp-config-sample.php|readme.html|readme.txt|license.txt|wp-config.php|php.ini [NC]
RewriteRule .* - [F,L]
# END Block Sensitive Files
And then, the last image shows the rewrite rule I have set on the /wp-content/uploads directory (note URI and location). This is a simple Apache-style rewrite that blocks accessing files in uploads that might be put there to do bad things and/or execute code.
Then there’s the SSL tab, and that’s the last tab I had to mess with:
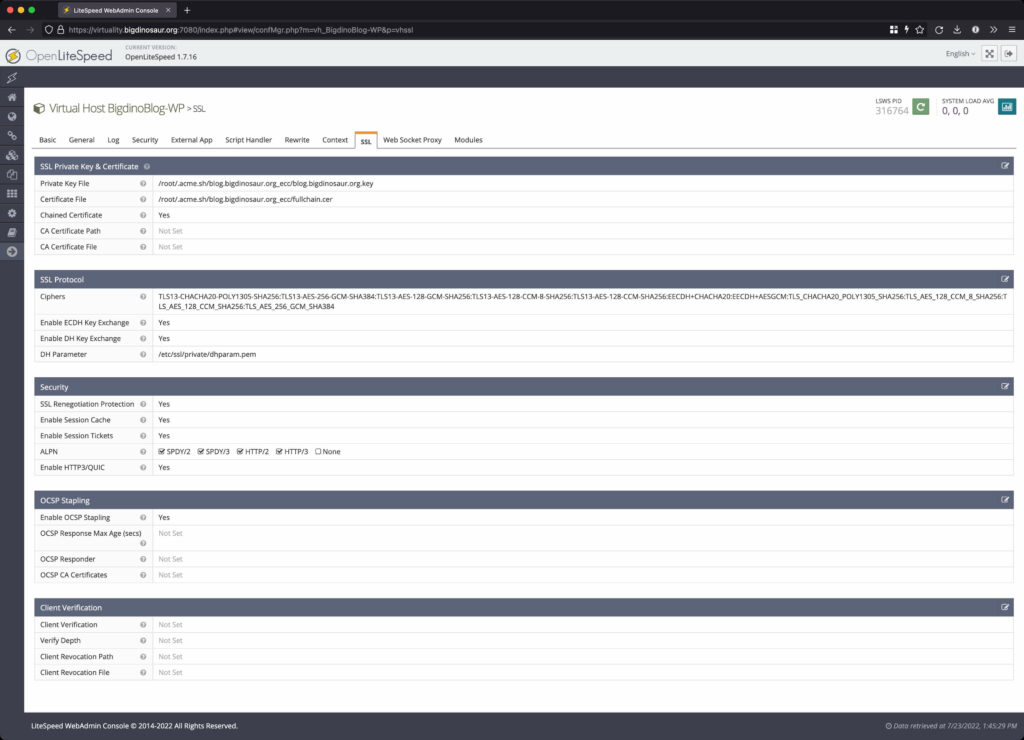
OLS lets you configure a default server-wide SSL configuration, and you can override things at the vhost level as required with the “SSL” tab in your vhost config. I’ve got my SSL certificate and key (LetsEncrypt via acme.sh), my preferred cipher suite (adapted from Mozilla’s recommended intermediate TLS 1.2-compatible config), my preferred key exchange options and the location of my DH param file, and whatever other SSL options you want. For me, I wanted to make sure all the ALPN options are enabled to let modern browsers use as many speedy page-loading tricks as possible.
Configuring Wordpress itself
Turning away from OLS, the last thing to look at is the stuff you have to do to Wordpress itself, and that, fortunately, isn’t a huge amount. The main thing is to get WP up and running and then install the LiteSpeed Cache WP plugin so that OLS can do its thing.
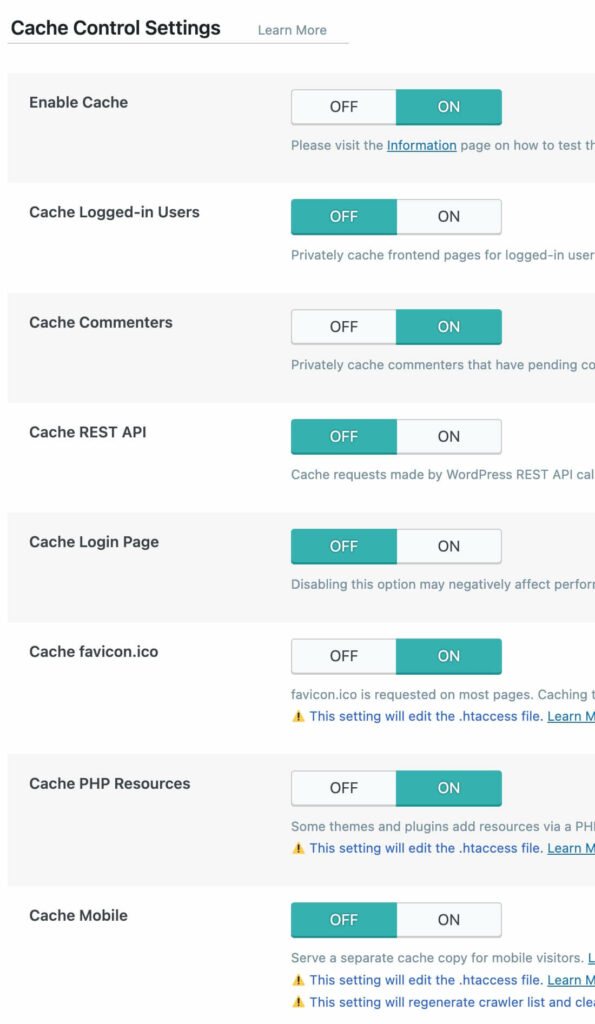
At right are the OLS cache settings I’ve found work best for me with Wordpress. One particular deviation from standard that I’ve had to make is changing the “Cache Login Page” setting to “off,” because having the login page served from cache was causing some downright weird behavior with Duo, my preferred two-factor authentication solution.
In general, it’s advisable to keep as many of these turned on as you can without actually screwing anything up. If you have a lot of logged-in visitors to your site, “Cache Logged-in Users” can be a critical setting for you; if you don’t, best to leave it off. I also am not really certain I’d ever want to cache REST API responses, but the option is there if you think you need it.
There’s one more thing in the LS Cache plugin I had to screw with that I want to point out—the Object Cache.
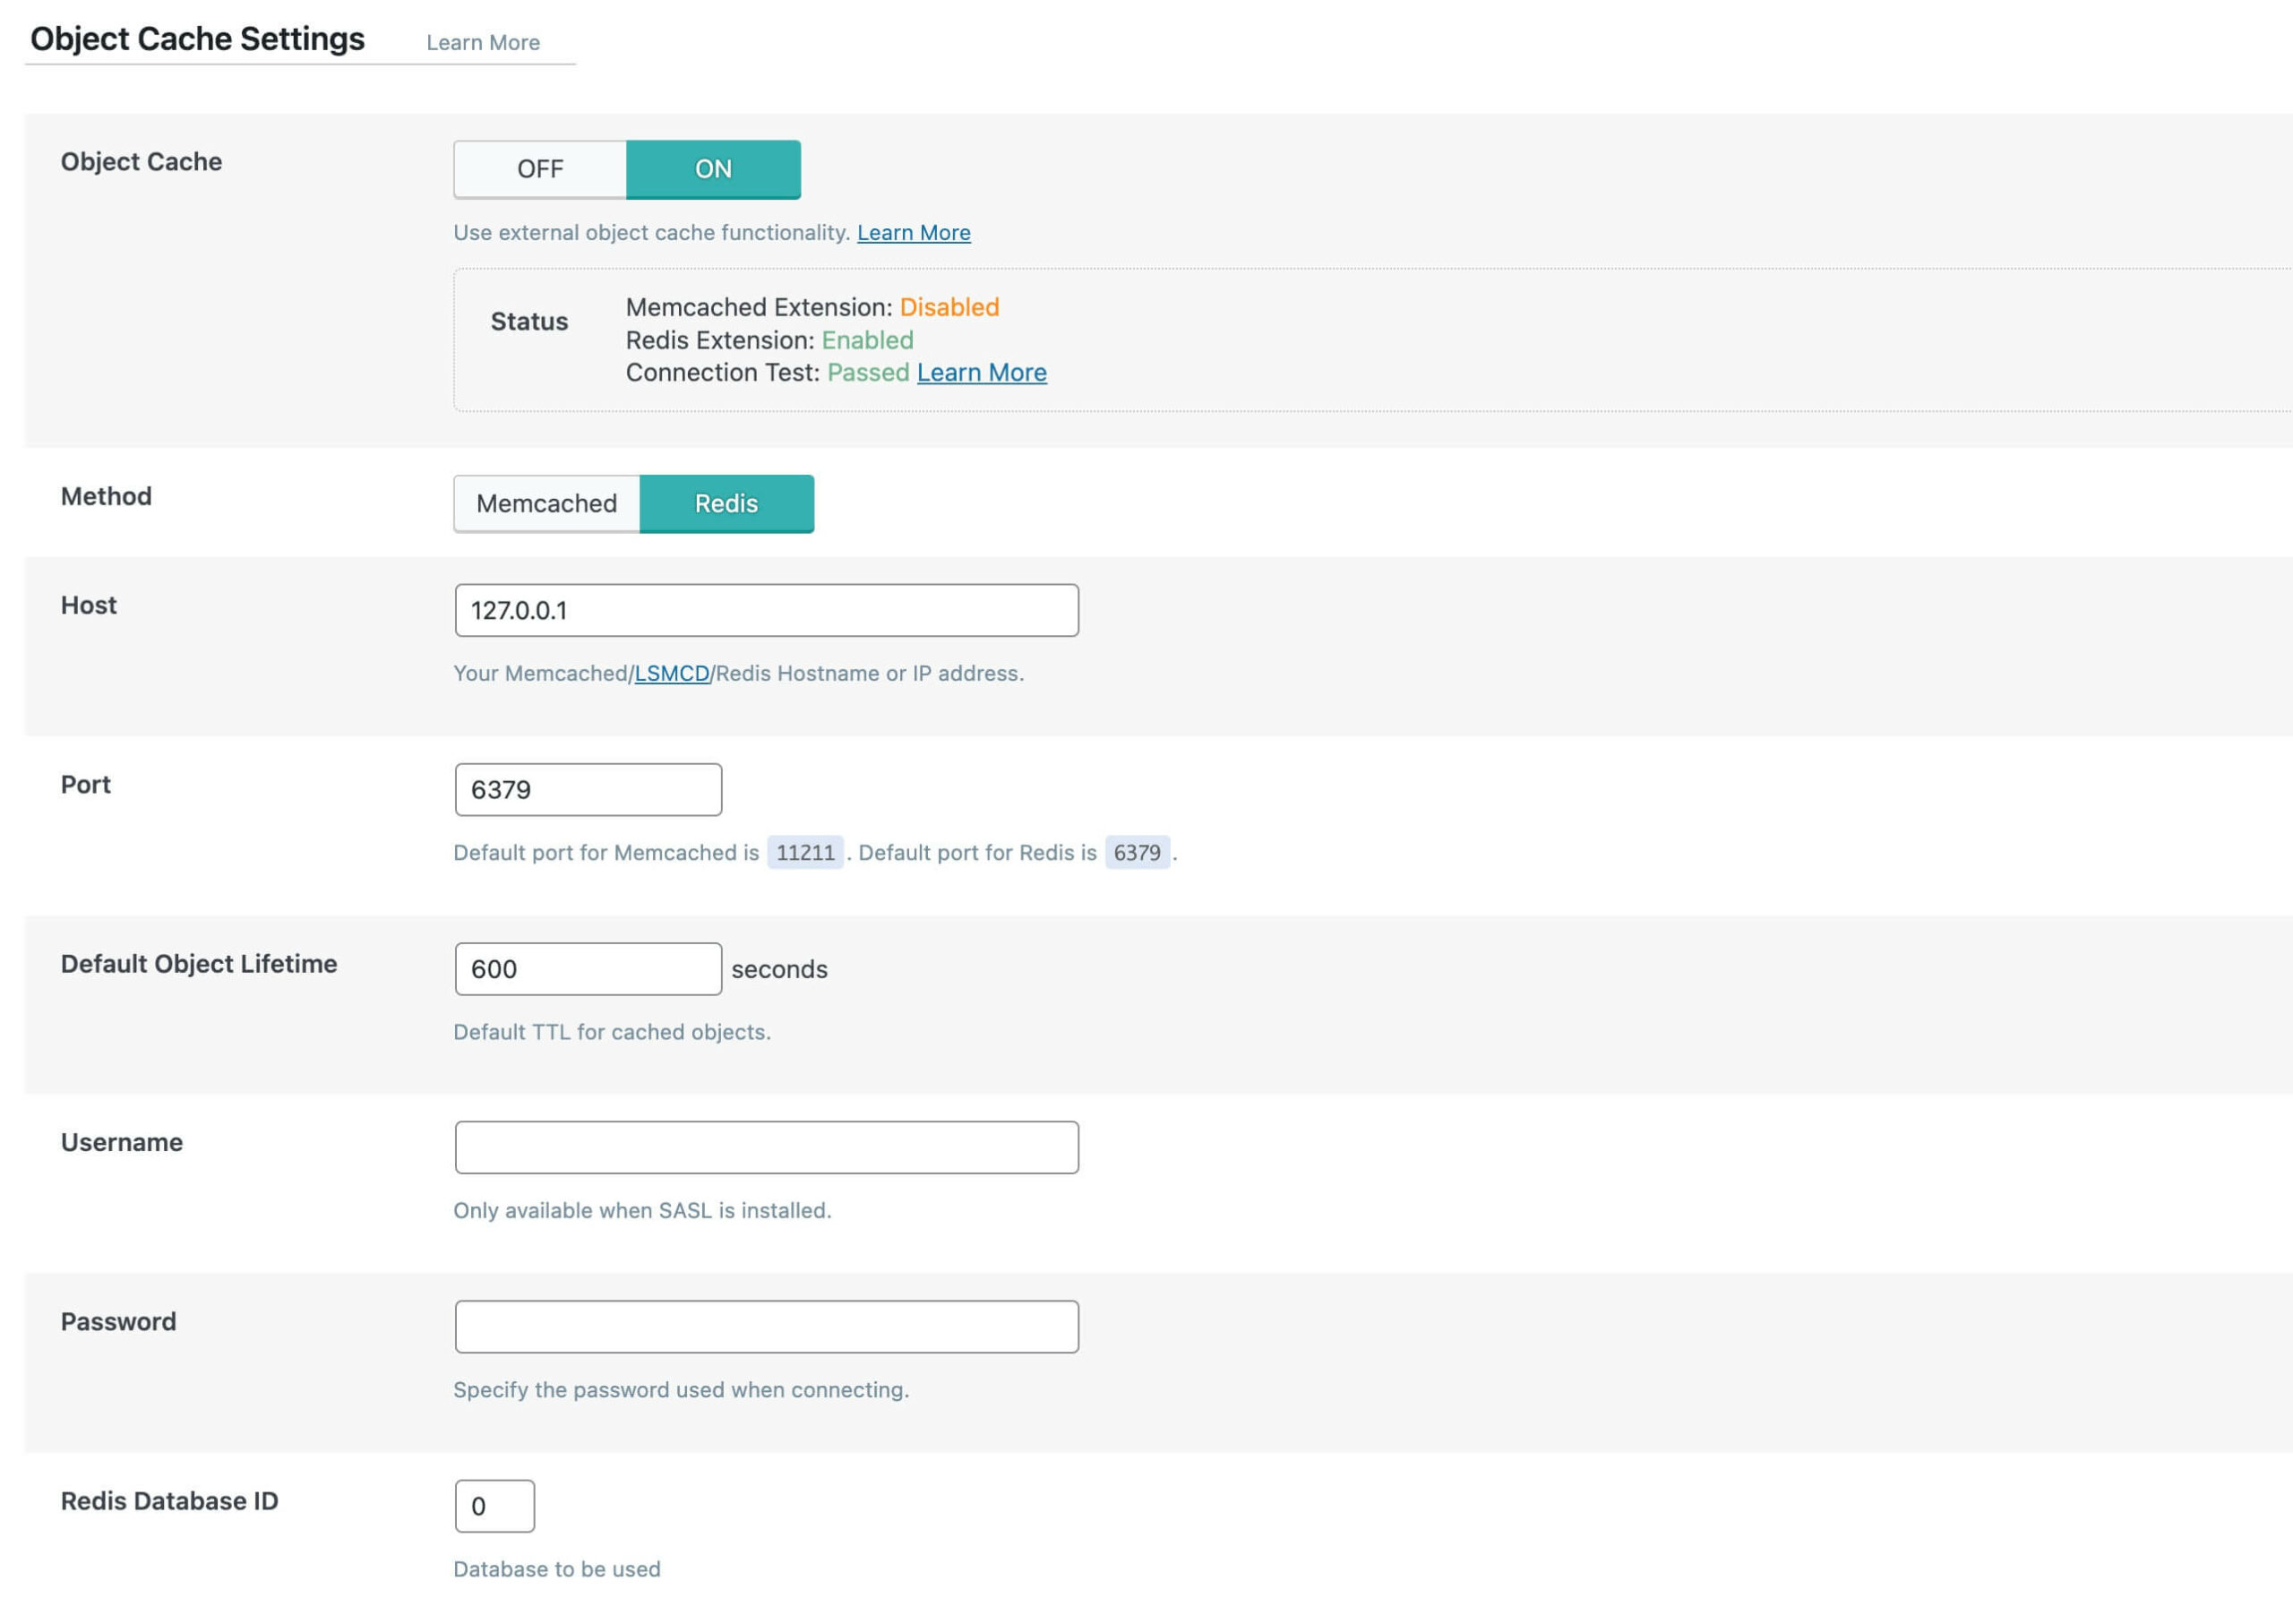
The object cache hangs on to database query results, greatly decreasing the load on your WP database. Using it requires you (or your web host) to set up an external application on your server for cache storage—either Memcached, Redis, or LiteSpeed’s modified version of Memcached, Litespeed Memcached (along with the appropriate php extension). Once the cache application is up and running and its extension is installed, the “Status” area of the page should show a green “Enabled.”
You’ll then need to enter the appropriate host and port details into the fields so that Wordpress can begin using the database. (You can also use Unix sockets, but I haven’t bothered yet. I should probably switch that on soon, though.)
Now, here’s the tricky part. If you’re only hosting a single Wordpress blog, then it doesn’t much matter whether you pick Memecached or Redis. (Litespeed Memcached’s main distinguishing feature is that it’s built to work distributed, so that’s not really a useful feature for small WP installs.) However, if you’re going to host more than one Wordpress site, Redis is the choice you want to make. The reason is because Redis can use multiple databases, while Memcached has a single store—so you can put one WP site on database 0, and the second WP site on database 1. Or, if you really, really love Memcached, you can just spin up multiple Memcached instances locally, each on different ports or sockets, and keep track of things that way.
And that’s it! That’s all it took to make Wordpress work right on OLS. There are probably some more small config tweaks scattered around that I did and that I’ve forgotten about, but this ought to cover everything important. Enjoy!