
(Now updated to work with HAProxy 1.6.x!)

The unencrypted web is on the way out. We made the switch here at BigDino Central to all-HTTPS a few weeks ago, but doing so brought with it a problem: how can we keep using Varnish cache with HTTPS traffic? The answer turned out to be by adding another layer into the web stack—and now we’re using HAProxy to terminate SSL. It wasn’t difficult to set up, and it works for all the different sites we host on our one physical web server.
Keeping Varnish in the mix felt important, because we’ve been using it for a few years (wow, has it been that long?), and it’s a neat tool that’s helped the site bear up under some crazy Reddit- and Ars-driven traffic storms. But the nature of Varnish means that out of the box it won’t help you with HTTPS traffic. Because the HTTPS negotiation happens between the end user and Nginx—which sits below Varnish in the stack—all Varnish sees of HTTPS traffic is the encrypted side, and you can’t cache what looks like an unending string of unique, encrypted nonsense.
You’re terminated
The way around this is to add another layer into the stack so that you get to eat your cake and also have your cake. I went with a tool called HAProxy, a load balancer that also happens to do SSL/TLS termination—that is, it can for the purposes of HTTPS pretend to be the web server, setting up the secure connection to the end users while passing on the actual web request to the actual web server. Plus, by adding HAProxy in front of Vanish and Nginx, I can also force all traffic to be HTTPS, while at the same time still keeping Varnish in the stack for fast caching of all my site’s static objects.
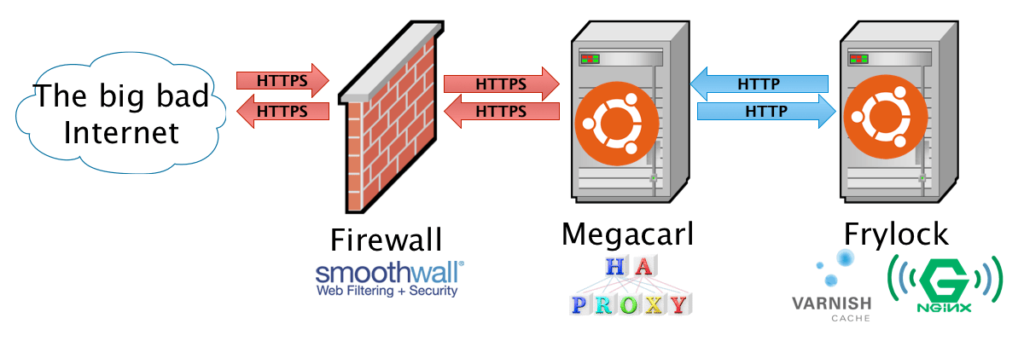
I elected to put HAProxy on its own server for simplicity’s sake, but there’s no reason you couldn’t implement it on a single server. Ports 80 and 443 on the HAProxy server are exposed to the Internet and get both HTTP (not really shown in the diagram) and HTTPS traffic. All HTTP requests are given a 301 redirect to the same URL but with an HTTPS scheme, and then requests are forwarded to the web server as plain HTTP. The HAProxy instance handles all of the SSL/TLS connections and the web server sees everything as plain ol’ HTTP.
By doing this, we can also at the same time support HTTP Strict Transport Security or HSTS–a way of making sure that all your web site’s users are browsing your site as securely as possible.
Of course, it’s a bit more complicated than that in practice—so let’s walk through the configuration.
Installing HAProxy
The HAProxy packages included with Ubuntu 14.04 LTS aren’t anywhere remotely near current, and so we need to add the following PPA before we get going:
sudo add-apt-repository ppa:vbernat/haproxy-1.6Then update your sources and install haproxy:
sudo aptitude update
sudo aptitude install haproxy
The main HAProxy configuration file lives at /etc/haproxy/haproxy.cfg, so pop that open for editing. Here’s the configuration I’m using:
global
    log /dev/log	local0
    log /dev/log	local1 notice
    chroot /var/lib/haproxy
    stats socket /run/haproxy/admin.sock mode 660 level admin
    stats timeout 30s
    user haproxy
    group haproxy
    daemon

    # Default SSL material locations
    ca-base /etc/ssl/certs
    crt-base /etc/ssl/private

    ssl-default-bind-ciphers  EECDH+ECDSA+AESGCM:EECDH+aRSA+AESGCM:EECDH+ECDSA+SHA384:EECDH+ECDSA+SHA256:EECDH+aRSA+SHA384:EECDH+aRSA+SHA256:EECDH+aRSA+RC4:EECDH:EDH+aRSA:!aNULL:!eNULL:!LOW:!3DES:!MD5:!EXP:!PSK:!SRP:!DSS:!RC4
    ssl-default-bind-options no-sslv3 no-tlsv10
    tune.ssl.default-dh-param 4096

defaults
    log		global
    mode	http
    option	httplog
    option	dontlognull
    option	forwardfor
    http-reuse always
    timeout connect 5000
    timeout client  50000
    timeout server  50000
    errorfile 400 /etc/haproxy/errors/400.http
    errorfile 403 /etc/haproxy/errors/403.http
    errorfile 408 /etc/haproxy/errors/408.http
    errorfile 500 /etc/haproxy/errors/500.http
    errorfile 502 /etc/haproxy/errors/502.http
    errorfile 503 /etc/haproxy/errors/503.http
    errorfile 504 /etc/haproxy/errors/504.http

frontend yourservername
    bind *:80
    bind *:443 ssl crt /etc/ssl/private/cert1.pem crt /etc/ssl/private/cert2.pem
    acl secure dst_port eq 443
    redirect scheme https if !{ ssl_fc }
    http-response set-header Strict-Transport-Security "max-age=31536000; includeSubDomains; preload;"
    rsprep ^Set-Cookie:\ (.*) Set-Cookie:\ \1;\ Secure if secure
    default_backend webservername

backend webservername
    http-request set-header X-Forwarded-Port %[dst_port]
    http-request add-header X-Forwarded-Proto https if { ssl_fc }
    server webservername 192.168.1.50:80

listen statistics
    bind *:8778
    mode http
    stats enable
    stats show-desc BigDinosaur HAProxy Status
    stats uri /
Nothing like a gigantic code block to get the blood pumping! Let’s break this down. If you need a vim syntax highlight config for HAProxy, you can grab a good one right here.
Global
We’re leaving the first chunk under the global section alone. This sets up HAProxy’s logging level and stats reporting config, along with the directory where HAProxy will be chroot’ed when it starts and the user/group for HAProxy to run under while daemonized.
We do care about the next bits, which tells HAProxy where our system’s CA root store is and where your SSL/TLS certificates will be located. You might need to change ca-base and crt-base to match your system’s root and cert store.
The ssl-default-bind-ciphers line determines which SSL/TLS ciphers HAProxy will use when establishing secure connections with clients. I’m using the recommended list from Qualys/SSL Labs for perfect forward secrecy across most browser/OS combos. I’ve also edited the ssl-default-bind-options line to disallow SSLv3 and TLS1.0 ciphers, to help protect against vulnerabilities and security holes. The last line in the global section, tune.ssl.default-dh-param, tells HAProxy to use a max of 4096 bits for its ephemeral Diffie-Hellman parameter when doing a DHE key exchange.
Defaults
We’re leaving the first four options alone. They establish what HAProxy should and shouldn’t log, and tell it that in all cases for us we want HAProxy operating in in HTTP (layer 7) and not TCP (not layer 7) mode. For this example we’re only caring about HTTP/HTTPS requests; if you wanted to use HAProxy to load balance things other than HTTP/HTTPS, you’d use the mode directive to help with that.
We’re going to add a couple of things, though: option forwardfor and option http-server-close. We’re using HAProxy as a reverse-proxy (the SSL termination is a subset of that functionality), and so HAProxy needs to be able to tell the upstream servers what IP address all of its requests used. Otherwise, all the traffic to the web server looks like it’s coming from the HAProxy server. Rather than fiddling with manual header editing, option forwardfor tells HAProxy that it’s operating as a reverse proxy and it needs to add the appropriate X-Forwarded For header on things it passes on to the upstream server.
The http-reuse always setting is new in 1.6 (reference) and in this context it will allow HAProxy to multiplex connections to Varnish. In the words of HAProxy maintainer Will Tarreau, “This will significantly speed up the communication between the two, reduce the number of concurrent connections there, and reduce overall CPU usage.”
Certificates
Now we get to the meat. The frontend section tells HAproxy what kind of traffic it should be listening for and where to send that traffic.
We’re binding HAProxy to both ports 80 and 443, having it listen for incoming HTTP traffic on port 80 and incoming HTTPS traffic on port 443. For the HTTP side, we’re feeding HAProxy two different SSL/TLS certificates (I’m actually using three in production). HAProxy uses Server Name Identification (SNI) to match the hostname on incoming HTTPS requests against the right SSL/TLS certificate, so it knows which cert to use based on what the client is asking for. I’m using three different wildcard certificates (*.bigdinosaur.org, *.chroniclesofgeorge.com, and *.bigsaur.us) and HAProxy has no problems picking out the right one for each request.
One thing you might have to do is concatenate your certificate and its decrypted private key file into a single .pem file, since that’s the format HAProxy supports. You can do this from the command line:
cat your-decrypted-ssl-key.key your-ssl-cert.crt > your-ssl-cert.pemNote that as with your decrypted SSL key, you should ensure the concatenated .pem file is owned by the root user and group and that its permissions are set so that only root can read it:
sudo chown root:root your-ssl-cert.pem
chmod 400 your-ssl-cert.pem
HTTP to HTTPS, with bonus HSTS
(Hat tips to rnewson and Nathan at Stupendous.net for this section’s code!)
Next, we very quickly define an ACL, or an access control list. This doesn’t quite work the same way as an ACL in, say, Windows; with HAProxy, ACLs are lists of things that match certain criteria.
acl secure dst_port eq 443We’ve created an ACL called secure that matches anything headed for destination TCP port 443. We’ll use this ACL in a minute to apply a few actions only to HTTPS traffic.
The next line in the config is where we’re actually performing the redirect of all traffic from HTTP to HTTPS. This one’s important.
redirect scheme https if !{ ssl_fc }This tells HAProxy that if an incoming request is not HTTPS, to send a 301 redirect for the same resource with the HTTPS scheme instead of HTTPS.
Now for a bit of bonus configuration magic. Because we’re forcing everything to HTTPS, we can use HAProxy to enforce HTTP Strict Transport Security . This tells HAProxy to send a header back to all users’ browsers telling the browsers that they should use only HTTPS for your web site and for all other sites on the same parent domain:
http-response set-header Strict-Transport-Security "max-age=31536000; includeSubDomains; preload;"Here we use the http-response set-header config option to append a header at the end of HTTP requests. The contents of the header follow the HSTS header guidelines. This header tells any browser that supports HSTS that the site and all its subdomains prefer to be spoken to via HTTPS, and that this preference will stay in effect for one year (31,536,000 seconds). Further, appending the preload directive tells the folks at Google that you’re consenting to have your site added to their big list of HSTS-compliant web sites—a list that’s shared so that other browser developers can use it.
As a quick aside, using HSTS is the right thing to do. An end-to-end encrypted web is a good thing, and responsible web server administrators should do everything they can to broaden the use of SSL/TLS. If you intend to use HSTS, you should also go submit your domain to the HSTS preload list once you’re done getting everything here set up.
Speaking of security: because we’re doing this big HTTP-to-HTTPS redirect, we need to make sure that any cookies set by the web server are appropriately modified to include a “secure” attribute (because as far as the web server is concerned, you’re only using HTTP). To do this, we use the rsprep option to substitute in that attribute based on a regex:
rsprep ^Set-Cookie:\ (.*) Set-Cookie:\ \1;\ Secure if secureNote the if secure at the end. This ensures that we’re only modifying cookies that are actually passing back to the user over HTTPS (secure is the ACL we built a few lines back to match HTTPS traffic). Everything should be HTTPS, so this shouldn’t be necessary, but there’s nothing wrong with wearing suspenders with your belt. Actually, that’s not true—don’t do that in real life. But in your security configuration it’s fine.
The last line in the section tells HAProxy where to send traffic. This is the default_backend line. If you had multiple web servers, you could build configs to send traffic to them for different reasons—like, if you had an app server, you could send app traffic to it while non-app traffic to other web servers. Or, if you had multiple backends and wanted to load balance between them, you could do that here as well.
Our needs are simple—one back-end server. You can name it whatever you’d like.
The back end
Because we’re only using a single backend server, this section is short. HAProxy’s role as an SSL/TLS terminator means we need to add a couple of headers so that the web server understands that the actual client communication is happening over HTTPS, even if all it sees is HTTP:
http-request set-header X-Forwarded-Port %[dst_port]
http-request add-header X-Forwarded-Proto https if { ssl_fc }
The first sets the X-Forwarded-Port header so that Varnish and Nginx know that the client originally connected to port 443 (this can be important for returned responses, so that web applications know not to generate HTTP URLs back to clients and instead generate URLs with the proper scheme).
The second reinforces the first, setting the X-Forwarded-Proto to HTTPS if the requests came in over HTTPS—again, so that the actual web server and its applications know what’s going on and don’t generate the wrong kinds of responses.
And, then, we tell HAProxy where to actually send the requests—here you put the name, IP address, and port for your web server. For me, this is a separate server, so I’m putting in a different IP address and port 80. If you’re doing this all on one box, you’d put localhost and then the port number where Varnish is listening (or just Nginx, if you’re not using Varnish).
Stats if you like
The last section simply tells HAProxy to display its internal status page at the port you specify. You can include basic user name/password authentication by adding stats auth username:password below what’s there, or specify a different URL other than / if you wish.
Note that if you’re using HSTS with the includesubdomains option, you might not be able to reach the stats page by name, since your web browser will attempt to load the HTTPS version of the page and HAProxy only serves the page out via HTTP. You can work around this by accessing the stats page by IP address instead (entering http://192.168.1.50:9000 in your browser’s address bar instead of trying by your web server’s name).
Clean up time
Save your config file, but don’t restart the HAProxy service quite yet. If you’re running HAProxy on the same box as Varnish or Nginx and one of those two is already listening on ports 80 and 443, you’ll need to do some clean up first.
For Varnish, that means editing /etc/default/varnish and changing the DAEMON_OPTS section. The listen port is set with the -a flag, so change that from -a :80 to whatever other port you’d like to use (it doesn’t really matter what, so long as it’s not in use and you’re pointing to it in the server line from your HAProxy backend config).
For Nginx, we need to do some more serious surgery. Because we’ll no longer be serving HTTPS requests with Nginx at all, you can elide every one of your HTTPS server stanzas from every one of your Nginx virtual host files. This might feel, as Morpheus says, a little weird, but HAProxy is taking care of everything now. If you’re not using Varnish and Nginx is bound to port 80, you’ll need to change all of those bindings as well.
And that ought to do it. There aren’t any Nginx or Varnish-specific extras you need to add—though if you’re not already doing it, you might want to set the following two lines in your main nginx.conf file, just to make sure Nginx knows to use the X-Forwarded-For header to replace the IP addresses on requests that come in from 127.0.0.1:
set_real_ip_from 127.0.0.1;
real_ip_header X-Forwarded-For;
This will only work if you’re using a version of Nginx built with ngx_http_realip_module, so check the output of nginx -V before adding this.
Restart the HAProxy service (service haproxy restart) and it will begin listening for requests.
Verifying it works
If you want to check and make sure everything’s working and your HTTPS requests are being properly cached by Varnish, there’s a quick way to do this. First, make sure that Varnish is appending a cache hit header with its responses—that’s the easiest way to tell if a request is coming from cache or not. To do this, edit your Varnish vcl file (which will be /etc/varnish/default.vcl if you’re lazy like me) and add the following immediately at the start of the sub vcl_deliver section:
# Display hit/miss info
if (obj.hits > 0) {
    set resp.http.X-Cache = "HIT";
}
else {
    set resp.http.X-Cache = "MISS";
}
Restart Varnish, then clear your web browser’s cache and load up your site a couple of times to warm up Varnish. Once you’ve reloaded and clicked around a bit, check your headers (in Chrome, for example, you can pull up the Developer Tools console (More Tools > Developer Tools) and click the “Network” tab, then reload the page and click on the individual page elements. Images and other static assets should come back showing cache hits in the Response Headers section:
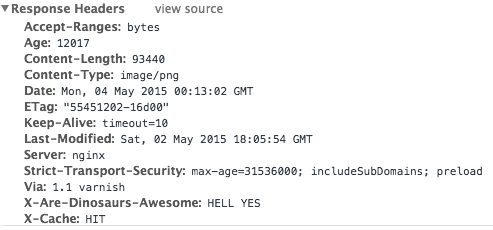
And if that’s what you’re seeing, we’re done! Relax and bask in your Varnish-accelerated, all-HTTPS site.
In addition to rnewson and Nathan at Stupendous.net, this post also uses info from ServersForHackers’ Load Balancing with HAProxy guide.