

So, hey, it turns out that while the grass is indeed a little bit greener over here on this side of the blogging fence, Wordpress still does a couple of things I don’t like and that need correcting. This gives me an opportunity to do that most overdone of blog posts—the “here’s how to add $THING to Wordpress!” post.
There are two problems we’re going to fix: the first is Automattic’s decision to make “Wordpress” (without camel-case) always render as “WordPress” (with camel-case) no matter how the author writes the word. We’re going to undo this unwanted trademark enforcement via a must-use plugin.
The second problem we’re going to fix is the block editor’s “Welcome Guide” popover, and its insistence at re-appearing even after being dismissed. The damn thing comes back every time I create a new post in a new browser window—I assume because for whatever reason its dismissal is recorded not in an actual site preference, but in a cookie or something. So we’re going to banish it permanently via another must-use plugin.
And then, since we’re already going to make a couple of must-use plugins, we’ll make one more—this one will add PrismJS-based syntax highlighting to Wordpress. Which I will be typing with a lowercase “p.”
Plugins, not functions.php modifications
We’re going to be adding our three bits of functionality as plugins—more specifically, as special plugins called “must-use plugins.” A must-use plugin is automatically loaded by Wordpress before normal plugins and cannot be disabled; must-use plugins are also displayed on their own page, rather than cluttering up the main plugin list. There are some downsides to must-use plugins, which you can read about on the must-use plugin documentation page, but none of those downsides apply to what we’re going to be doing.
Ah, but, you might ask, why use plugins at all? Can’t we just append whatever we want into our theme’s functions.php file? Well, we could—but there are some very good reasons not to. I’ll quote the good folks over at wpmudev:
At the core of WordPress lies a simple principle: design and functionality should (whenever possible) be clearly separated.
That is why we have themes and plugins; ostensibly, themes are solely responsible for design and plugins are solely responsible for functionality. One should be able to switch themes without affecting functionality, and one should be able to deactivate plugins without affecting the design.
…
If you understand what functions.php is for (functionality strictly related to a particular theme), you should be able to figure out what it isn’t for.
Alex Stine & Martin Aranovitch
Since we’re going to be altering core functionality—specifically, neutering the Wordpress camel-case override and killing the block editor welcome box—plugins are the way to go. And while syntax highlighting is arguably something that should indeed vary from theme to theme, we’re already going to be making two plugins, so doing a third one is a matter of convenience.
I’ll say “Wordpress” if I want & you can’t stop me
The first thing to do is to get Automattic’s branding decisions out of my blog. Wordpress began automatically applying camel-case to its name with this WP core change all the way back in 2010. Fortunately, unwinding this unwanted feature just requires a bit of php.
I’m going to use Tom Lany’s “Remove WordPress to Wordpress filter” plugin, except instead of installing it as a normal plugin via the WP interface, I’m going to install it as a must-use plugin via the command line.
Must-use plugins live in a different directory from regular plugins—instead of wp-content/plugins, they go in wp-content/mu-plugins. If you don’t have a mu-plugins directory, now’s the time to create it.
Then, create a php file inside of mu-plugins. I called my php file lowercasepress.php, but you can call yours whatever you’d like.
Inside it, paste the contents of the php file inside Tom Lany’s plugin package:
<?php
/*
Plugin Name: Remove Wordpress to WordPress filter
Plugin URI: https://tomlany.net/code/
Description: This turns off the default filter that changes all instances of "Wordpress" to "WordPress".
Version: 1.3
Author: Tom Lany
Author URI: https://tomlany.net/
License: GPLv2 or later
*/

/* For more information about this plugin, see the readme.txt file included with the download package. */

foreach ( array( 'the_content', 'the_title', 'wp_title', 'comment_text' ) as $filter ) {
	$priority = has_filter( $filter, 'capital_P_dangit' );
	if ( $priority !== FALSE ) {
		remove_filter( $filter, 'capital_P_dangit', $priority );
	}
}

?>
Save the file, and either reload Wordpress to have it take effect immediately, or continue on with our second plugin.
Begone forever, block editor welcome box
The “Welcome to the block editor!” popover was informative the very first time I saw it, but its insistence on appearing every time I logged in from a different browser or in incognito mode quickly turned it into a nuisance. Wordpress enthusiast Andrew Duthie felt the same way, since he wrote an excellent simple plugin to prevent the popover from ever showing up ever again.
We’re going to do the exact same thing with Andrew’s plugin as we did with Tom’s: stick its php file directly into our wp-content/mu-plugins directory. Here’s the code:
<?php

/**
 * Plugin Name: Disable NUX
 * Plugin URI:  https://github.com/aduth/wp-disable-nux/
 * Description: Disables "New User Experience" guides.
 * Version:     1.1.0
 * Author:      Andrew Duthie
 * Author URI:  https://andrewduthie.com
 * License:     GPLv2 or later
 * License URI: https://www.gnu.org/licenses/gpl-2.0.html
 */

function dn_enqueue_scripts() {
    wp_add_inline_script(
        'wp-edit-post',
        'wp.data.select( "core/edit-post" ).isFeatureActive( "welcomeGuide" ) && wp.data.dispatch( "core/edit-post" ).toggleFeature( "welcomeGuide" );'
    );
}
add_action( 'admin_enqueue_scripts', 'dn_enqueue_scripts' );
Save the file and reload Wordpress to have it start working.
Syntax highlighting with PrismJS
Syntax highlighting makes me happy, so let’s get that set up. There are a few different syntax highlighter choices and a whole mess of different installation options, but we’re going to stick PrismJS (because I’m comfy with it and have used it before).
There’s an argument to be made that because syntax highlighting is probably something you want to vary with your theme, that any code to enable syntax highlighting should be added via editing a child theme’s functions.php. But, hey, we’re already making mu-plugins. Let’s make one more.
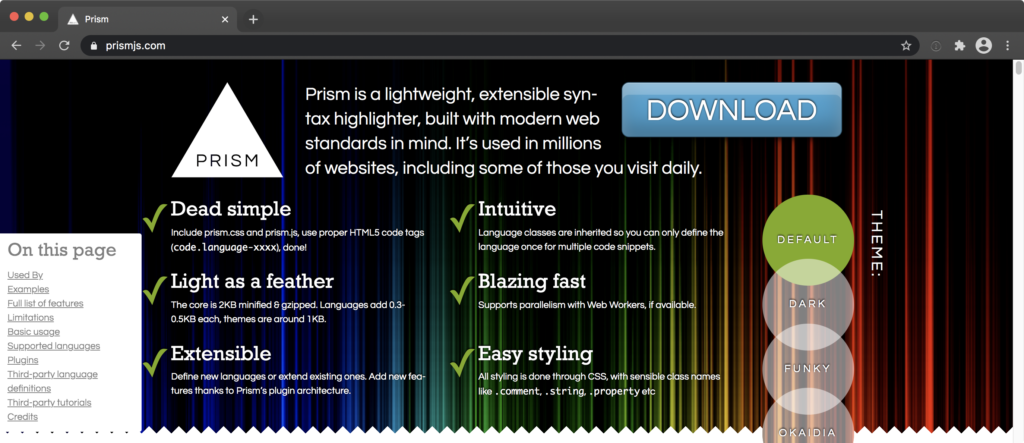
The first thing to do is to grab a copy of PrismJS with the color scheme you want and the languages that you think you’ll need highlighted. You can start that process directly on the PrismJS homepage, and it’ll take you to a long list of different lexers. Pick what you want, and then download both the resulting Javascript and CSS files and place them on your server somewhere that Wordpress can see. (I created a prism directory immediately off of the Wordpress webroot, but you can put them wherever you feel is appropriate if that doesn’t work for you.)
Once the two files are in place, it’s time to actually create the plugin. I’ve cribbed from Jake Pfohl’s excellent (and much more comprehensive) post over at Start Blogging 101—using his method, PrismJS highlighting will be applied to any post with the tag “code” applied to it. This will save some bandwidth by not loading any of the highlighting CSS or JS for posts that don’t have any code blocks in them. Just make sure to remember to tag your code posts with “code” so they do get highlighted!
If you’re still following along with this implementation, create a file named prism-syntax-highlighting.php and paste the following inside of it:
<?php

/**
* Plugin Name: Quick Prism.JS plugin
* Description: Adds Prism.JS-based syntax highlighting to any post with the "code" tag. Adapted from this <a href="https://startblogging101.com/how-to-add-prism-js-syntax-highlighting-wordpress/">Start Blogging 101 post</a>.
* Author: Jake Pfohl
* Version: 0.1
*/

/* Your code goes below here. */
function add_prism() {

    if ( is_single() && has_tag( 'code' ) ) {

        // Register prism.css file
        wp_register_style(
            'prismCSS', // handle name for the style
            '/prism/prism.css' // location of the prism.css file
        );

        // Register prism.js file
        wp_register_script(
            'prismJS', // handle name for the script
            '/prism/prism.js' // location of the prism.js file
        );

        // Enqueue the registered style and script files
        wp_enqueue_style('prismCSS');
        wp_enqueue_script('prismJS');

    }
}
add_action('wp_enqueue_scripts', 'add_prism');

/* Your code goes above here. */

?>
Once you’re actually creating posts with code blocks in them, you specify the highlighting language by selecting the code block, going to its “Advanced” settings, and filling in the desired language in the “Additional CSS class(es)” box, prefaced by “lang-“. (The block above has lang-php specified.) For a complete list of language identifiers used by PrismJS, see this page.
And that’s it! Refresh your Wordpress dashboard and check the plug-ins menu. You should see your normal plugins listed first, and then a new page showing the must-use plugins separately:
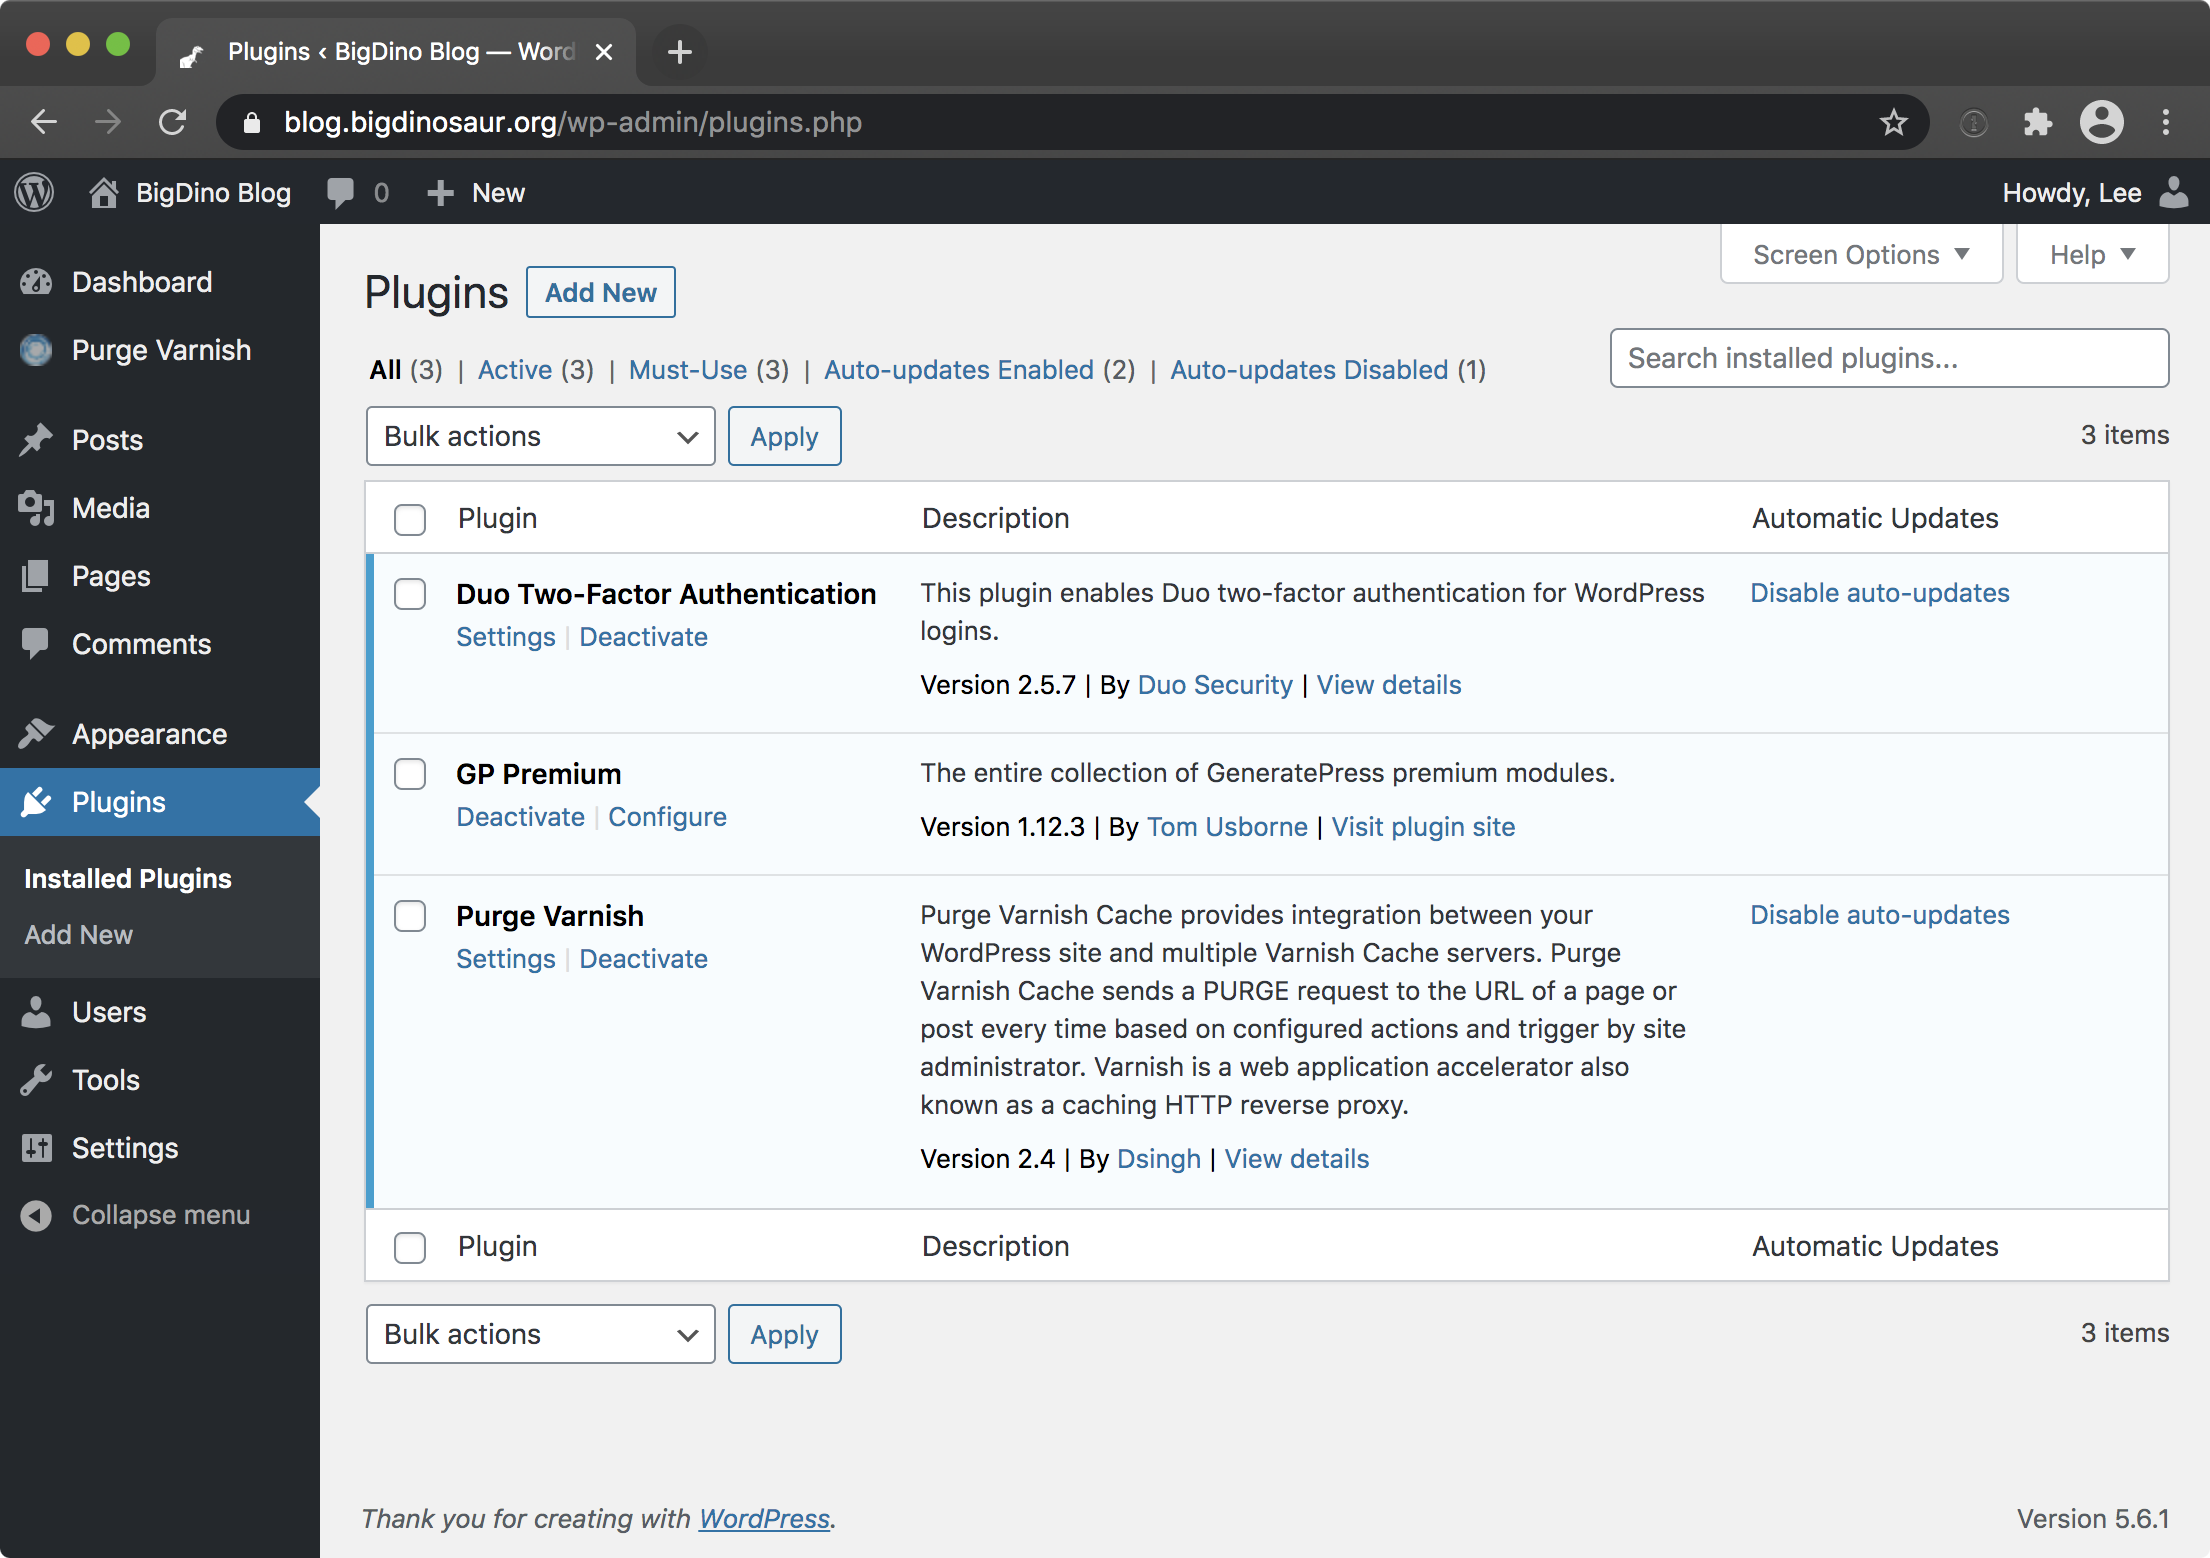
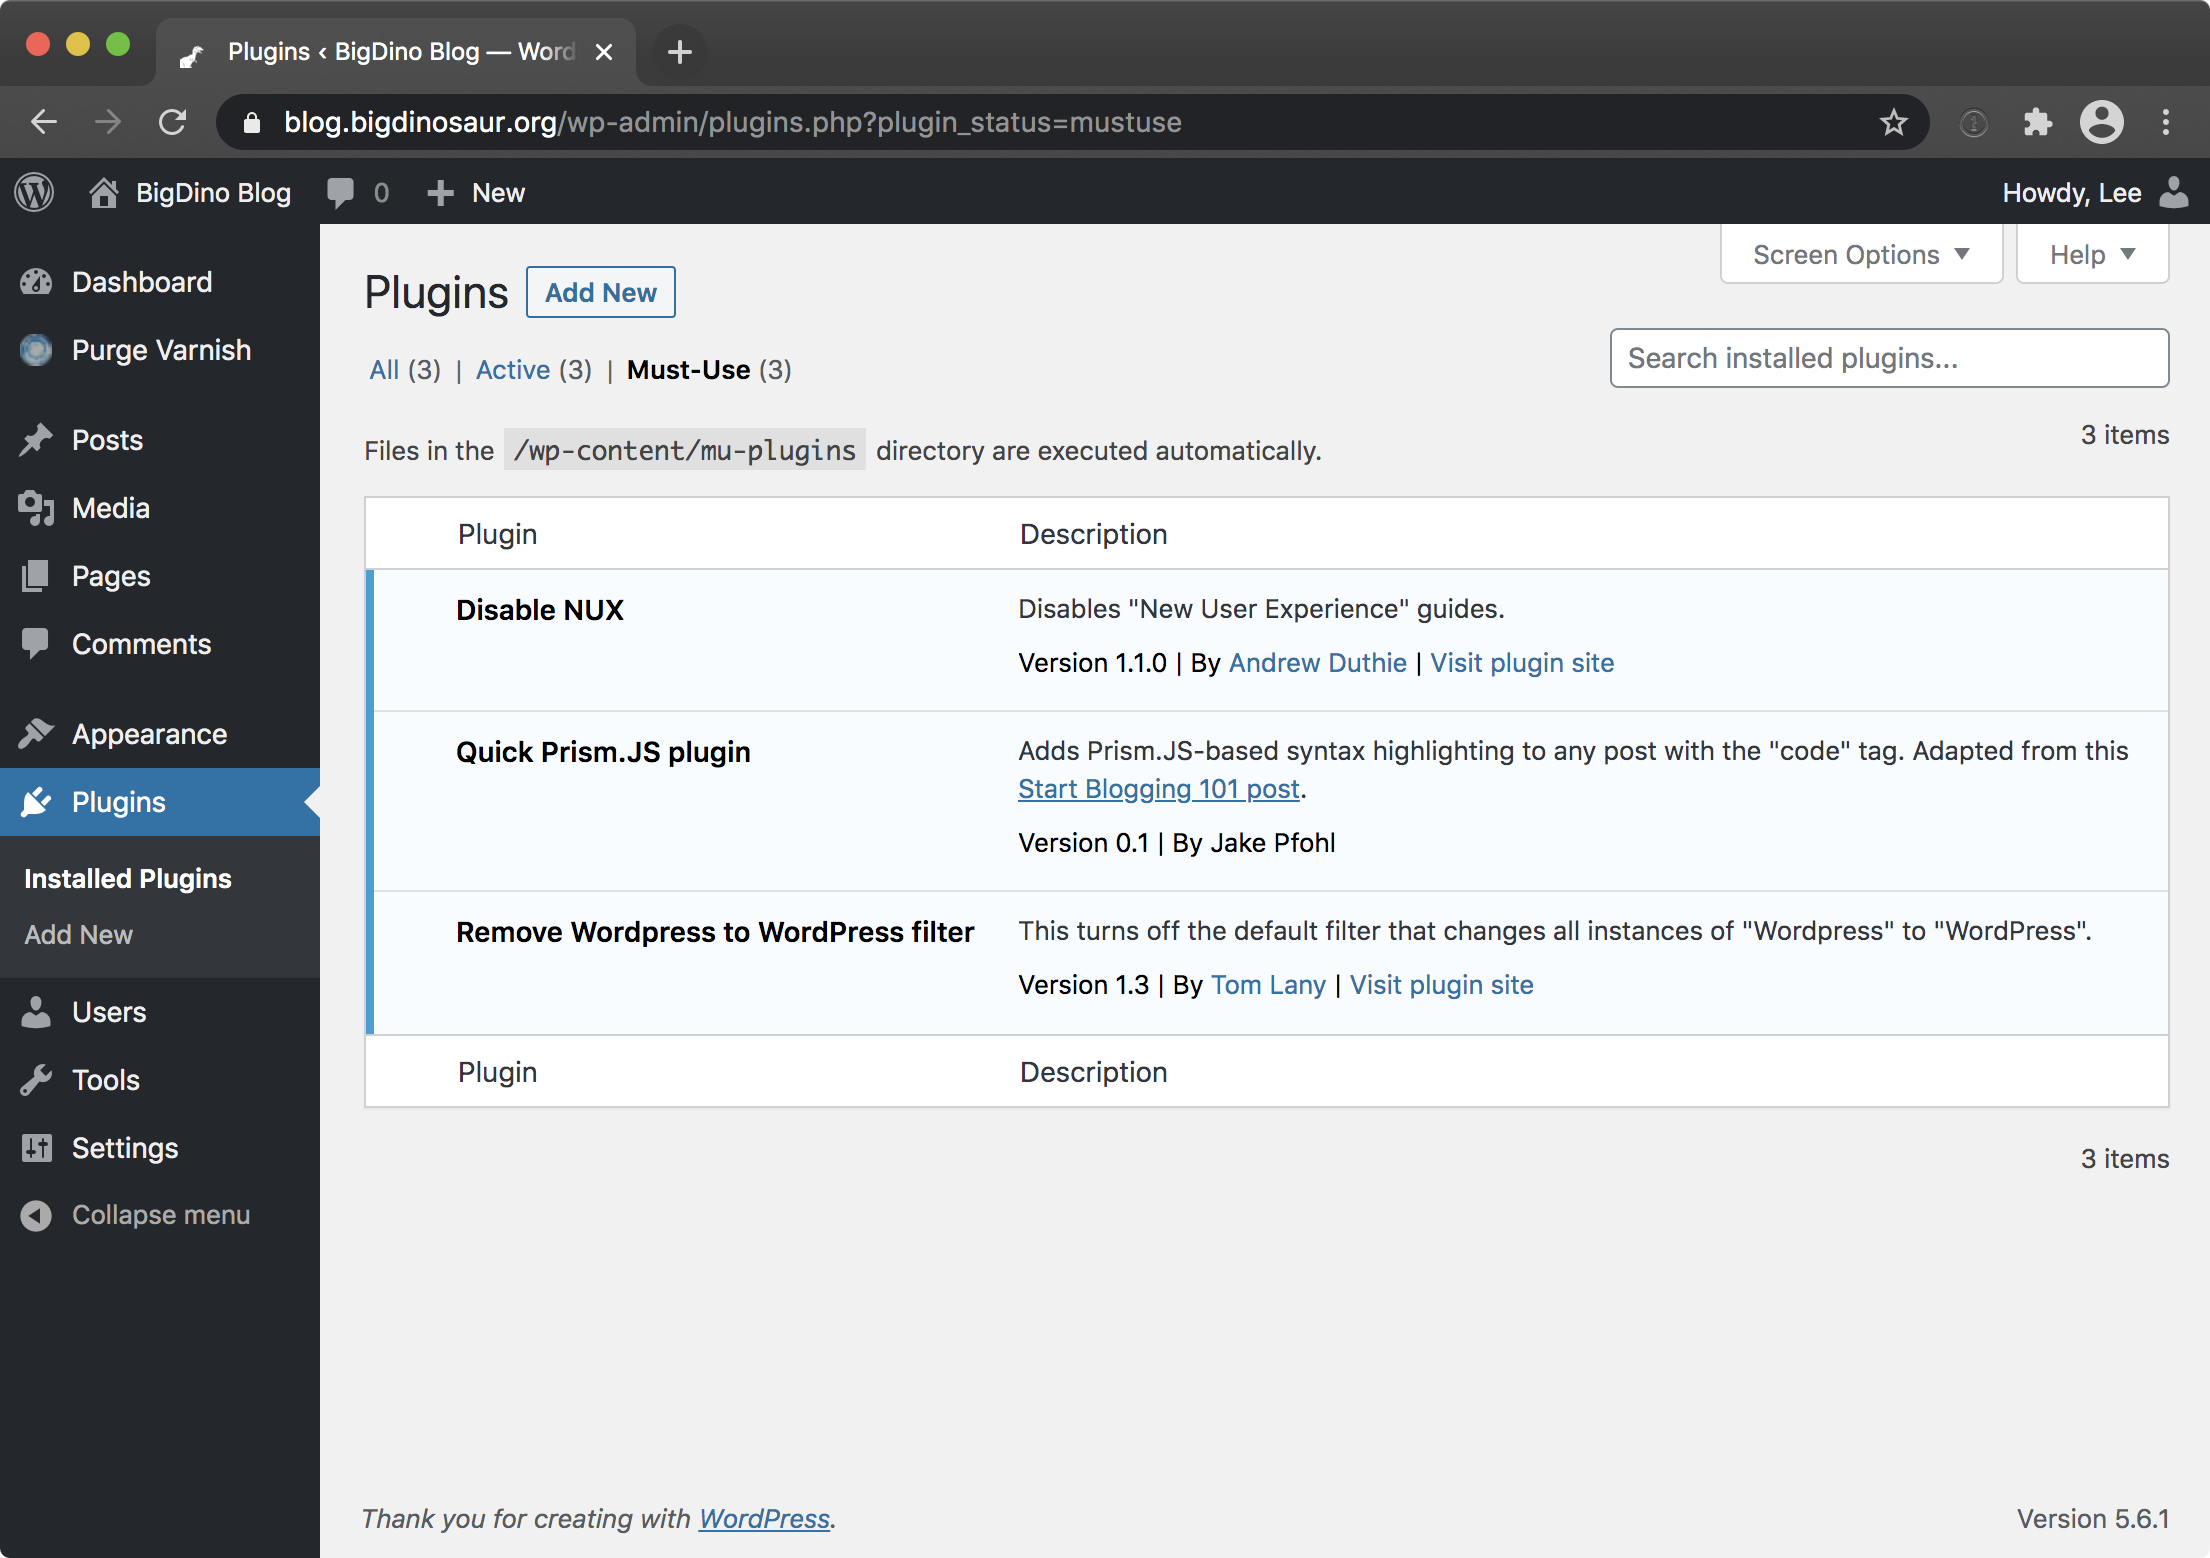
And keeping things organized like this makes me happy.