
This is an old post. It may contain broken links and outdated information.
Hi there, visitors from Google! The procedure outlined here will work to get Discourse up and running, but you are way, way better off following the official Discourse installation guide and utilizing the Discourse Docker image. Proceed below at your own risk!

I like fiddling with new software and seeing if I can make it work—that’s what most of this blog is about, in fact. Most of the web-based apps I’ve walked through deploying have been written with PHP, but there’s a fancy new bit of Ruby-based forum software that I’ve sort of fallen in love with: Discourse.
Discourse is shiny and new, and the developers (including Jeff Atwood, one of the folks behing StackExchange). It’s made out of Ruby instead of PHP, and it uses PostgreSQL and Redis for its back-end. The project is still very, very beta; there are multiple methods of deploying it and it has a robust development environment that you can set up and start hacking away on.
This doesn’t matter much to me, though—I dont’ code. I just wanted to set it up and play with it. So, this is a walkthrough on how to deploy Discourse on Ubuntu, using Nginx and Phusion Passenger. If you want to see the end result, check out my Discourse test forum—when we’re done, you’ll have something similar up and running.
The inevitable prerequisites
There’s always gotta be stuff to set up before you can jump in and play, though, right? We’re going to operate under the assumption that you’ve already got Nginx, PostgreSQL, Postfix, and Redis installed. I talked about how to install Redis here, and you can follow this entry’s instructions to get rocking with Postfix (though it’s a little outdated at this point).
The tool that we need to add to our system now is Ruby. There are lots and lots of ways of getting Ruby installed, and most of them manage to be very developer-friendly while at the same time being very sysadmin-hostile—the default way of installing Ruby is to stash it under the installing user’s home directory. We don’t want that—we want a system-wide installation of Ruby, because we’re going to be using it to execute applications under the Nginx www-data user’s context. Additionally, developers frequently peg their applications to certain Ruby versions, and so it’s not uncommon to need to install multiple Ruby versions on the same system; to that end, there are other tools you can install to support that insanity.
We’re going to take the extremely simple, extremely easy route and install one version of Ruby, and we’re going to install it system-wide.
First, let’s add in everything that Ruby is going to need to operate, along with a few other odds and ends we’re going to need to get Discourse up and running:
$ sudo aptitude install libyaml-dev ncurses-dev libreadline-dev bison libgdbm-dev libc6-dev
libssl-dev libsqlite3-dev make build-essential libssl-dev libreadline6-dev zlib1g-dev
libyaml-dev libreadline-ruby libopenssl-ruby libcurl4-openssl-dev libxml2-dev libxslt1-dev
libpq-dev gcc
This will kick off a whole mess of packages and dependencies. Let ’em all install.
Installing Ruby
Next, we need to install Ruby itself. Rather than use a package, we’re going to compile it from source, using the code bundles available on the Ruby site. Launch a root shell to simplify things, then grab the current Ruby 2.0 tarball using wget and stage its contents in your temp directory:
$ sudo /bin/bash
cd /tmp
wget ftp://ftp.ruby-lang.org/pub/ruby/2.0/ruby-2.0.0-p247.tar.gz
tar zxfv ruby-2.0.0-p247.tar.gz
Now, using Ubuntu’s compiler, compile and install Ruby system-wide:
cd ruby-2.0.0-p247
./configure --prefix=/usr/local
make
make install
The configure --prefix=/usr/local ensures that our compiled Ruby binaries and support files are installed in the /usr/local/ directory and are thus accessible to everyone, not just the installing user.
Next, edit your system-wide PATH statement so that the necessary Ruby folders are included. This can be done by modifying /etc/environment. If you’ve never changed the file, it will probably look like this:
PATH="/usr/local/sbin:/usr/local/bin:/usr/sbin:/usr/bin:/sbin:/bin:/usr/games"There are two directories we need to add into the PATH statement, delimited by colons. While we’ve got this file open, there are two other variables we need to add—don’t worry if they don’t make sense now, as I’ll explain them in a bit when we actually put them to use:
PATH="/usr/local/sbin:/usr/local/bin:/usr/sbin:/usr/bin:/sbin:/bin:/usr/games:
/usr/local/lib/ruby/gems/2.0.0:/usr/local/lib/ruby/gems/2.0.0/gems"
RUBY_GC_MALLOC_LIMIT=90000000
RAILS_ENV=production
Rather than individually export each of those statements at the bash prompt, just go ahead and reboot the server to make them live. Yes, yes, I know, that’s the lazy Windows way out, but it’s also nice and quick.
When you log back on, run the following command to see if your Ruby installation is alive and working:
$ ruby -ropenssl -rzlib -rreadline -e "puts 'Hello Ruby World'"If you see a Hello Ruby World printed out below your bash prompt, then congratulations, you’ve installed Ruby. Run a quick sudo gem update --system to make sure you’re up to date, and that’s all we need to do with that.
Installing Passenger
This is going to be a little tricker. Discourse needs to be served via an application server. It comes prepackaged with Thin, a Ruby web server, but Thin brings with it its own set of security and scaling complications. Rather than walk down that path, we’re going to fall back on trusty Nginx to serve our Discourse web site. To do that, we need to incorporate Passenger into the mix.
Passenger is a fast application server that can be integrated into existing Nginx and Apache installations with a minimum of fuss and tuning. The only problem with it is that we have to re-compile Nginx from source in order to add in support for Passenger. Fortunately, this isn’t as scary as it sounds. Passenger comes with scripts to automate this process.
The first thing we need to do, though, is tell Ubuntu to stop automatically updating Nginx via aptitude or apt-get, since automated updates will eat the specially-compiled binary we’re about to generate. To exclude Nginx from automatic updates, use the following command:
$ sudo aptitude hold nginx-full(Substitute nginx or nginx-light as appropriate, depending on which Nginx package you installed.)
Next, we need to grab the Nginx source code and stage it, since we’ll be recompiling it with support for Passenger. The current version of Nginx as of this writing is 1.5.1, so that’s what we’ll grab:
$ sudo /bin/bash
cd /tmp
wget http://nginx.org/download/nginx-1.5.1.tar.gz
tar zxfv nginx-1.5.1.tar.gz
Next, install the Passenger gem:
gem install passengerThis pulls down the actual Passenger application and its support files. After that process completes, it’s time to compile Nginx with support for Passenger. To kick the process off, run the Passenger Nginx installation script:
$ sudo passenger-install-nginx-moduleThe Passenger guys have done an excellent job in making the compiling process as easy as possible, but we need to be able to step in and customize things just a bit in order to preserve existing Nginx functionality. So, when the script prompts you on whether or not you want to automatically download and install Nginx, you’ll need to say no, by choosing option 2.
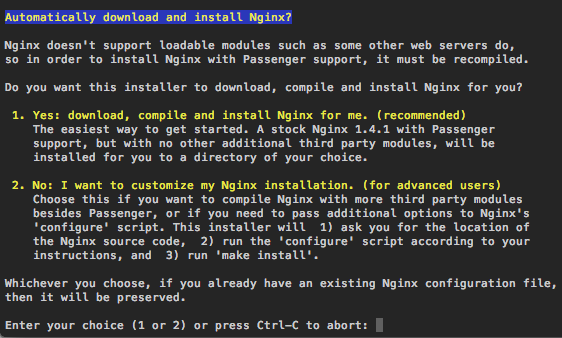
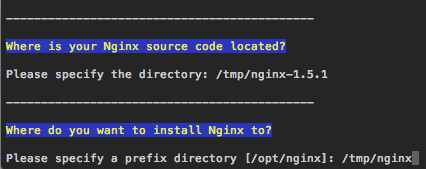
The script will download some Passenger stuff, and you’ll be asked to provide the location of your Nginx source code directory, which we downloaded just a second ago. Enter /tmp/nginx-1.5.1 when asked.
Next, the script will ask where you’d like to install Nginx to. For now, enter /tmp/nginx as the location. We’ll manually stop Nginx and copy over the new binary after the Passenger script stops.
The next step is a biggie: the script will ask what configure options to use when compiling Nginx. This is where you’ll need to specify all the Nginx modules you want included. This list will vary depending on what you’re using Nginx for and what options you need installed. If you’d like, you can cut and paste the following list in, since this is what I’m using:
--conf-path=/etc/nginx/nginx.conf --error-log-path=/var/log/nginx/error.log
--http-client-body-temp-path=/var/lib/nginx/body --http-fastcgi-temp-path=
/var/lib/nginx/fastcgi --http-log-path=/var/log/nginx/access.log
--http-proxy-temp-path=/var/lib/nginx/proxy --http-scgi-temp-path=/var/lib/nginx/scgi
--http-uwsgi-temp-path=/var/lib/nginx/uwsgi --lock-path=/var/lock/nginx.lock
--pid-path=/run/nginx.pid --with-pcre-jit --with-http_addition_module
--with-http_realip_module --with-http_stub_status_module --with-http_sub_module
--with-ipv6 --with-sha1=/usr/include/openssl --with-md5=/usr/include/openssl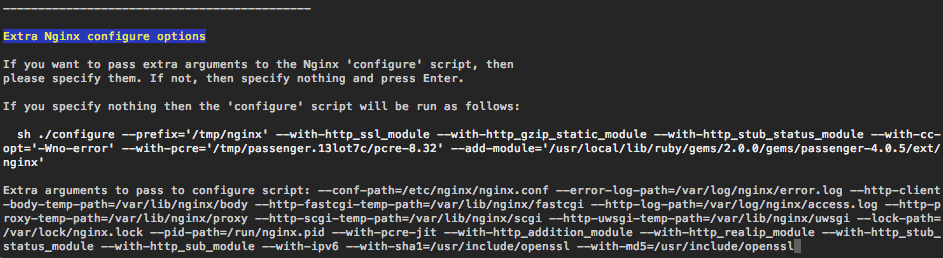
Then, hit enter a couple of times and let it run. The script will compile an Nginx binary and place it at /tmp/nginx/sbin/. When the script is finished, it will display some instructions on what configuration file options to twiddle in order to enable Passenger support for Nginx; we’ll enter those shortly.
First, though, we need to plug in our new shiny Nginx binary. To do this, we’ll stop Nginx, back up our exisitng Nginx binary, copy the new one into place, and start Nginx back up again:
$ sudo /etc/init.d/nginx stop
$ sudo mv /usr/sbin/nginx /usr/sbin/nginx-old
$ sudo mv /tmp/nginx/sbin/nginx /usr/sbin
$ sudo /etc/init.d/nginx start
Run nginx -V and take a look at the output. Nginx should report back that its version number is 1.5.1 (or whichever version you elected to compile and install), and you should see a couple of Passenger entries near the beginning of the configure arguments section.
The last thing we need to do with Nginx is modify its config file per the Passenger script to add in the Passenger configuration options. Open /etc/nginx/nginx.conf for editing and append the following lines near the bottom of the http section:
    # Phusion Passenger settings
    passenger_root /usr/local/lib/ruby/gems/2.0.0/gems/passenger-4.0.5;
    passenger_ruby /usr/local/bin/ruby;
Then, restart Nginx with sudo /etc/init.d/nginx restart to activate your changes.
Prepping PostgreSQL
With Nginx (almost) done, we turn our attention to our main database. Discoruse uses both PostgreSQL and also Redis, but PostgreSQL holds the meat of the forum. To that end, we need to create a database and a Postgres user for Discourse. There are automated Discourse tasks for doing this, but I feel more confident doing it myself using the psql command line tool.
(A quick note: Discourse will require the HSTORE Postgres extension, and so you might need to install the postgresql-contrib package in order to get that.)
First, switch to the postgres user using su and start the psql console:
$ sudo /bin/bash
su postgres
$ psql
Then, at the PostgreSQL prompt, run the following two commands to create a Discourse user and a Discourse database:
postgres=# CREATE USER discourse WITH PASSWORD 'yourpassword';
postgres=# CREATE DATABASE discoursedb WITH OWNER discourse ENCODING 'UTF8';
postgres=# \connect discoursedb
postgres=# CREATE EXTENSION hstore;
postgres=# CREATE EXTENSION pg_trgm;
You might also need to modify PostgreSQL’s configuration to enable md5 authentication; this can be done by editing the file/etc/postgresql/9.1/main/pg_hba.conf. Scroll down to near the bottom of the file and change the second un-commented line from local all all peer to local all all md5. Otherwise, Discourse might not be able to access the database you’ve set up with the credentials you created.
Prepping Postfix
It’s very important that you be able to correctly send and receive mail before installing Discourse, because otherwise you won’t be able to add any new users (or, at least, not wihtout a lot of difficulty). There are lots of different ways to go about doing this; as noted near the beginning of this entry, I’ve got a blog entry on setting up Postfix to relay e-mails through a Google Apps account. An alternative to relaying via Google Apps is relaying via Mandrill.
Actually getting into Postfix configuration would further bloat this already heavily bloated blog entry, though. We’re just going to assume that your web server is already set up to send e-mails and move on.
Actually installing Discourse
With Nginx (almost) done, it’s time to grab Discourse. The fastest and easiest way to do that is to clone down the Github repo where Discourse lives:
$ git clone https://github.com/discourse/discourse.gitWe’re going to set up Discourse to run on its own virtual host rather than in a subdirectory of an exisitng web site, and so I suggest doing this outside of your existing web root (for a fresh Nginx installation, you can clone in /usr/share/nginx, which will create a discourse subdirectory). Make note of where it is; in a moment, we’re going to pop back over to Nginx and create the virtual host config, and we’ll need that directory name.
First, though, we need to configure Discourse’s database options. Navigate to the discourse/config directory and copy the following two sample files as production files:
cp database.yml.sample database.yml
cp redis.yml.sample redis.yml
Then, edit database.yml. In the Production section, change database to the name of the Postgres database you created previously, and un-comment and change the username and password fields to the Postgres user you created. Finally, modify host_names to be the fully qualified domain name of your web server.
    database: discoursedb
    username: discourse
    password: yourpassword
...
    host_names:
      - yourserver.whatever
You might also need to modify redis.yml if you’re already using Redis on your server for other stuff. By default, the included redis.yml file uses db0 for its main database and db2 for its cache database; if you’re already running Redis for other things, it’s highly likely you’re already using one or both of those databases. If needed, modify those two settings in the file accordingly.
Next, we need to install the Ruby bundler tool, which in turn will automatically gather and install all of the various Ruby components Discourse needs to function. Navigate to the discourse directory and run the following two commands:
cd /usr/share/nginx/discourse
gem install bundler
bundle install
It’s important that you execute the bundle install command from inside the discourse directory becuase otherwise bundler won’t know what to do with itself; more, we want to make sure that everything it installs gets installed in the right directory tree so Discourse can find all of its components and tools when it needs them.
The install will take a few minutes while it finds and downloads everything it needs. Once it’s done, we next need to generate Discourse’s secret token, which is used during session cookie generation. There’s a pre-defined rake task for this, so from your Discourse directory type:
rake secretCopy the output to the clipboard, and then open discourse/config/initializers/secret_token.rb for edting. Un-comment the Discourse::Application.config.secret_token line and replace the SET_SECRET_HERE placeholder with the token you just generated, and then delete all of the lines below that. Those are pre-set by the Discourse developers so that you can run Discourse in development and testing mode, which we’re not going to be doing.
Next, from the discourse directory, trigger the built-in precompile task so that Discourse can prep all of its assets. This is an automated process which you kick off with the following command:
rake assets:precompileThen, we’re going to populate our Discourse PostgreSQL database with some sample data. The Discourse devs have already included a handy chunk of data we can use. Dump that data into the production database with the following command (which will prompt you for the password of your Discourse database user):
psql -U discourse discoursedb < pg_dumps/production-image.sqlAfter that, we’ll need to bring our database up to date. Fortunately, there’s a rake task for that. Enter the following command to ensure that the database’s contents are in the form that Discourse will expect:
bundle exec rake db:migrateDaemonizing clockwork and sidekiq
We’re rounding the home stretch, but we’re not quite there yet. Discourse relies on two other Ruby applications, sidekiq and clockwork, to help it run. Clockwork is used for scheduling and running various Discourse tasks, and Sidekiq is used to fire off e-mails and other things. Discourse comes with instructions for running both programs automatically with a Ruby gem called bluepill, but I’d much rather rely on good old init scripts to do the job.
Both sidekiq and clockwork will need somewhere to dump their outputs (which you’ll want to keep so that you can identify any problems with them). So, we’ll create directories for them under /var/log:
mkdir /var/log/sidekiq
chown www-data:adm /var/log/sidekiq
mkdir /var/log/clockwork
chown www-data:adm /var/log/clockwork
Since each daemon will be sending its output to those places as log files, we’ll also need to make logrotate.d entries for each, so that they won’t overflow our whole hard drive. Create the following files with the following contents:
/var/log/sidekiq/*.log {
    weekly
    missingok
    copytruncate
    rotate 12
    compress
    notifempty
}
/var/log/clockwork/*.output {
weekly
missingok
copytruncate
rotate 12
compress
notifempty
}Now we focus on each individually. Daemonizing sidekiq is the eaiser of the two; simply copy the following into a file named /etc/init.d/sidekiq:
#!/bin/bash /etc/init.d/sidekiq
SERVICE=sidekiq
USERNAME="www-data"
SCRIPT_NAME=/etc/init.d/sidekiq
DISCOURSEPATH=/usr/share/nginx/discourse
PIDFILE=/var/run/discourse/sidekiq.pid
LOGFILE=/var/log/sidekiq/sidekiq.log

# Does pifile dir exist? Create it if not.
if [ ! -d "/var/run/discourse" ];
then
    mkdir /var/run/discourse
    chown www-data /var/run/discourse
fi

ME=`whoami`
as_user() {
if [ "$ME" == "$USERNAME" ] ; then
then
    bash -c "$1"
else
    su - $USERNAME -c "$1"
fi
}

sidekiq_invoke() {
if ps ax | grep -v grep | grep -i 'sidekiq 2'> /dev/null
then
    echo "Tried to start but $SERVICE was already running!"
else
    echo "$SERVICE was not running... starting."
    as_user "cd $DISCOURSEPATH && bundle exec sidekiq -d -P $PIDFILE -L $LOGFILE"
    sleep 7
    if ps ax | grep -v grep | grep -i 'sidekiq 2' > /dev/null
    then
        echo "$SERVICE is now running."
    else
        echo "Could not start $SERVICE."
    fi
fi
}

sidekiq_kill() {
if ps ax | grep -v grep | grep -i 'sidekiq 2' > /dev/null
then
    echo "$SERVICE is running...stopping"
    as_user "cd $DISCOURSEPATH && kill -TERM `cat $PIDFILE`"
    sleep 7
else
    echo "$SERVICE was not running."
fi
if ps ax | grep -v grep | grep -i 'sidekiq 2' > /dev/null
then
    echo "$SERVICE could not be shut down... still running."
else
    echo "$SERVICE is shut down."
fi
}

case "$1" in
start)
sidekiq_invoke
;;
stop)
sidekiq_kill
;;
restart)
sidekiq_kill
sidekiq_invoke
;;
status)
if ps ax | grep -v grep | grep -i 'sidekiq 2' > /dev/null
then
    echo "$SERVICE is running."
else
    echo "$SERVICE is not running."
fi
;;
*)
echo "Usage: $SCRIPT_NAME {start|stop|status|restart}"
exit 3
;;
esac
(Thanks to Chris Dyer for his version of the Sidekiq init script, from which I’ve cribbed liberally!)
Clockwork requires a bit more work. Navigate back to the Discourse directory, and install the following two gems:
gem install daemons
gem install clockworkd
Then, create a clockwork init script with the following contents:
#!/bin/bash
SERVICE=clockwork
USERNAME="www-data"
SCRIPT_NAME=/etc/init.d/clockwork
DISCOURSEPATH=/usr/share/nginx/discourse/
CONFPATH=/usr/share/nginx/discourse/config/clock.rb
PIDDIR=/var/run/discourse/
LOGDIR=/var/log/clockwork/

# Does pifile dir exist? Create it if not.
if [ ! -d "/var/run/discourse" ];
then
    mkdir /var/run/discourse
    chown www-data /var/run/discourse
fi

ME=`whoami`
as_user() {
if [ "$ME" == "$USERNAME" ] ; then
    bash -c "$1"
else
    su - $USERNAME -c "$1"
fi
}

clockwork_invoke() {
if ps ax | grep -v grep | grep -i 'clockworkd.clock'> /dev/null
then
    echo "Tried to start but $SERVICE was already running!"
else
    echo "$SERVICE was not running... starting."
    as_user "cd $DISCOURSEPATH && bundle exec clockworkd start -c $CONFPATH --log --log-dir $LOGDIR --pid-dir $PIDDIR"
    sleep 7
if ps ax | grep -v grep | grep -i 'clockworkd.clock' > /dev/null
    then
        echo "$SERVICE is now running."
    else
        echo "Could not start $SERVICE."
    fi
fi
}

clockwork_kill() {
if ps ax | grep -v grep | grep -i 'clockworkd.clock' > /dev/null
then
    echo "$SERVICE is running...stopping"
    as_user "cd $DISCOURSEPATH && bundle exec clockworkd stop -c $CONFPATH --log --log-dir $LOGDIR --pid-dir $PIDDIR"
    sleep 7
else
    echo "$SERVICE was not running."
fi
if ps ax | grep -v grep | grep -i 'clockworkd.clock' > /dev/null
then
    echo "$SERVICE could not be shut down... still running."
else
    echo "$SERVICE is shut down."
fi
}

case "$1" in
start)
clockwork_invoke
;;
stop)
clockwork_kill
;;
restart)
clockwork_kill
clockwork_invoke
;;
status)
if ps ax | grep -v grep | grep -i 'clockworkd.clock' > /dev/null
then
    echo "$SERVICE is running."
else
    echo "$SERVICE is not running."
fi
;;
*)
echo "Usage: $SCRIPT_NAME {start|stop|status|restart}"
exit 3
;;
esac
Lastly, make both the sidekiq and clockwork scripts executable, and set them to auto-start on boot:
chmod +x /etc/init.d/sidekiq
chmod +x /etc/init.d/clockwork
update-rc.d sidekiq defaults
update-rc.d clockwork defaults
Clean-up and Nginx config
We are almost ready to take the plunge. First, though, we need to clean up a bit. We’ve been traipsing all around our Discourse directory as root, but we need to make sure that the www-data user has ownership of all the files there, since that user will be the one Nginx and Passenger use to run Discourse. So, navigate back to the Nginx share directory and chown the Discourse directory and all its contents, like this:
cd /usr/share/nginx
chown -R www-data:www-data discourse/
The very final step—promise!—is setting up a virtual host file for Nginx. We’re going to set up a new vhost and serve Discourse as if it were on its own server; depending on how your LAN is set up and what your hosting situation looks like, you may need to add DNS entries to your local DNS setup and a new A record to your external domain DNS entry to make sure the hostname resolves.
Create a new file in /etc/nginx/sites-available called discourse, and insert the following:
server {
    server_name discourse.yoursite.com;
    root /usr/share/nginx/discourse/public;
    index index.html;
    autoindex off;
    sendfile on;
    passenger_enabled on;
    passenger_set_cgi_param SERVER_PORT 80;

    location ~ ^/t\/[0-9]+\/[0-9]+\/avatar {
        expires 1d;
        add_header Cache-Control public;
        add_header ETag "";
    }

    location ~ ^/assets/ {
        expires 1y;
        add_header Cache-Control public;
        add_header ETag "";
        break;
    }

}
You can optionally also add in an HTTPS section, with mostly the same parameters (crib from earlier blog entries for the best way to do this). Then, symlink the virtual host file into /etc/nginx/sites-enabled and restart Nginx to set it live:
ln -s /etc/nginx/sites-available/discourse /etc/nginx/sites-enabled/discourse
/etc/init.d/nginx restart
Starting sidekiq and clockwork
Let’s also get sidekiq and clockwork started up before we actually visit our Discourse site:
/etc/init.d/sidekiq start
/etc/init.d/clockwork start
When I was creating this blog post, I ran into a weird anomaly at this point. In spite of the fact that I’d previously run bundle install, it appeared as if the Discourse gem bundle hadn’t actually been installed. The first time, bundle install completed with “Your bundle is complete! Use bundle show [gemname] to see where a bundled gem is installed.” I had to run bundle install a second time for it to actually say “Your bundle is complete! It was installed into ./vendor/bundle”. I don’t know if this is something I did incorrectly or not, but just in case you get stuck here with an error that the www-data user can’t find any gems.
Finally accessing Discourse
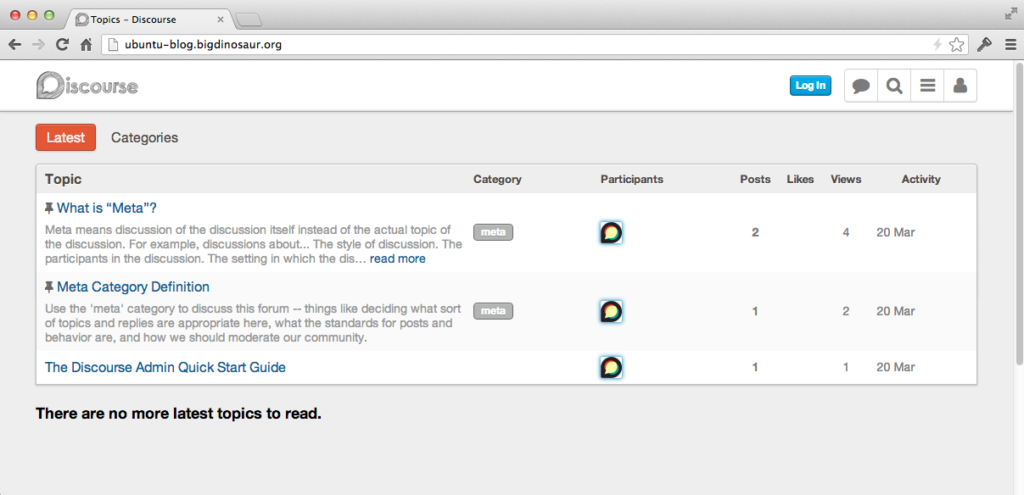
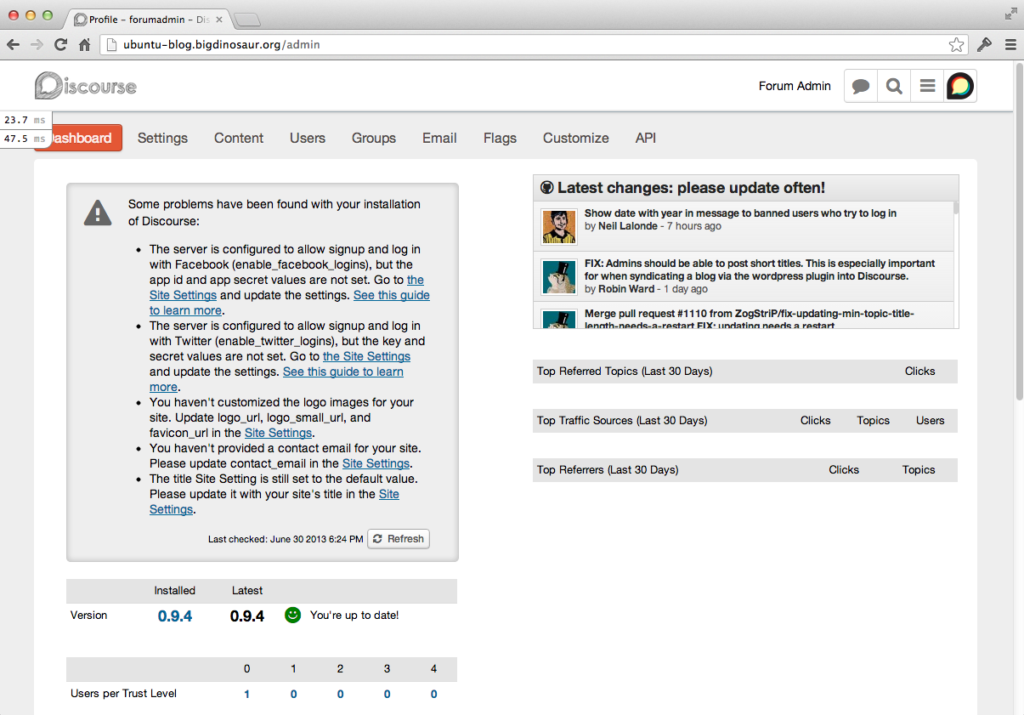
If sidekiq and clockwork successfully start, then cross your fingers and fire up a web browser, because here we go. Point your browser at your new site, and, if everything has come together correctly, you’ll see something like this:
One of the things included in that database dump we used was a pre-created forum administrator account, named forumadmin, with a password of password. Try logging in, then accessing the admin dashboard by clicking first on the forumadmin profile button, then clicking the “admin” button.
Updates
Discourse is still in the phase of constant updates. To ensure you’re running on the latest code, you’ll want to do a git pull at least once a day. The procedure I follow when updating is as follows:
$ sudo /bin/bash
/etc/init.d/clockwork stop && /etc/init.d/sidekiq stop
cd /usr/share/nginx/discourse
git pull https://github.com/discourse/discourse.git
bundle install
rake assets:precompile
RAILS_ENV=production bundle exec rake db:migrate
cd ..
chown -R www-data:www-data discourse /
/etc/init.d/nginx restart
/etc/init.d/clockwork start && /etc/init.d/sidekiq start
The full rigamarole isn’t necessary for every update, but doing it ensures that my gems also stay up to date. Additionally, it’s a good idea to keep an eye on Nginx and Passenger updates; when a new one of either drops, you’ll need to install the new Passenger gem, remove the old one, re-compile Nginx and udpate its configuration file to point at the new Passenger gem.
Where to go from here
This was a long-ass post! From here, you’ll want to do some basic setup and maintenance on your forum: change the admin user name and password, obviously, and update the graphics with your own. Then, visit other Discourse forums to see how others have things configured! Mine is here, but probably the most important one on the web is the Discourse Meta forum, where the developers can be found. There’s also the new BoingBoing BBS, which just shifted over to Discourse. A mostly-current list of Discourse forums can be found in this thread on Meta.
It’s also easy to add HTTPS support via Nginx, or Varnish support. For Varnish, I’m using the following entry in my vcl file under sub vcl_recv:
# Cache only the static assets in Discourse's "assets" dir and pass everything else
if (req.http.host ~"discourse.bigdinosaur.org") {
    if (!(req.url ~ "^/assets/")) {
        return (pass);
}
Enjoy your new, flashy, Ruby-based forum!