
This is an old post. It may contain broken links and outdated information.

I’m a huge fan of StartCom’s StartSSL service—these days there are no few certificate authorities who will get you free or low-cost SSL/TLS certificates, but the customer service experiences I’ve had with StartSSL have been outstanding. They respond to e-mail very quickly, sometimes within minutes, and that’s what keeps me using them.
Bigdinosaur.org has been rocking the HTTPS ever since I came across this Ars Technica article a couple of years ago detailing how to get free SSL/TLS certificates for your web site. Once you start using real CA-generated certificates, you quickly realize how awesome it is to no longer have to deal with the hassle of self-signed certificates and worthless browser security warnings; I wanted a certificate for everything! The easiest way to do that, actually, is with what’s called a “wildcard” certificate, so named becaue instead of being valid for just a single host name, the certificate is valid for several. Shortly after signing up for free class 1 SSL/TLS certs from StartSSL, I went back and paid the fee for a class 2 identity validation, which then gave me the right to get as many class 2 certificates as I wanted—and, more importantly, gave me the ability to request wildcard certificates, too. Rather than deal with several certs for the several hosts that make up Bigdinosaur.org, I opted for a single wildcard certificate that covers *.bigdinosaur.org.
It was great and I installed it everywhere. The Bigdino web server uses it, my firewall uses it, postfix uses it, Murmur (the Mumble voice chat server we used for Minecraft) uses it, and even the Bigdino Openfire Jabber/XMPP instant messaging server uses it. In fact, this morning I got the notice that it had been two years since I’d generated the wildcard certificate, and it needed to be renewed. I spent a few minutes plugging the new certificate in to all the places where it needed to go, but I was a bit stymied by Openfire. I recalled going through some gymnastics to get the certificate installed on it a couple of years ago, but like a fool I didn’t write anything down, and so I had to embark on a long Google hunt to recreate whatever the hell I’d done in 2009.
Openfire makes it pretty darn easy to generate a self-signed certificate, or to generate a certificate signing request that you can send to your certificate authority, but it’s a little more difficult to take an existing certificate and import it. No small part of the problem is caused by Openfire’s web console not actually doing what you think it’s going to do when you attempt to import new certificates. Fortunately, several others have gone down this road before, and so here’s the procedure I pieced together from several different web sites and from posts on Openfire’s forum, particularly this one.
Assumptions
Going in, we’re going to make the following assumptions:
- You have already generated an SSL/TLS certificate (wildcard or otherwise) and you have it and its corresponding private key
- You have already installed and configured Openfire
- You’re running Openfire on GNU/Linux
If you haven’t done the first or second, then you probably should go do and do them if you’re planning on following along. As to the third, while the actual commands given herein will be for Linux, the steps are the same for Windows—you’ll just have to figure out what to type on your own.
First: prep
We’re going to need to get your certificate and private key converted to binary format, if they’re not already, so let’s do that first. If you’ve installed Openfire from a repository, the directory in which we’ll need to be working is owned by the openfire user account and is locked down, so we’ll open a shell as root so that we can work.
sudo /bin/bash
cd /etc/openfire/security
Then, using OpenSSL, convert your certificate and private key. I’m running Openfire on my web server, so the certificate and key are already on the server in /etc/ssl and /etc/ssl/private; if they’re on a different box, copy them locally and then proceed.
openssl x509 -in /etc/ssl/my_cert.crt -inform PEM -out ./cert.der -outform DER
openssl pkcs8 -topk8 -nocrypt -in /etc/ssl/private/decrypted_key.pem -inform PEM -out ./key.der -outform DER
Since I’m using a class 2 certificate, I have an intermediate CA certificate that I also need to convert and use; if you’re using a class 1 certificate, this step won’t be necessary.
openssl x509 -in /etc/ssl/c2-intermed.crt -inform PEM -out ./c2-intermed.der -outform DERClass 2 users will then need to concatenate the server certificate and the intermediate certificate together to form a chain certificate:
cat cert.der c2-intermed.der > chaincert.derWe now need to go compile a Java application real quick, because the Java Keytool command we’re going to use in a minute for viewing and deleting things in the Openfire keystore doesn’t actually have the ability to add things to it. Yes, that’s retarded, but this fine fellow has written a solution for us. Copy the following text into a file and name it KeyStoreImport.java:
//
// KeyStoreImport.java
//
// Adds a specified certificate chain and associated RSA private key
// to a Java keystore.
//
// Usage: java KeyStoreImport KEYSTORE CERTS KEY ALIAS
//
//              KEYSTORE is the name of the file containing the Java keystore
//              CERTS is the name of a file containing a chain of concatenated
//                      DER-encoded X.509 certificates
//              KEY is the name of a file containing a DER-encoded PKCS#8 RSA
//                      private key
//              ALIAS is the alias for the private key entry in the keystore
//
// ©Neal Groothuis
// 2006-08-08
//
// This program is free software; you can redistribute it and/or modify
// it under the terms of the GNU General Public License as published by
// the Free Software Foundation; either version 2 of the License, or
// (at your option) any later version.
//
// This program is distributed in the hope that it will be useful,
// but WITHOUT ANY WARRANTY; without even the implied warranty of
// MERCHANTABILITY or FITNESS FOR A PARTICULAR PURPOSE.  See the
// GNU General Public License for more details.
//
// You should have received a copy of the GNU General Public License
// along with this program; if not, write to the Free Software
// Foundation, Inc., 51 Franklin St, Fifth Floor, Boston, MA  02110-1301  USA
//
import java.security.*;
import java.security.spec.*;
import java.security.cert.*;
import java.io.*;
import java.util.*;

public class KeyStoreImport {

public static void main(String args[]) {
try {
// Meaningful variable names for the arguments
String keyStoreFileName = args[0];
String certificateChainFileName = args[1];
String privateKeyFileName = args[2];
String entryAlias = args[3];

// Get the password for the keystore.
System.out.println("Keystore password:  ");

String keyStorePassword = (new BufferedReader(
new InputStreamReader(System.in))).readLine();

// Load the keystore
KeyStore keyStore = KeyStore.getInstance("jks");
FileInputStream keyStoreInputStream =
new FileInputStream(keyStoreFileName);
keyStore.load(keyStoreInputStream, keyStorePassword.toCharArray());
keyStoreInputStream.close();

// Load the certificate chain (in X.509 DER encoding).
FileInputStream certificateStream =
new FileInputStream(certificateChainFileName);
CertificateFactory certificateFactory =
CertificateFactory.getInstance("X.509");
// Required because Java is STUPID.  You can't just cast the result
// of toArray to Certificate[].
java.security.cert.Certificate[] chain = {};
chain = certificateFactory.generateCertificates(certificateStream).toArray(chain);
certificateStream.close();

// Load the private key (in PKCS#8 DER encoding).
File keyFile = new File(privateKeyFileName);
byte[] encodedKey = new byte[(int)keyFile.length()];
FileInputStream keyInputStream = new FileInputStream(keyFile);
keyInputStream.read(encodedKey);
keyInputStream.close();
KeyFactory rSAKeyFactory = KeyFactory.getInstance("RSA");
PrivateKey privateKey = rSAKeyFactory.generatePrivate(
new PKCS8EncodedKeySpec(encodedKey));

// Add the new entry
System.out.println("Private key entry password:  ");

String privateKeyEntryPassword = (new BufferedReader(
new InputStreamReader(System.in))).readLine();
keyStore.setEntry(entryAlias,
new KeyStore.PrivateKeyEntry(privateKey, chain),
new KeyStore.PasswordProtection(privateKeyEntryPassword.toCharArray())
);

// Write out the keystore
FileOutputStream keyStoreOutputStream =
new FileOutputStream(keyStoreFileName);
keyStore.store(keyStoreOutputStream, keyStorePassword.toCharArray());
keyStoreOutputStream.close();
}

catch (Exception e) {
e.printStackTrace();
System.exit(1);
}
}
}
Then, save it and compile it:
javac KeyStoreImport.javaWith that bit of ridiculousness out of the way, all of the pieces are in place.
Next: plug it in
Stop Openfire with /etc/init.d/openfire stop, and then let’s take a peek inside Openfire’s truststrore file for our SSL/TLS certificate authority’s name. We need to make sure that it’s listed, because otherwise our certificates won’t be considered valid since Openfire won’t recognize the issuer. To check, we’re going to use the Java Keytool command:
keytool -list -keystore truststoreYou’ll be prompted for a password, which by default is changeit, unless you did what it told you to do and changed it (and we’ll cover that shortly). Scan through the list (or re-run the command and pipe it through grep) and look for your CA’s name; if it’s not there, then we’ll need to import your CA’s root certificate. This should be easy for you to get (if you’re using StartSSL, for example, it’s right here). Unlike with the server and intermediate certificates, you don’t have to convert this one to binary format—just add it directly to the truststore file with keytool.
Before we go about changing things willy-nilly, though, let’s make backups of the two files we’re going to be modifying:
cp truststore truststore-knowngood
cp keystore keystore-knowngood
Now that we have something to revert back to in case of disaster, go ahead and import your CA’s root certificate like this:
keytool -importcert -alias "myrootca" -keystore truststore -file ca.cerYou’ll be challenged for the password again. After the operation is complete, re-run the keytool -list command from above and verify that the certificate imported correctly.
The next step is to add your server’s SSL/TLS certificate (or its chain certificate) and private key into the truststore file. We’re going to be removing anything else inside the truststore as well. If this is the first time you’ve done this, the only thing in the file is going to be the Openfire self-signed cert; if you’re like me and doing this again to replace an expiring certificate with a fresh one, the only thing in the truststore should be the expiring cert. Either way, let’s clean ’em out.
First list the truststore’s contents:
keytool -list -keystore keystoreYou’ll get prompted for a password (changeit), and then you should get back some text saying “Your keystore contains 1 entry”, with that entry below. The entry will start off with its alias, which is how the system identifies each entry. If this is the first time you’ve done this, you might have two entries instead of one, named “rsa” and “dsa” or something similar. However many there are, we’re going to get rid of them, using the alias as the identifier:
keytool -delete -keystore keystore -alias <alias of first entry>
keytool -delete -keystore keystore -alias <alias of second entry>
...
However many there are, remove all of them.
Next, import your certificate and key. For this, we have to use the little Java program we compiled a moment ago, because as I mentioned above, the keytool command we’ve been using doesn’t have the ability to import keys. Which is stupid. But whatever. Run this command, using cert.der for your regular certificate or chaincert.der if you had to create a chain certificate above:
java KeyStoreImport keystore cert.der key.der "alias-you-want-for-this-entry"You will be prompted for two passwords—the first is the one or the keystore, which is changeit, as you should know by heart now. However, you will also be prompted for a password to apply to the private key. This password will need to be supplied by Openfire when it launches so that it can unlock the private key and use it; Openfire is configured by default to use changeit for this password as well. So, for now, set this to changeit so that we can start up Openfire and verify that everything works, and we’ll modify the passwords in a future blog entry.
After the import is done, re-list the keystore’s contents and verify that the import was successful. If you see your new certificate listed, then it’s time to start Openfire back up with /etc/init.d/openfire start and try things out.
Seeing if it worked
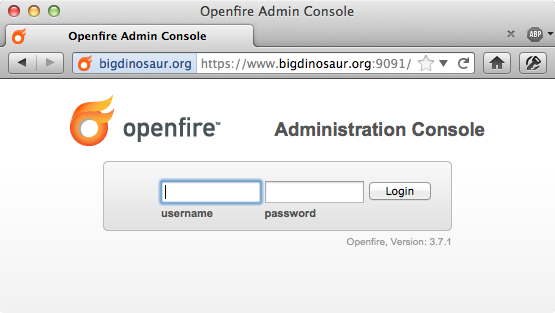
You could check the Openfire error log at /var/log/openfire/error.log, or you could just trust that you did everything right and try to hit the secure version of the openfire web console at https://servername:9091. If everything worked, you’ll be able to tell immediately because the address bar will indicate a good encrypted connection and a valid certificate:
If the site times out, check and see if the non-encrypted version is available on :9090; if it is, Openfire has started but is unable to read the certificate from the keystore, and you should check the Openfire error log (referenced above) for clues.
However, if everything appears as expected, go ahead and log on to the Openfire console. If you’re using a wildcard certificate, you might get a yellow caution splat by the server name on the Server Information tab:
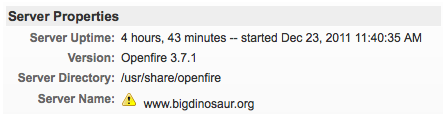
This is because the listed server name doesn’t match the name on the certificate—and it won’t, since in my case the certificate is for *.bigdinosaur.org and the server name is www.bigdinosaur.org.
To view the details of the certificate you installed, click the “Server Settings” tab, and then click “Server Certificates” in the left column. You should see your certificate listed and it should appear as correctly signed:

This is because Openfire expects both an RSA and DSA certificate to be installed; we’ve only given it an RSA certificate. You can safely ignore this warning—your certificate is functioning properly.
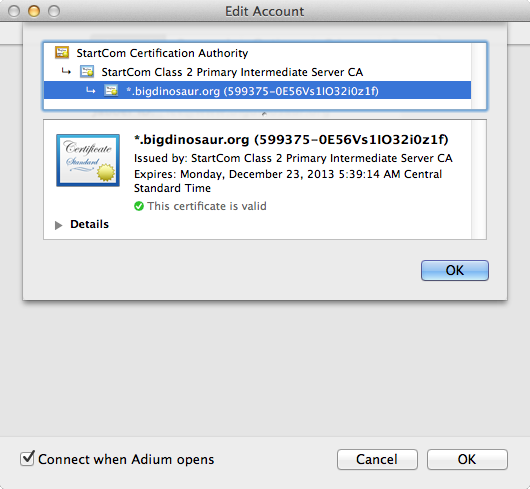
The last check, of course, is to connect to the server with your IM client using the SSL/TLS port, and then have your IM client retrieve the server’s certificate. This shouldn’t be a problem, since we’ve gotten this far already and Openfire shows everything working, but it’s always good to check:
Next steps
Now that we’ve got the cert installed (or reinstalled!), there are some additional things you can set to ensure that the server and the clients both are using SSL/TLS for authentication and communciation. I tackle that in this blog post.