
Note: I no longer use key pinning and support for the feature is deprecated in Chrome. Proceed at your own risk.

Public key pinning is scary. The technology’s purpose is to allow website owners to include a cryptographic fingerprint in outgoing HTTP headers that corresponds with the fingerprint of the server’s certificate; if the fingerprint in the headers doesn’t match the actual fingerprint, it could be evidence that something nefarious is going on. You might be the victim of a MITM attack, or the site might have been compromised, or you might be accessing a fake version of the site that has a legitimate (but falsely-issued) SSL/TLS certificate.
The scary part is that as with HSTS, a mistake with your HPKP configuration can make your site unreachable—potentially for a long time.
So why the hell do it?
Security researcher Scott Helme has some in-depth thoughts on HPKP, as does SSL Labs’ Ivan Ristic. The short version is that HPKP provides a significant amount of protection against a number of different potential attacks. The problem is that it does so with a pretty heavy hand; browsers presented with mis-matched HPKP fingerptints will block the display of a site for as long as the HPKP header has instructed them to, and that period of time might be weeks, months, or years. A misconfigured HPKP header will ruin potentially a lot more than just your day.
In spite of the scariness, HPKP is a useful thing to implement—it’s just got to be done right. Personally, I decided to push forward with my own HPKP setup for the same reason that I usually jump head-first into stuff like this: just like jumping head-first into a cold swimming pool, it’s best to get it over with.
As usual, some caveats before we start
Before we get rolling, let’s cover some basics: we’re going to be using LetsEncrypt’s certbot tool, which comes with LetsEncrypt; that will make these instructions broadly applicable to just about anyone. There are many other ways to get this done, though—if you’d prefer to use a different tool, knock yourself out!
We’re going to do our HPKP implementation by “pinning at the leaf”—that is, by presenting fingerprints that correspond to the leaf certificate. The leaf certificate is the final certificate in a chain and is usually the server’s own SSL/TLS certificate. You can pin at other levels in the chain, too—you could, for example, pin “at the root” and present the fingerprints of the root CA certificate. There are pros and cons for each level of pinning; we’ll be pinning at the leaf both because it potentially offers more security than pinning higher in the stack, and also because it gives us a lot more control over the end user experience. If you pin higher and your CA changes its root or intermediate certificates (something LetsEncrypt has done at least once) then you’re screwed unless you’ve done some extensive pre-planning and have some alternate pins ready to go. (Which you absolutely should! and I’ll tell you how in just a bit.)
Finally, we’re going to implement this with discrete certificates, instead of one mega-certificate that covers all your subdomains with SAN entries. Actually, that’s not quite true—we’re going to do one SAN certificate for two hostnames, and then two certificates for the two remaining hostnames. This will show both methods (and it also makes things easy if you’re doing a www redirect for your domain).
HAProxy configuration
The web stack here at BigDinosaur.org starts with HAProxy, which I’m using for SSL termination. When running in HTTP mode, HAProxy has the ability to stick its fingers into the stream and route traffic based on certain conditions, and so we need to make sure HAProxy listens for the ACME requests made by LetsEncrypt and send them not down the stack to the cache layer and web server, but rather to the TCP port where certbot is waiting to answer those requests.
We did this in a past tutorial, but I’ve updated my configuration since then. Let’s go over the relevant bits from the HAProxy configuration I’m using now:
frontend mainredirect
	mode http
	bind :::80 v4v6 # Use this for IPv4 and IPv6
	#bind *:80      # Use this for IPv4 only
	acl letsencryptrequest path_beg -i /.well-known/acme-challenge/
	use_backend letsencrypt if letsencryptrequest
	acl http ssl_fc,not
	http-request redirect scheme https if http !letsencryptrequest
	default_backend dummy

...

backend letsencrypt
	mode http
	server local 127.0.0.1:54321

backend dummy
	mode http
	server local 127.0.0.1:9999
From top to bottom, we’re first setting up a new frontend, called mainredirect because that’s where I’m doing all of my redirections. The bind statement listens on TCP port 80 for incoming IPv4 or IPv6 traffic (comment out the first bind and uncomment the second if you’re only using IPv4).
The acl letsencryptrequest matches TCP requests that include /.well-known/acme-challenge/ in the URN, and then the use_backend statement shoves those matching requests to the letsencrypt backend (which points at TCP port 54321 on localhost).
The rest of the redirect frontend redirects HTTP traffic to HTTPS, but only if the traffic doesn’t match the letsencryptrequest ACL. Finally, the dummy backend needs to be declared or HAProxy will complain, but it can point at anything, since it should never be used.
Now make some keys
The next step in the process is to generate the private keys we’re going to be using for our LetsEncrypt certificates. We need to make three keys per host. In our example, we’ll use four hostnames: example.com, www.example.com, forum.example.com, and blog.example.com. We’ll do some SAN magic so that example.com and www.example.com share the same key and certificate, so our total discrete certificate count will be three.
Three certificates means we need to make nine keys. But why so many? Why do we need three keys per host?
Because HPKP is unforgiving, and we need to build some backup plans into our rollout. Remember that HPKP matches a fingerprint in your HTTP headers against the actual fingerprint of your server’s certificate; if the server’s fingerprint ever changes and stops matching the headers, HPKP-compliant web browsers will refuse to display your site. But HPKP allows you to include multiple fingerprints for each hostname, and as long as any one of those fingerprints matches, your site will load.
So, we’re going to generate three keys—and three sets of prints—for each of our three hostnames. If there’s ever a problem with the first key (if we lose it, or if it’s compromised, or if we screw up something with our certificate generation), we can throw it out and shift to one of our two backups keys, re-generate a new certificate from that key, and keep on serving pages.
(N.B. You might, depending on your level of paranoia, want to generate these keys offline, on a computer you control at your home rather than directly on the web server. When we’re done we’re going to remove the spare keys from the server, but the ultra-paranoid might feel better about never having them there in the first place.)
First, get yourself a root shell open by whatever method makes you happy so we don’t have to put sudo in front of every single command we’re doing. Then generate your keys using OpenSSL from the command line, and make sure they’re set so they can only be read by root:
cd /etc/ssl/private
openssl genrsa -out www.example.com.0001.key 4096
openssl genrsa -out www.example.com.0002.key 4096
openssl genrsa -out www.example.com.0003.key 4096
openssl genrsa -out blog.example.com.0001.key 4096
openssl genrsa -out blog.example.com.0002.key 4096
openssl genrsa -out blog.example.com.0003.key 4096
openssl genrsa -out forum.example.com.0001.key 4096
openssl genrsa -out forum.example.com.0002.key 4096
openssl genrsa -out forum.example.com.0003.key 4096
chmod 400 ./*.key
Next, generate CSRs (certificate signing requests) for each of the keys. We’re going to be using these CSRs with certbot later, and they’re the trick to this entire operation—using CSRs with LetsEncrypt instead of letting it come up with new keys each time is what makes leaf-pinning with LetsEncrypt possible.
openssl req -new -key www.example.com.0001.key -sha256 -out www.example.com.0001.csr
openssl req -new -key www.example.com.0001.key -sha256 -out www.example.com.0002.csr
openssl req -new -key www.example.com.0001.key -sha256 -out www.example.com.0003.csr
(...and so on)
The CSRs will ask for several pieces of information, but the only field we care about is the “Common Name” field. For that, we’ll need to enter the fully qualified hostname we want on that certificate. For every other field, enter a . so that the field will be blank (or put whatever you’d like in there). The resulting output for each CSR will look like this when you’re done:
You are about to be asked to enter information that will be incorporated
into your certificate request.
What you are about to enter is what is called a Distinguished Name or a DN.
There are quite a few fields but you can leave some blank
For some fields there will be a default value,
If you enter '.', the field will be left blank.
-----
Country Name (2 letter code) [AU]:.
State or Province Name (full name) [Some-State]:.
Locality Name (eg, city) []:.
Organization Name (eg, company) [Internet Widgits Pty Ltd]:.
Organizational Unit Name (eg, section) []:.
Common Name (e.g. server FQDN or YOUR name) []:www.example.com
Email Address []:.

Please enter the following 'extra' attributes
to be sent with your certificate request
A challenge password []:.
An optional company name []:.
You’ll need to do this nine times (once for each key, with three keys per host). You don’t need a separate CSR for the main domain name, as we’ll be using an extra SAN on the www certificate to cover it.
Then, generate the cryptographic fingerprints. The command below will output the fingerprints to stdout, so write them down or dump into a text file because we’ll need them again in a few more steps:
openssl req -pubkey < www.example.com.0001.csr | openssl pkey -pubin -outform der | openssl dgst -sha256 -binary | base64
openssl req -pubkey < www.example.com.0002.csr | openssl pkey -pubin -outform der | openssl dgst -sha256 -binary | base64
openssl req -pubkey < www.example.com.0003.csr | openssl pkey -pubin -outform der | openssl dgst -sha256 -binary | base64
(...and so on)
Putting the files in place
Now we’re going to build our directory and file structure so that our scripts work and so that HAProxy can get to them easily. Either do this with a root shell or use sudo for everything.
cd /etc/ssl/private
mkdir hpkp
mkdir hpkp/www.example.com
mkdir hpkp/blog.example.com
mkdir hpkp/forum.example.com
mv www.example.com.000*.* hpkp/www.example.com
mv blog.example.com.000*.* hpkp/blog.example.com
mv forum.example.com.000*.* hpkp/forum.example.com
Next, copy the 0002 and 0003 keys for all of your hosts to your local computer. Make sure you have them copied locally. Verify they’re the same, and then delete the 0002 and 0003 keys. Why are we doing this? Because these keys are your backup keys, for use as a last resort if you either bork your HPKP configuration or if your server is somehow compromised. For that reason, you want to store them somewhere not on the server (preferably somewhere offline, like on a USB stick in a fire safe). Make sure you copy these keys before you delete them or you will not have a good time.
Once you’ve copied them (are you sure you’ve copied them? It wouldn’t hurt to double check!), delete them from the server. Obviously, do not delete your local copy. That would be dumb and bad.
rm hpkp/www.example.com/www.example.com.0002.*
rm hpkp/www.example.com/www.example.com.0003.*
rm hpkp/blog.example.com/blog.example.com.0002.*
rm hpkp/blog.example.com/blog.example.com.0003.*
rm hpkp/forum.example.com/forum.example.com.0002.*
rm hpkp/forum.example.com/forum.example.com.0003.*
Then, finally, rename the remaining files so that you can easily reference them in the LetsEncrypt script we’re going to be implementing in the next step:
mv hpkp/www.example.com/www.example.com.0001.key hpkp/www.example.com/current.key
mv hpkp/www.example.com/www.example.com.0001.csr hpkp/www.example.com/current.csr
mv hpkp/blog.example.com/blog.example.com.0001.key hpkp/blog.example.com/current.key
mv hpkp/blog.example.com/blog.example.com.0001.csr hpkp/blog.example.com/current.csr
mv hpkp/example.com/forum.example.com.0001.key hpkp/forum.example.com/current.key
mv hpkp/example.com/forum.example.com.0001.csr hpkp/forum.example.com/current.csr
Whip up a script
Now it’s time for our HPKP-compliant LetsEncrypt script. This is an adaptation of the BrixIT script I used in my previous blog post about HSTS, with a few CSR-specific modifications. Save the following script as /usr/local/bin/le-renew-hpkp.sh:
#!/bin/bash

# Path to certbot
LE_TOOL=/opt/letsencrypt/certbot-auto

# Directory where the acme client puts the generated certs
LE_OUTPUT=/etc/letsencrypt/live

# Place where CSRs live
LE_CSRDIR=/etc/ssl/private/hpkp

# FQDN to use
LE_DOMAIN=$1

# Create or renew certificate for the domain(s) supplied for this tool
cd /$LE_CSRDIR/$LE_DOMAIN
$LE_TOOL --agree-tos --force-renewal --standalone --preferred-challenges http-01 --http-01-port 54321 certonly --csr $LE_CSRDIR/$LE_DOMAIN/current.csr

# Cat the certificate chain and the private key together for haproxy
cat $LE_CSRDIR/$LE_DOMAIN/0001_chain.pem $LE_CSRDIR/$LE_DOMAIN/current.key > /etc/haproxy/ssl/${1}.pem
chmod 400 /etc/haproxy/ssl/${1}.pem

# Reload the haproxy daemon to activate the cert
systemctl reload haproxy

# Cleanup
rm $LE_CSRDIR/$LE_DOMAIN/0000_cert.pem
rm $LE_CSRDIR/$LE_DOMAIN/0000_chain.pem
rm $LE_CSRDIR/$LE_DOMAIN/0001_chain.pem
The script takes one input: the hostname you’re using. Briefly from the top, the script defines the paths we’re going to be working with, and then executes certbot with a set of options that instruct it to use the http-01 challenge, to listen on TCP port 54321, and to generate a certificate for the supplied hostname using the proper CSR for that hostname.
Then, the script concatenates the certificate chain and the private key into a single file, sets strict permissions on the file (because, remember, it contains a decrypted private key) and puts that file where HAProxy can read it. Then the script reloads HAProxy and deletes the temporary files created by certbot.
Actually, make two scripts
Ah, but—we need a different set of options for the example.com and www.example.com shared certificate. Specifically, we need to tell certbot to ask LetsEncrypt to create the certificate for both hostnames.
Someone better at scripting than I am could probably do all this with a single script with some simple logic in it; I am bad at scripting, so I use two scripts. Here’s the modified script for the SAN certificate. Create it as /usr/local/bin/le-renew-hpkp-www.sh:
#!/bin/bash

# Path to the letsencrypt-auto tool
LE_TOOL=/opt/letsencrypt/letsencrypt-auto

# Directory where the acme client puts the generated certs
LE_OUTPUT=/etc/letsencrypt/live

# Place where CSRs live
LE_CSRDIR=/etc/ssl/private/hpkp

# FQDN to use
LE_DOMAIN=$1

# Create or renew certificate for the domain(s) supplied for this tool
cd /$LE_CSRDIR/$LE_DOMAIN
$LE_TOOL --agree-tos --force-renewal --standalone --preferred-challenge http-01 --http-01-port 54321 certonly --csr $LE_CSRDIR/$LE_DOMAIN/current.csr -d www.example.com,example.com

# Cat the certificate chain and the private key together for haproxy
cat $LE_CSRDIR/$LE_DOMAIN/0001_chain.pem $LE_CSRDIR/$LE_DOMAIN/current.key > /etc/haproxy/ssl/${1}.pem
chmod 400 /etc/haproxy/ssl/${1}.pem

# Reload the haproxy daemon to activate the cert
systemctl reload haproxy

# Cleanup
rm $LE_CSRDIR/$LE_DOMAIN/0000_cert.pem
rm $LE_CSRDIR/$LE_DOMAIN/0000_chain.pem
rm $LE_CSRDIR/$LE_DOMAIN/0001_chain.pem
The scripts are exactly the same, except that the line that executes certbot includes an extra -d option to specify the two domains we want the certificate to cover.
Then mark both scripts as executable:
chmod +x /usr/local/bin/le-renew*.shRearrange your HAProxy certificates (if needed)
The last step before we pull the trigger on this is to rearrange your HAProxy certificates so that they’re in the right place. This step is necessary because HAProxy has to be able to read in the new certificates, and we’re enabling that to happen by ensuring the new certificates have the same name and location as the old ones.
(This leads to a potential issue, though—an aborted certbot run can overwrite a good certificate with an incomplete bad one. It’s best to keep a copy of your HAProxy certificate files in a subdirectory or something. Or come up with a better method than this and let me know so I can do that instead!)
If you have existing certificates, move and rename them as necessary so that each certificate is named like www.example.com.pem (in other words, the fully-qualified domain name and a PEM extension), and they’re all located in /etc/haproxy/ssl. Then modify your HAProxy config file to reflect this:
crt-base /etc/haproxy/ssl

...

frontend mainfront
	# Use 'bind *:443 ssl' instead if IPv4 only
	bind :::443 v4v6 ssl crt /etc/haproxy/ssl/www.example.com.pem \
	                     crt /etc/haproxy/ssl/blog.example.com.pem \
	                     crt /etc/haproxy/ssl/forum.example.com.pem \
	                     ecdhe secp384r1 alpn h2,http/1.1 #customize as needed
...
Once everything’s in the right place, reload HAProxy:
systemctl reload haproxy…and then we can pull the trigger. Well, okay, almost. We need to test everything out first.
Doing a dry run
For maximum caution, let’s do a quick dry run to make sure everything’s going to work properly. Execute the following command for one of your subdomains:
/opt/letsencrypt/certbot-auto --dry-run --agree-tos \
--force-renewal --standalone --preferred-challenges \
http-01 --http-01-port 54321 certonly --csr \
/etc/ssl/private/hpkp/forum.example.com/current.csr
You don’t need to supply the hostname, since that gets picked up from the CSR.
If your dry run is successful, the output from certbot ought to look something like this:
Saving debug log to /var/log/letsencrypt/letsencrypt.log
Performing the following challenges:
http-01 challenge for forum.example.com
Waiting for verification...
Cleaning up challenges

IMPORTANT NOTES:
 - The dry run was successful.
(If you’ve never used certbot before, the initial execution might take a bit of time as it has to bootstrap its virtual environment. It’ll also print a lot stuff on the screen while it does so. Eventually, though, it’ll finish bootstrapping and should output something similar to the above.)
Generating those certificates
If the dry run completes successfully, then you’re ready to run the scripts for real. Fire ’em off, one at a time, and as each one successfully completes, you should be able to navigate to your sites and view the new certificates in action:
# Do this as root or everything will fail
/usr/local/bin/le-renew-hpkp.sh forum.example.com
/usr/local/bin/le-renew-hpkp.sh blog.example.com
And for your www and main domain certificate, use the second script:
# Do this as root or everything will fail
/usr/local/bin/le-renew-hpkp-www.sh www.example.com
If the scripts complete successfully, then congrats: your LetsEncrypt configuration is now HPKP-friendly, and we can move onto the next step.
Actually implementing HPKP
HPKP is controlled via the HTTP headers sent from your web server. To activate HPKP, we need to modify those headers. This could potentially be done at any layer in your stack; I’ll share two implementations here.
Remember those fingerprints you wrote down a few steps back? Get ’em handy, because it’s time to use them!
The Nginx way
The simplest method is to set the headers in the web server’s configuration. For Nginx, you’d do this by editing the vhost file of each one of your hostnames, and adding the following lines. Make sure to substitute in your fingerprints for that hostname (the ones in the example are mine, and won’t for you):
add_header Public-Key-Pins 'pin-sha256="OgTIdBRPZ0StuwYBTf4kkCzAvp8e4+uTr2/qVhtnRVY="; \
pin-sha256="0omV1UV4TeKqplA30kW/wsKwycISOfoyj+6sSWYkNdQ="; \
pin-sha256="YOdesi5bRtcos8t7BLGMT+1A4EqMILtB+xKCuQlC/V8="; \
max-age=5';
The max-age component of the header is particularly important because that defines how long in seconds your browser will go before re-computing your site’s fingerprint and reassessing the pinning for your site. If you’ve got something messed up in your HPKP config, a max-age of 5 seconds means you’ll only be locked out from accessing your site for no more than five seconds.
The Varnish way
If your web stack has a cache layer, that’s also a good place to modify your headers—I prefer to do it that way over and save time versus passing those requests down the stack to the web server layer.
To make Varnish set your HPKP headers, add the following lines to your Varnish config’s sub vcl_deliver stanza:
if (req.http.host ~ "www.example.com" ) {
	set resp.http.Public-Key-Pins = {"pin-\
	sha256="7IjrQab9uQmCR98M+b3EYhC/G2GF4hZkJBHXv8xs9Sw="; \
	pin-sha256="qvjy4gWppACpa7eDZaJEsC67Lt4hxSnmkoNvlwqGJ9I="; \
	pin-sha256="iPUIMTeJlbpStrWLzZuiXGYziGAmkaDO38iqFcrmSks="; \
	max-age=5"};
}

if (req.http.host ~ "blog.example.com" ) {
	set resp.http.Public-Key-Pins = {"pin-\
	sha256="c9uxTwWtICkYpcdzLKrxYKKDfTJdCr2vCjUEaJHnI1M="; \
	pin-sha256="n7u8UYS4WE/UAvm+CgHAmHzttL0iNaFNatLyuDcTHjY="; \
	pin-sha256="RF/QlRsg/RTGqGxaElP5onv254RI/N4RcWF+DcF6ugI="; \
	max-age=5"};
}

if (req.http.host ~ "forum.example.com" ) {
	set resp.http.Public-Key-Pins = {"pin-\
	sha256="GrOq0+EiXg5YD1E9jHxrAtvzrLtPuQXdHYrNQtf+YBA="; \
	pin-sha256="Iks6mLGy8AfIKSW5aqyifXKd9owuwB9ZCqmMrSSQJnI="; \
	pin-sha256="c+HLHkpUsFlVkpJEaDixo+5Dx5hOghZaoduWhwUYsRw="; \
	max-age=5"};
}
Test and verify
Once your hosts’ configurations have been updated, reload Nginx or Varnish and view the headers on your site. If everything’s going well, you should see the public-key-pins header in the list, like this:
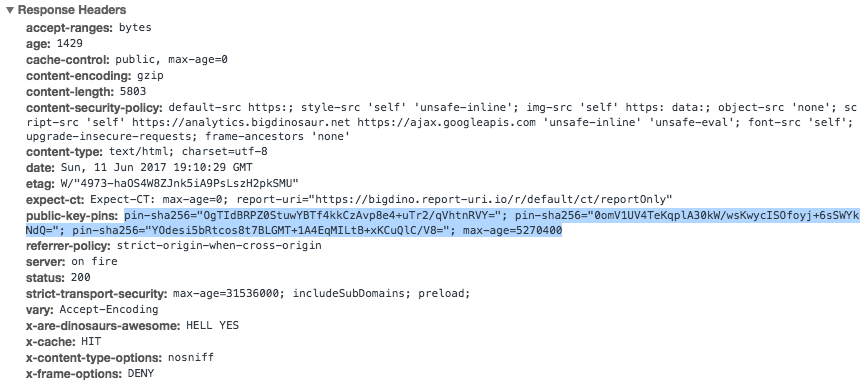
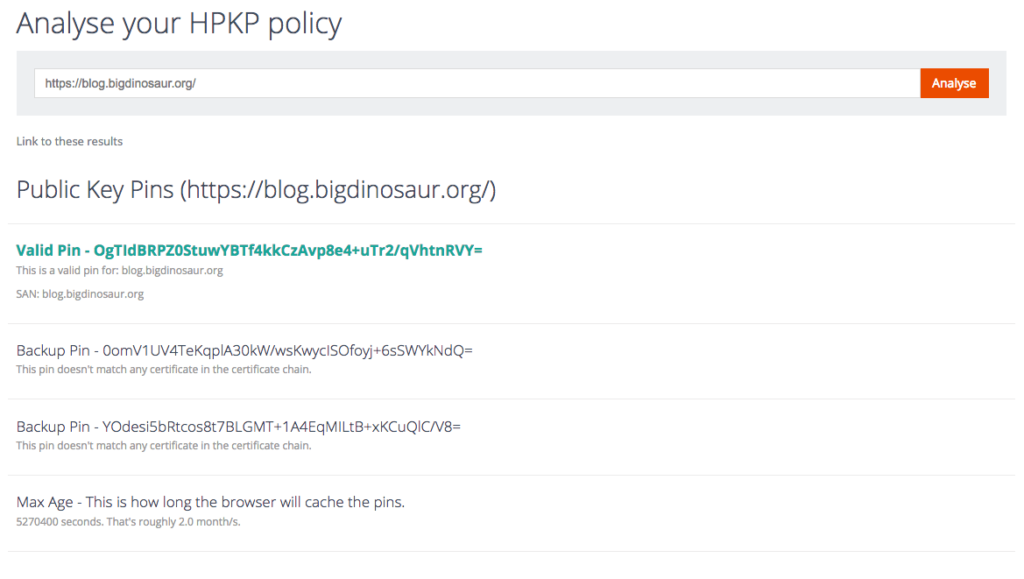
Now would be an excellent time to use some tools and verify that your HPKP setup is valid. I’d recommend hitting up Scott Helme’s excellent HPKP Analyzer, which is part of his comprehensive Report-URI.io toolkit. If your HPKP config is correct, you’ll get a result that verifies your primary pin is functioning and that your backup pins are also in place:
Automate and finish
If your site is still functional and your web server isn’t in flames, it’s time to adjust your HPKP max-age out a bit. Set it for 3600 seconds (that’s one hour) and try re-generating one of your certificates (don’t do more than one, though, to avoid abuse of LetsEncrypt’s system). If the new certificate still matches the same fingerprint, then everything’s working and you can start increasing your max-age out to a production value. Something like two months (5270400 seconds) is a good permanent setting.
Speaking of: the last step in this grand adventure is to automate our certificate renewals. And, since we already have our scripts to execute, we just need to tell our friendly local cron daemon to kick them off once a month. So, add the following to your system crontab at /etc/crontab, replacing any existing scripted LE renewal entries:
42 1    7 * *	root	/usr/local/bin/le-renew-hpkp.sh blog.example.com
42 2    7 * *	root	/usr/local/bin/le-renew-hpkp.sh forum.example.com
42 3    7 * *	root	/usr/local/bin/le-renew-hpkp-www.sh www.example.com
In case of emergency…
The last thing to talk about is what to do if you need to change your keys. If your server suffers data loss and you lose your main key, or your main key is compromised, or any number of other things happen—that’s when you need to employ your backup keys.
The way to do this is to dig up your first backup key and CSR and copy them to your web server, replacing the existing key and CSR. Then, trigger your LE script using the new CSR, and LE will generate a new certificate for your server with the first backup key’s fingerprint. Your original key is dead, your first backup is now your primary key, and your second backup is now your only remaining backup.
You’ll therefore need to immediately generate a new backup key and CSR (locally, not on the server—or at least get them off the server immediately after generating them). Generate its fingerprint, then modify your host’s HPKP headers to remove the old primary pin from the list and add the new backup pin you just made in its place.
As visitors to your site come and go, the previous max-age will expire and they’ll read your site’s new HPKP configuration, and the new HPKP headers will stick. If a second problem arises while you’re waiting out your max-age period, you’ll need to promote your final backup and regenerate a new backup in its place. This is why we created two backups! (If a third issue arises and you lose three keys, you should probably reassess whatever the hell it is you’re doing, because with that many issues something ain’t right with your approach to infosec or operations.)
And that, dear reader, is it. This entry went long, but it’s a complicated subject. I absolutely welcome any suggestions for improvements!