I don’t know what normal people do on days off from work, but I do things that are too esoteric even to write about for Ars Technica because…because I think there’s something wrong with me. So, last Friday I spent a few hours setting up a vanity URL shortening service and custom image uploading service for Twitter, so I can, I don’t know, be cooler than everyone else. It was surprisingly fun!
First, though, the annoying caveat: Twitter already shortens every link with its t.co service, and you can’t opt out. The reasons they give are mostly marginal and downplay the fact that aggregate clicking behavior has a substantial dollar value attached to it, but there you go. Still, it’s totally cool to have your own link shortening—you just get to have your links double-shorted when they’re posted inside of tweets.
Link shortening works best with a cool short domain, and I desperately wanted bigdi.no as mine. Unfortunately, to register a domain in the .no TLD requires an actual business presence in Norway, so that was out. I settled on registering bigsaur.us instead, which is only two letters longer.
You then need a program to actually shorten the links, and a web server on which to host it. I have the web server already, but not the program; some quick searching led me to Lessn More, a nice little PHP-based URL application that I cloned into a directoy on my web server.
As explained on the site, Lessn More is designed to work with Apache, but user Michael McKelvaney has a blog entry about adapting it for Nginx. Using that as a starting point, I wound up with the following Nginx virtual host configuraiton:
server {
    server_name www.bigsaur.us;
    listen 8881;
    root /path-to-lessnmore;
    index index.html index.php;
    return 301 http://bigsaur.us$request_uri;
}

server {
    server_name bigsaur.us;
    listen 8881;
    root /path-to-lessnmore;
    autoindex off;
    index index.html index.php;

    location ~ /\. { access_log off; log_not_found off; deny all; }
    location ~ ~$ { access_log off; log_not_found off; deny all; }
    location = /robots.txt { access_log off; log_not_found off; }

    location ^~ /img/ {
        try_files $uri =404;
    }

    location / {
        try_files $uri $uri/ $uri.php @rules;
    }

    location @rules {
        rewrite ^/(.*)$ /index.php?token=$1;
    }

    location ~ \.php {
        try_files $uri =404;
        include fastcgi_params;
        fastcgi_pass php5-fpm-sock;
        fastcgi_param SCRIPT_FILENAME $document_root$fastcgi_script_name;
        fastcgi_intercept_errors on;
    }
}
Notes on the code
Before you just copy and paste the above, though, there are several things to be aware of. Let’s walk through it.
1) Redirect from www to non-www
The biggest point behind having a short URL is to have a short URL, and so we want to ensure that no one is using the www version of our URL. So, the very first thign we do is set up a quick 301 redirect that sends all traffic from www.bigsaur.us to just plain bigsaur.us. I’m also explicitly specifying an http redirect rather than using the protocol-agnostic $scheme token because I’m not supporting any HTTPS traffic here.
2) Non-standard TCP port
I’m having Nginx listen on TCP port 8881 because I use Varnish, a web caching solution that functions as a reverse-proxy for Nginx. Varnish is listening on port 80, and so Nginx can’t. If you don’t have Varnish or another reverse proxy in place, use port 80.
3) There’s an “img” location
That’s for the image uploading part that we haven’t gotten to yet. Patience.
4) The PHP upstream is a variable and not a named location or defined upstream server
That’s because I’ve got it defined elsewhere in an included config file. If you want to know more about how Nginx and PHP-FPM are configured on this web server, I’ve written about it here, as part of my extensive web server how-to series on Ars.
Finishing the installation
Lessn More requires a database to work, so if you’ve already got MySQL or PostgreSQL, create a database for it and a database user. You can also resort to using SQLite if you’d prefer.
Navigate to the - subdirectory underneath your Lessn More web root, and copy config-example.php to config.php, then open it for editing. You’ll need to define an admin user and fill in the databse information; I also switched the URL slug generation method to mixed-smart, based on the documentation’s recommendation.
Once you’re ready to go, restart Nginx (after having linked the virtual host file from sites-available to sites-enabled or whatever your preferred method) and visit http://yourdomain.whatever/install.php to kick off the short Lessn More setup process. Once this is done, Lessn More is ready to go and you can delete the install.php file.
Logging in
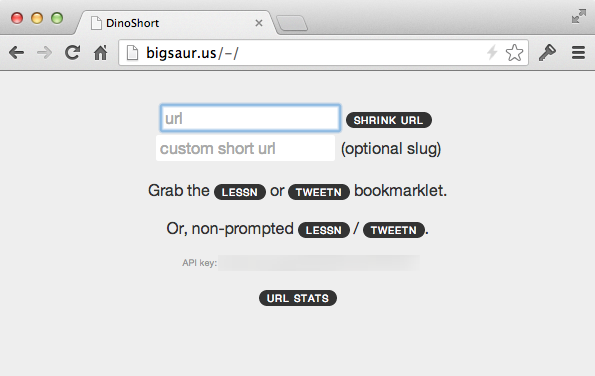
Navigate to http://yourdomain.whatever/-/ and supply the credentials you put into config.php. If Lessn More is working, it’ll look like this:

You can enter a URL into the box and click “Shrink URL” to test it out. If you want to specify the short part of the URL, too (the slug), you can put that in the second box.
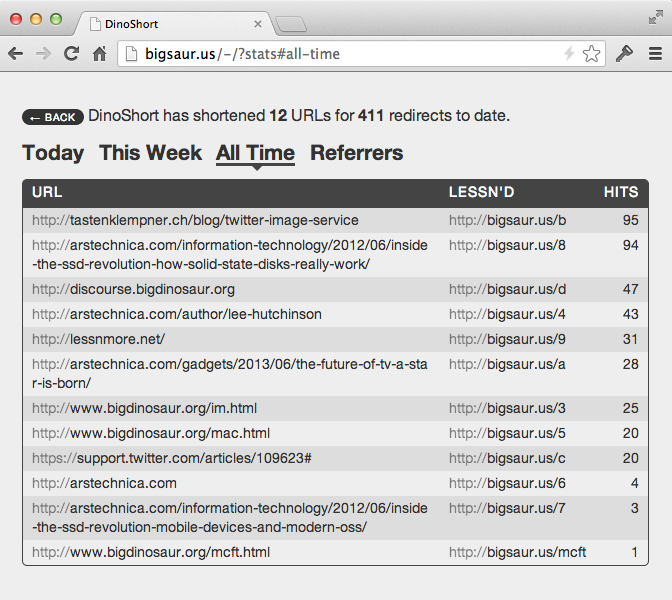
Lessn More also shows statistics on where each shortened link goes and how many times it’s been clicked:

Custom image uploading
Image uploading is even easier, though any time you’re opening up an upload window onto your web server you need to be cautious about security.
There’s a great blog entry here on custom image hosting on Twitter; from it, I pulled the following PHP file:
<?php

$saveDir = "/img/"; // place where the images should be saved.
$domain = "http://yourdomain.whatever"; // your domain.

//server-side directory
$directory_self = str_replace(basename($_SERVER['PHP_SELF']), '', $_SERVER['PHP_SELF']);
$uploadsDirectory = $_SERVER['DOCUMENT_ROOT'] . $directory_self . $saveDir;

// Image filetype check source:
// http://designshack.net/articles/php-articles/smart-file-type-detection-using-php/
$tempFile = $_FILES['media']['tmp_name'];
$imginfo_array = getimagesize($tempFile);

if ($imginfo_array !== false) {
    $mime_type = $imginfo_array['mime'];
    $mime_array = array("video/quicktime", "image/png", "image/jpeg", "image/gif", "image/bmp");
    if (in_array($mime_type , $mime_array)) {
        //generate random filename
          while(file_exists($uploadFilename = $uploadsDirectory.time().'-'.$_FILES['media']['name'])){$now++;}
    //upload the file to the webserver
    @move_uploaded_file($_FILES['media']['tmp_name'], $uploadFilename);
    //generate the filename that will be given to Tweetbot
    $outputFilename = $domain . $saveDir . basename($uploadFilename);
    //respond with JSON encoded media URL
    $response = array(url=>$outputFilename);
        echo json_encode($response);
    }
}
else {
    echo "This is not a valid image file";
    }
?>
The only changes I made to the file were substituting in my own server name as the $domain variable and the /img/ path as the $saveDir variable.
Place the PHP file in the same web root as Lessn More; you might also want to give it a random name so random folks can’t upload random stuff to your web server. Then, actually create the /img/ directory underneath your web root and change its ownership so that the Nginx user can write files into it.
Now go back to the Nginx virtual host file we created a few steps back. The script does some validation to make sure that it only handles image files, but we’ve got another layer there to ensure that nothing in there goes through the PHP interpreter:
location ^~ /img/ {
        try_files $uri =404;
}
The specific location directive used here is placed above the PHP handler in the virtual host file, and the ^~ /img/ regex means that when an evaluated experession matches, Nginx takes action and doesn’t try to match anything in the rest of the config file. The effective result here is that when asked to serve any URI on this virtual host containing /img/, Nginx will attempt to find an exactly named resource and send it to the requester, and if one doesn’t exist it’ll throw a 404 error. Regardless of the outcome, it will not pass the request upstream to PHP-FPM—either it’ll serve the file directly, or respond with a 404.
Varnish tweaks
If you do happen to be running Varnish, there’s one last configuration file to tweak. I’m not sure exactly how Varnish would treat Lessn More’s shortening HTTP requests, but we can definitely lean on it to cache our uploaded images. Here’s the statement I added into Varnish’s VCL file, under sub vcl_recv:
# Ignore URL shortening but cache images
if (req.http.host ~"yourdomain.whatever") {
    if (!(req.url ~ "^/img/")) {
        return (pass);
    }
}
Reload Varnish to make your changes take effect.
Configuring Tweetbot for these things
I use Tweetbot as my Twitter client on both the desktop and iOS, which lets me use custom URL shortening automatically. To make Tweetbot work with your Lessn More and image hosting setup, you’ll need to switch your link shortening setting to “Custom” and add the following to the “API Endpoint” dialog box:
http://yourdomain.whatever/-/?api=YOUR_API_KEY&url=%@Your API key can be found when you log into Lessn More—it’s right there on the front page. Replace YOUR_API_KEY in the line above with your actual API key, then stuff that string into Tweetbot or whatever Twitter client you’re using.
For image hosting, change the Image Upload box to “Custom” and use the following:
http://yourdomain.whatever/youruploadscript.phpAnd that’s it! Now all your Twitter links, including images, will have their own custom URLs, and everyone will be totes jelly!
